Get hands-on with the Law of Inertia! Make a homemade hovercraft and see how balloons can make you float.
I’m Ken Kuwako, a science trainer. Every day is an experiment.
Experience Science with a Homemade Hovercraft!
Hello everyone! How about enjoying the charm of science today through a unique craft project? The theme is a “Homemade Hovercraft”! When you think of a hovercraft, the common mechanism is an electric motor that creates wind to generate lift, right? But the hovercraft we’re introducing today is much easier! It floats using the power of a balloon and glides smoothly across a desk! The best part about this hovercraft is that it…
•Can be made in a short time!
•Materials are inexpensive!
•Even elementary school students can make it easily!
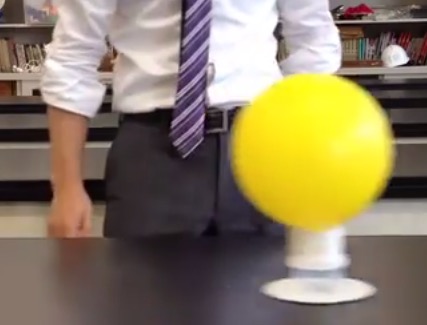
It’s very popular with students and is perfect for science classes or a free study project! First, check out the finished product in this video!
What do you think? The sound and movement of it gliding across the desk are so interesting, right? If you find yourself wondering, ‘Why does it float?’, that’s the moment the door to science opens!
Materials and Instructions
Let’s get right into how to make the hovercraft!
Materials
・CD ・Plastic container (like for side dishes) ・Balloon ・Paper cup ・Cutter ・Awl ・Double-sided tape

Instructions:
① Cut a hole in the paper cup
First, draw a line 4 cm from the bottom of the paper cup,

and cut it at this line.

Next, make a 2 cm diameter hole in the bottom of the paper cup.

② Cut a hole in the plastic container
Next, prepare the plastic container. Make a hole about 1 cm in diameter in the center.

Place the tip of the cutter vertically and press down to make a hole. Once a hole is made, insert scissors and cut it out. This way, you don’t have to worry about getting hurt.

Remove the lid and make a hole in the bottom of the container with an awl.

While holding the container with your hand, press firmly while rotating the awl, and a hole will be made easily.

③ Attach the CD and container
Attach double-sided tape around the hole of the CD.

Then, attach the container you just cut with the holes aligned.

④ Assemble
First, put the balloon through the paper cup,

then through the hole in the lid of the container,

and fit it into the container.

And it’s complete!! This is a manual for making it at home. Please print and use it.
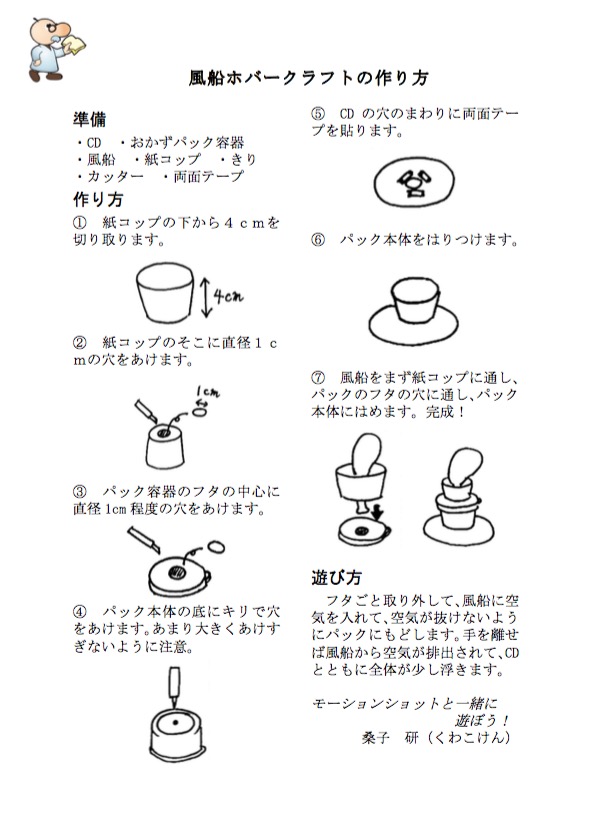
How to Experiment
① Open the lid of the hovercraft and inflate the balloon.
② Put the lid back on so the air doesn’t escape from the balloon.
③ Place it on a desk and give it a gentle push.
Now, let’s see it in action. Please watch this video.
Why does it float?
The mechanism is very simple. As air rushes out of the balloon, it spreads out underneath the CD, reducing the friction with the desk. This makes the hovercraft appear to be ‘floating’! It’s a fantastic project that lets you experience the basics of physics.
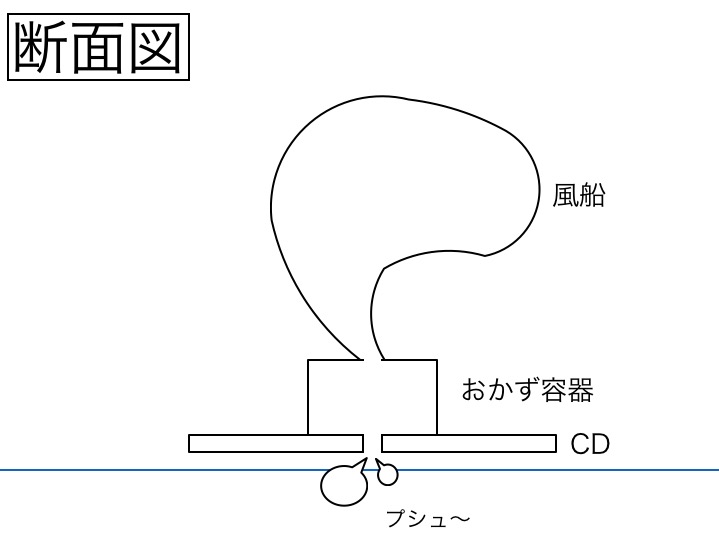
Since N in the friction force formula (F=μN) becomes smaller, F also becomes smaller. As a result, when you give the balloon a gentle push, the friction force, which is a major factor in braking, is small. This experiment demonstrates the law of inertia, where an object in motion stays in motion.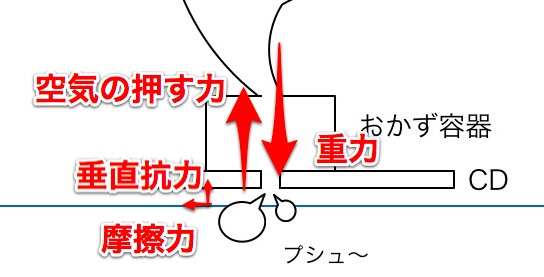
Kids’ Reactions
They start observing with great curiosity, asking ‘Why does it float with a balloon?’ or trying to improve it on their own to make it glide even longer… I just love the moments when kids’ eyes light up! This hovercraft lets you truly experience how fun science is, so please give it a try.
What did you think? This hovercraft is easy to make with everyday materials, so please give it a try. Science isn’t just about knowledge; it’s about touching, feeling, and enjoying it! Let’s continue to explore the world of science together!
Contact and Requests
Make the wonders and fun of science more accessible! We’ve compiled fun science experiments you can do at home and easy-to-understand tips. Feel free to search around!
・About the administrator, Ken Kuwako: here
・For various requests (writing, lectures, science workshops, TV supervision, appearances, etc.): here
・Article updates are delivered on X!
![]() The Science Fun Channel is currently distributing experiment videos!
The Science Fun Channel is currently distributing experiment videos!
NEW 分解問題集 理科
- 7月21日発売!『高校入試 分解問題集 理科』(学研)…難しい問題も小さな問題に分解することで、問題を解くことができます。そんな分解の技術が身につくように深く関わりを持って作りました。
7月のイチオシ実験!
夏でプシュッと爽やか実験!

テレビ番組監修・イベント等のお知らせ
- 7月18日(土)「TIF presents ONE SONG FES. 」(フジテレビ)
- 7月18日(土) 教員向け実験講習会「ナリカカサイエンスアカデミー」
- 7月23日(木)科学監修 19:00〜 THE突破ファイル(日本テレビ)
- 7月30日(水) 監修したテレビ番組放送予定
- 12月26日(土) ナリカサイエンスアカデミー(教員向け実験講習会)開催
書籍のお知らせ
- 『大人のための高校物理復習帳』(講談社)…一般向けに日常の物理について公式を元に紐解きました。特設サイトでは実験を多数紹介しています。※増刷がかかり6刷となりました(2026/02/01)

- 『きめる!共通テスト 物理基礎 改訂版』(学研)… 高校物理の参考書です。イラストを多くしてイメージが持てるように描きました。授業についていけない、物理が苦手、そんな生徒におすすめです。特設サイトはこちら。

各種SNS(更新情報をお届け!)
【日本語】X(Twitter)/instagram/Facebook 【英語】BlueSky/Threads
Explore
- 楽しい実験…お子さんと一緒に夢中になれるイチオシの科学実験を多数紹介しています。また、高校物理の理解を深めるための動画教材も用意しました。
- 理科の教材… 理科教師をバックアップ!授業の質を高め、準備を効率化するための選りすぐりの教材を紹介しています。
- Youtube…科学実験等の動画を配信しています。
- 科学ラジオ …科学トピックをほぼ毎日配信中!AI技術を駆使して作成した「耳で楽しむ科学」をお届けします。
- 講演 …全国各地で実験講習会・サイエンスショー等を行っています。
- About …「科学のネタ帳」のコンセプトや、運営者である桑子研のプロフィール・想いをまとめています。
- お問い合わせ …実験教室のご依頼、執筆・講演の相談、科学監修等はこちらのフォームからお寄せください。