Dynamic Chemistry Experiment: The Thermite Reaction, a Lesson in Oxidation-Reduction and Exothermic Processes (Aluminum Steals Oxygen!
I’m Ken Kuwako, a science trainer. Every day is an experiment.
Have you ever heard the term “thermite reaction“? It’s a very dramatic chemical reaction where a mixture of iron oxide and aluminum powder is ignited, producing intense heat and light as iron is formed. This experiment, which feels like a close-up of fireworks and the mystery of chemistry, is sure to leave a lasting impression on students. It’s a highly insightful chemical reaction that produces “iron,” a metal familiar to us all.
To successfully perform this experiment, certain safety precautions and thorough preparation are essential. However, the excitement of the result will more than make up for the effort of preparation. This time, I will introduce how we performed the thermite reaction in our science club. It’s a heartfelt experiment that we refined and refined.
What is the Thermite Reaction? Unraveling it from a Chemical Perspective
The thermite reaction utilizes aluminum’s strong reducing power. The chemical equation is as follows:
ceFe2O3+2Al −>2Fe +Al2O3
As this equation shows, iron(III) oxide (Fe2O3) and aluminum (Al) react to produce iron (Fe) and aluminum oxide (Al2O3).
Let’s take a closer look. Aluminum is a highly reactive metal with a strong affinity for oxygen. Iron(III) oxide, on the other hand, is a compound of iron and oxygen. In this experiment, the aluminum “steals” the oxygen from the iron(III) oxide, causing the iron to separate as a pure element, while the aluminum itself changes into aluminum oxide.
This is an exothermic reaction that generates a large amount of heat, and a key feature is that the iron produced melts into a molten lump. The temperature is said to reach over 2000°C. This high temperature is utilized in applications like welding railway tracks.
Practiced in the Science Club! Preparation and Experiment
We recently performed the thermite reaction in our science club. Here are the steps from preparation to execution.
What You’ll Need
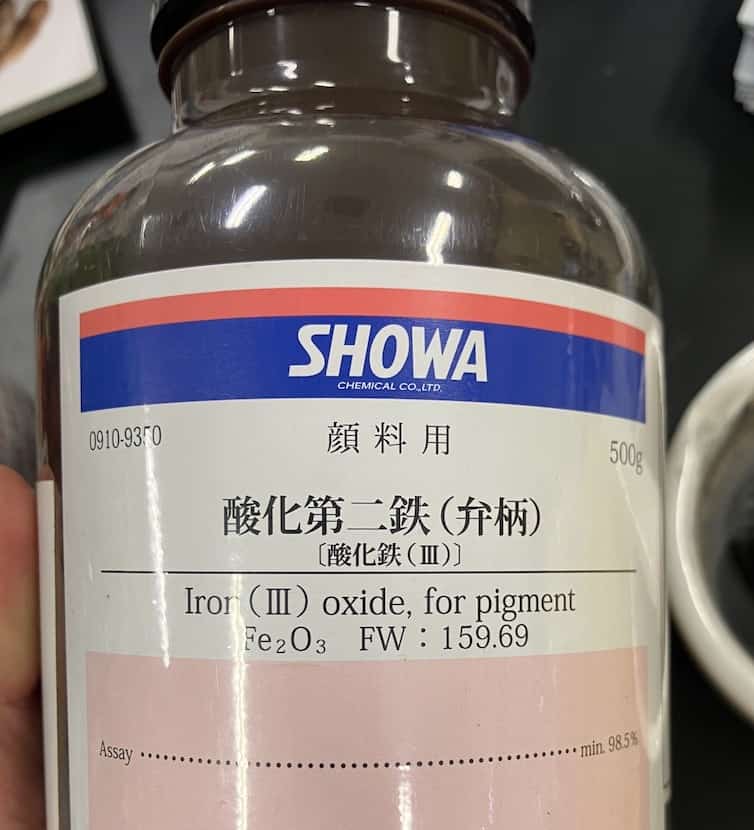
- Ferric Oxide (Iron(III) oxide): Sold as a chemical reagent.
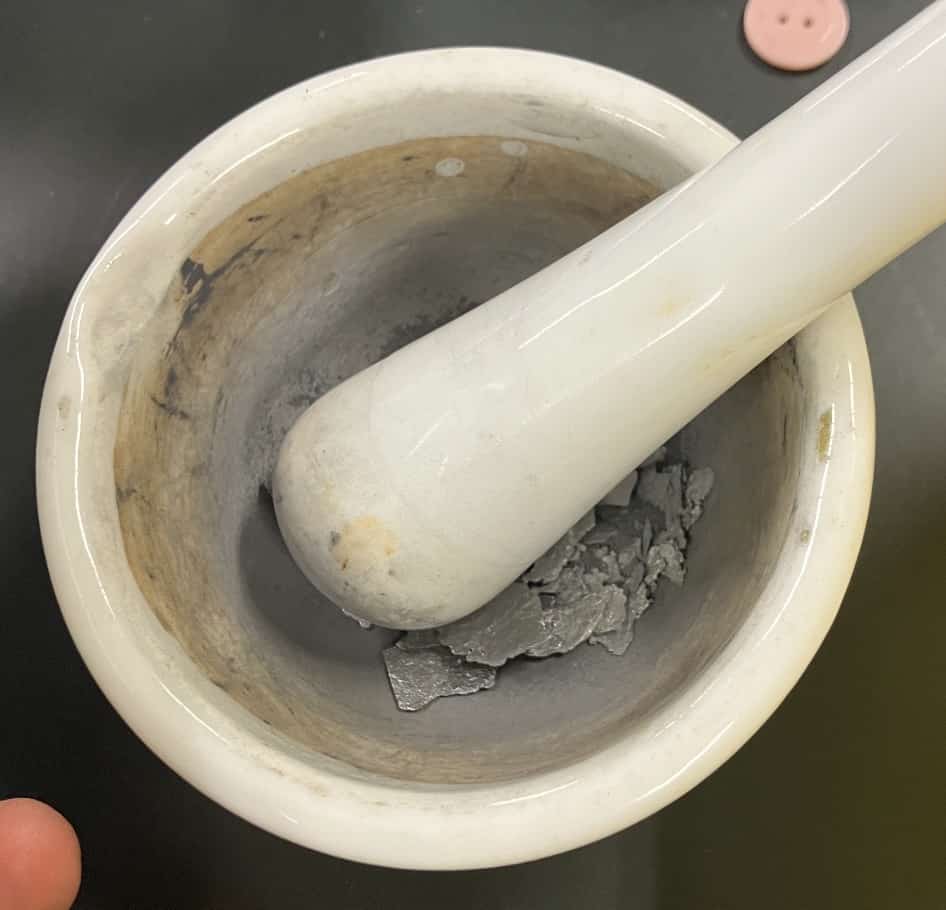
- Aluminum Powder: This time, we made it by hand from aluminum foil.
- Magnesium Ribbon: Used as a fuse for ignition.
- Beaker: To catch the products of the reaction.
- Tripod, Wire Gauze, Clamp, Clay Triangle:
- Newspaper: Lay it on the desk after wetting it with water.
- Lighter: Used to ignite the magnesium ribbon.
- Anvil and Hammer: Used to hit the produced iron and check for its metallic luster.
- Magnet: Used to confirm that the product is iron.
- Protective Gear: Be sure to wear safety goggles and take thorough fire prevention measures.
Procedure
- Preparing the Mixture:
- First, mix ferric oxide powder and aluminum powder well in a mass ratio of about 3:1. After various trials and errors for safety, we decided to use 1.6 grams of ferric oxide and 0.6 grams of aluminum powder this time.
- It’s important to mix the powders carefully using a mortar and pestle to ensure a uniform mixture.
- We made the aluminum powder by crushing aluminum foil in a mortar.
- Wet the first filter paper with water, then stack and set the second one on top
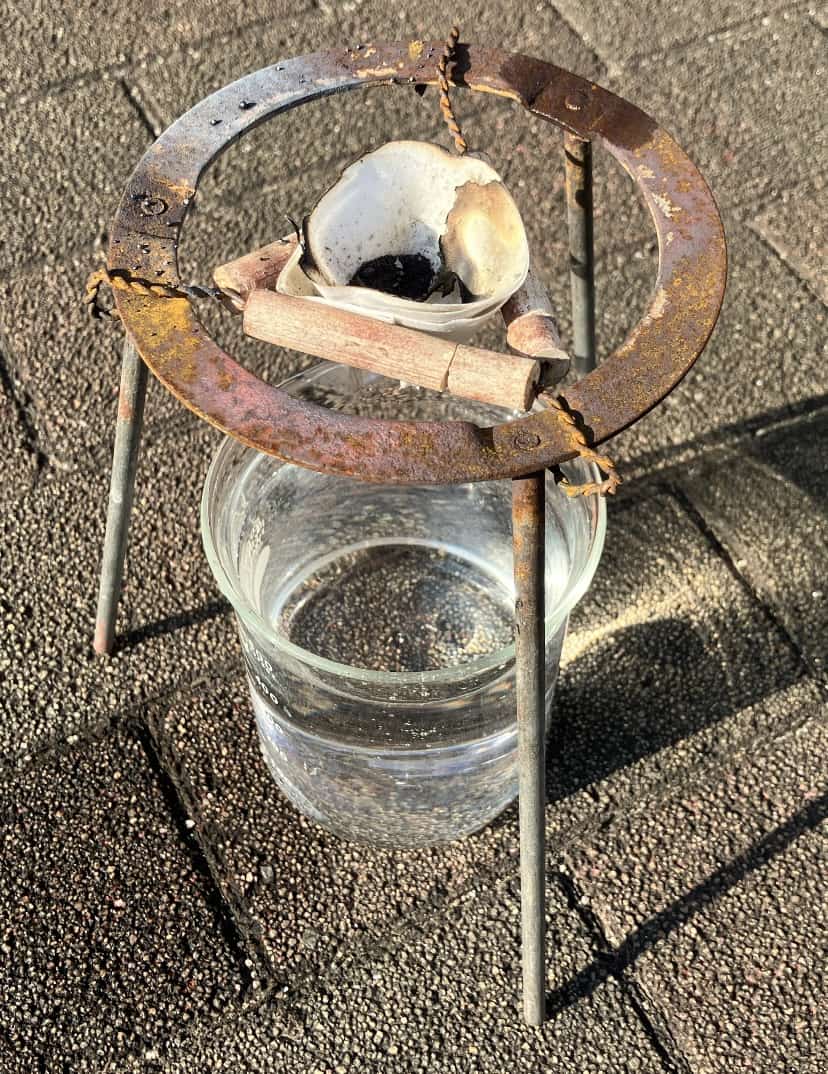
- Set the mixed powder on the filter paper.
- Secure it firmly on a tripod and clay triangle. A beaker with water should be placed underneath to safely catch the product if it falls.
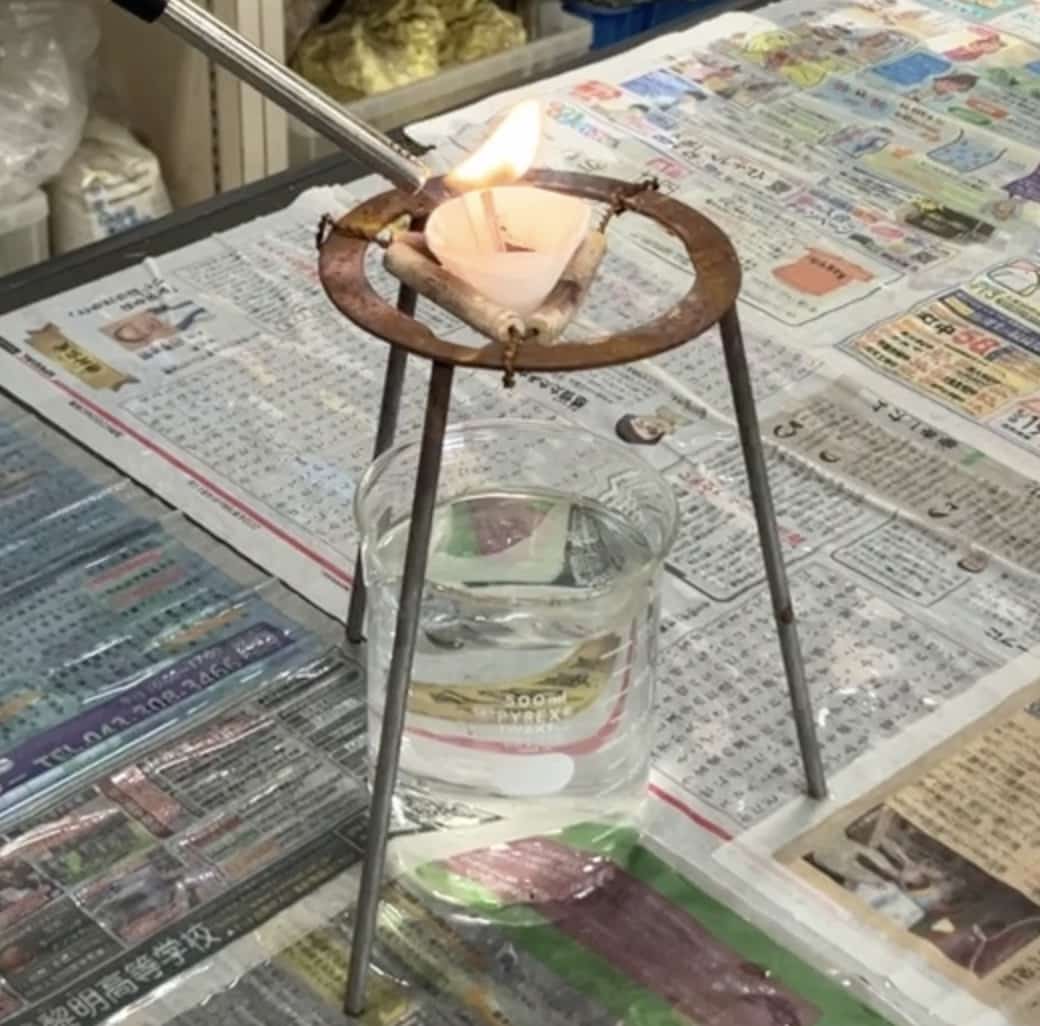
- Setting up the Fuse:
- Insert a magnesium ribbon vertically into the center of the crucible to act as a fuse. A slightly longer ribbon allows for ignition from a safe distance.
- Ignition!:
- Double-check that there are no flammable materials nearby.
- Always wear safety goggles and have students observe from a safe distance.
- Ignite the tip of the magnesium ribbon with a burner flame. The magnesium ribbon burns very brightly, leading the flame to the mixture.
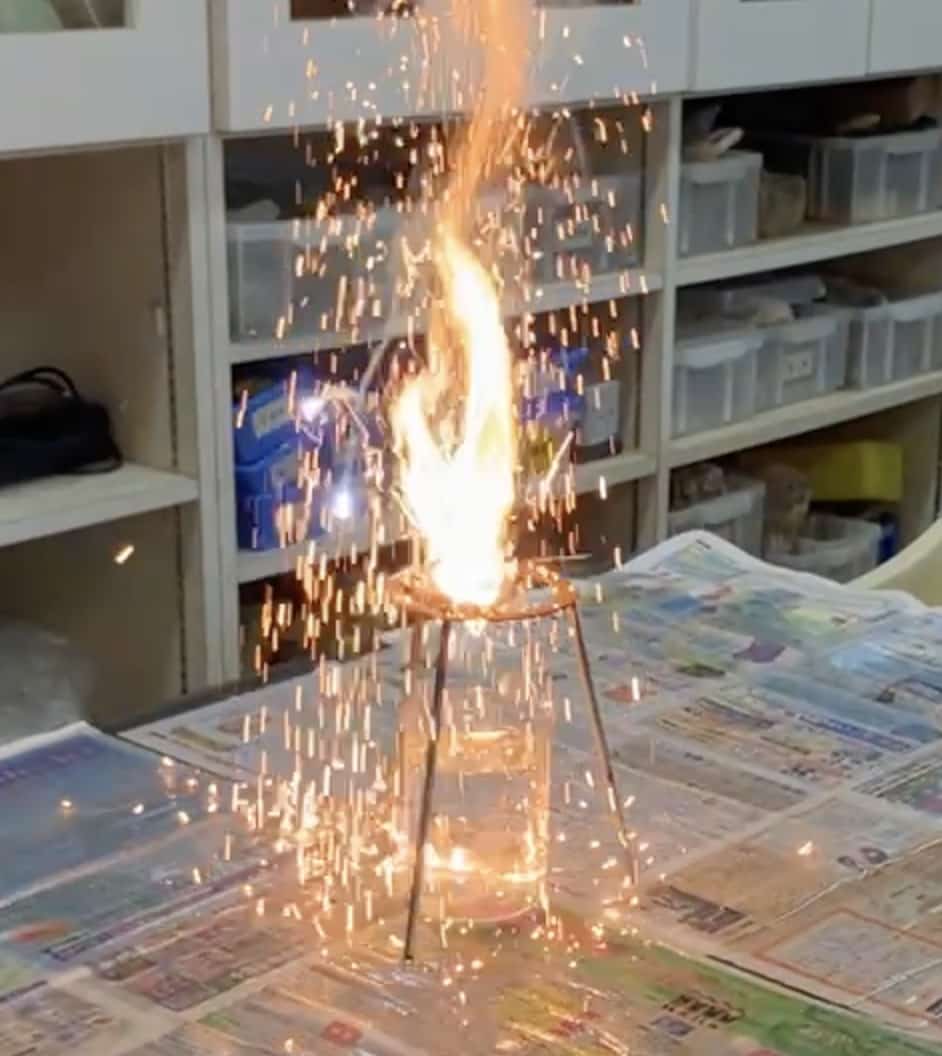
- Observing the Reaction:
- Once the magnesium ribbon has burned out and the fire has transferred to the mixture, there will be a loud “whoosh!” sound, accompanied by a blinding flash of light like fireworks and a shower of sparks. The students will surely let out a cheer of “Ooooh!”
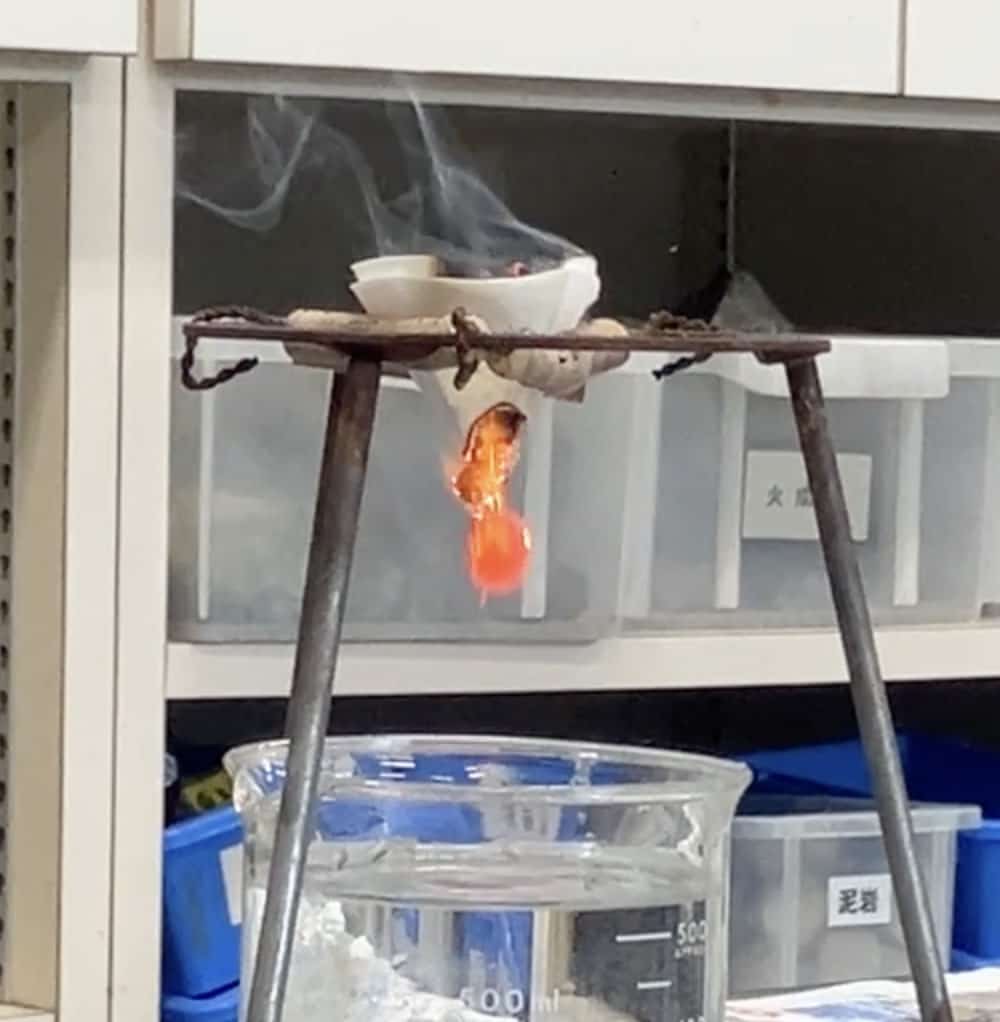
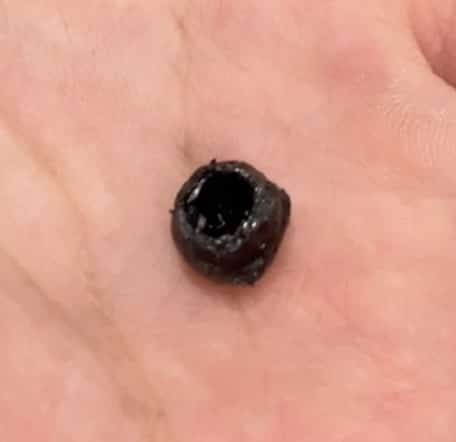
- When the reaction subsides, a black, ball-like lump will drop to the bottom of the crucible. This is the newly produced iron. Its shape is distinctive, round with a hole in it. Perhaps the magnesium ribbon was in that hole?
- Once the magnesium ribbon has burned out and the fire has transferred to the mixture, there will be a loud “whoosh!” sound, accompanied by a blinding flash of light like fireworks and a shower of sparks. The students will surely let out a cheer of “Ooooh!”
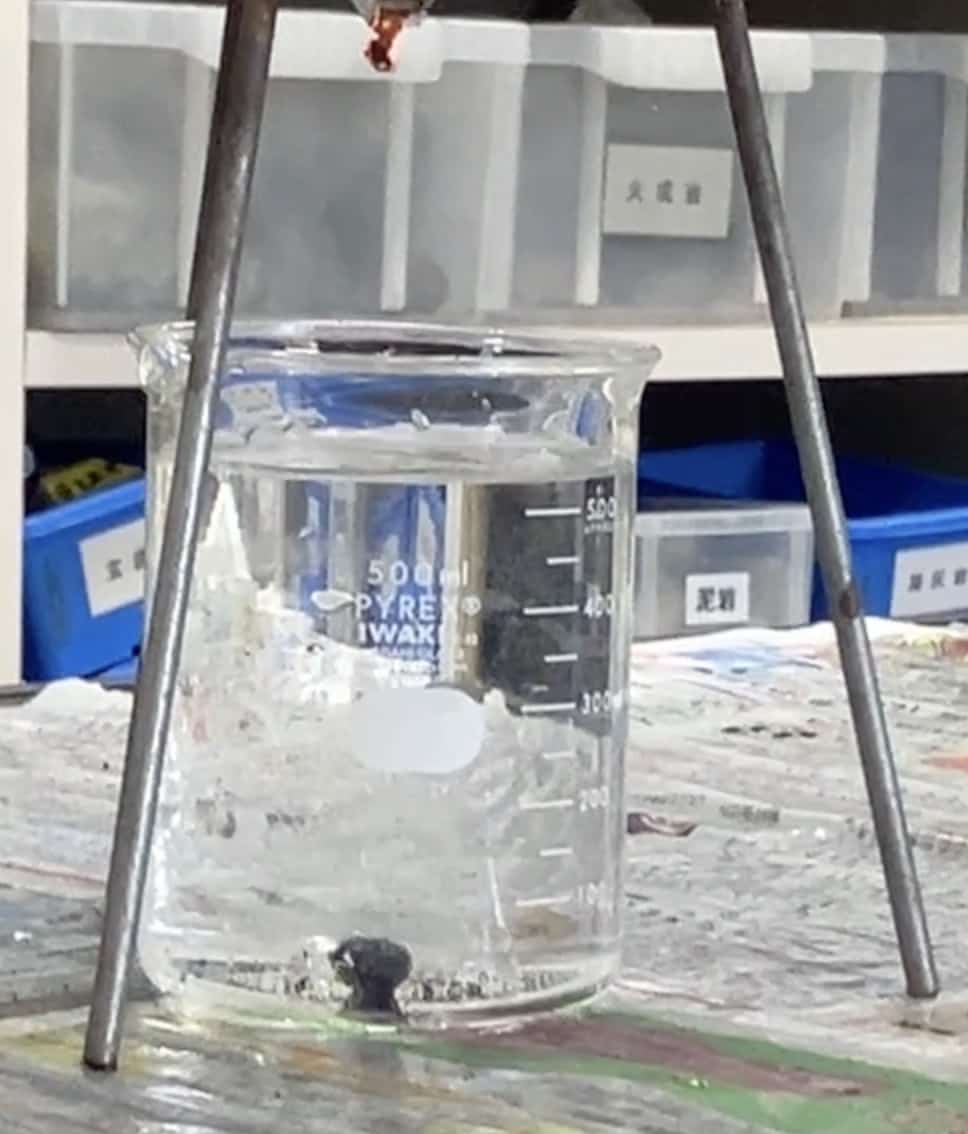
- Confirming the Product:
- After it has cooled down sufficiently (it will be extremely hot, so do not touch it!), take the black lump out of the crucible.
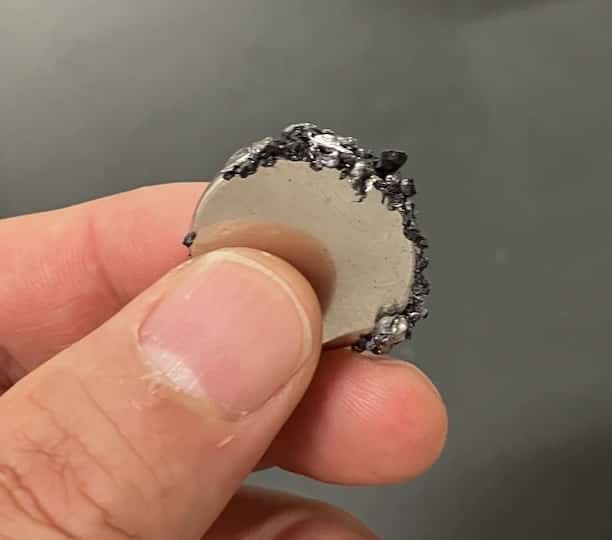
- Place this black lump on an anvil and hit it hard with a hammer. The oxidized outer layer will flake off, revealing a silvery, metallic substance inside.
- Next, bring a magnet close to this silvery part. You will see it click and stick to the magnet, confirming that the product is indeed iron.
What We Learn from This Experiment
The thermite reaction experiment is a treasure trove of deep learning, too valuable to simply end with “Wow!”
- Oxidation and Reduction: You can help students understand that this is a classic oxidation-reduction reaction, where reduction (aluminum ‘stealing’ oxygen from iron oxide) and oxidation (aluminum combining with oxygen) occur simultaneously.
- Exothermic Reaction: Students can physically feel the large amount of energy released, as a prime example of an exothermic reaction.
- Metal Smelting: You can explain that the process is similar in principle to smelting (extracting iron from iron ore) and touch on its connection to industry.
- Material Transformation: By witnessing the dramatic transformation of powders with completely different properties into a magnetic metal, “iron,” students can truly feel the excitement and depth of chemical reactions.
After ensuring thorough safety measures, I highly recommend letting students experience this impressive chemical reaction. It will surely serve as a catalyst for deepening their interest in science.
Contact and Requests
Bringing the wonders and fun of science closer to you! We’ve put together easy-to-understand guides on fun science experiments you can do at home, along with tips. Feel free to search around!
・About the administrator, Ken Kuwako: Click here
・For various requests (writing, lectures, experiment workshops, TV supervision, appearances, etc.): Click here
・Article updates are being distributed on X!
![]() Our “Science Fun Channel” is streaming experiment videos!
Our “Science Fun Channel” is streaming experiment videos!
NEW 分解問題集 理科
- 7月21日発売!『高校入試 分解問題集 理科』(学研)…難しい問題も小さな問題に分解することで、問題を解くことができます。そんな分解の技術が身につくように深く関わりを持って作りました。
7月のイチオシ実験!
夏でプシュッと爽やか実験!

テレビ番組監修・イベント等のお知らせ
- 7月18日(土)「TIF presents ONE SONG FES. 」(フジテレビ)
- 7月18日(土) 教員向け実験講習会「ナリカカサイエンスアカデミー」
- 7月23日(木)科学監修 19:00〜 THE突破ファイル(日本テレビ)
- 7月30日(水) 監修したテレビ番組放送予定
- 12月26日(土) ナリカサイエンスアカデミー(教員向け実験講習会)開催
書籍のお知らせ
- 『大人のための高校物理復習帳』(講談社)…一般向けに日常の物理について公式を元に紐解きました。特設サイトでは実験を多数紹介しています。※増刷がかかり6刷となりました(2026/02/01)

- 『きめる!共通テスト 物理基礎 改訂版』(学研)… 高校物理の参考書です。イラストを多くしてイメージが持てるように描きました。授業についていけない、物理が苦手、そんな生徒におすすめです。特設サイトはこちら。

各種SNS(更新情報をお届け!)
【日本語】X(Twitter)/instagram/Facebook 【英語】BlueSky/Threads
Explore
- 楽しい実験…お子さんと一緒に夢中になれるイチオシの科学実験を多数紹介しています。また、高校物理の理解を深めるための動画教材も用意しました。
- 理科の教材… 理科教師をバックアップ!授業の質を高め、準備を効率化するための選りすぐりの教材を紹介しています。
- Youtube…科学実験等の動画を配信しています。
- 科学ラジオ …科学トピックをほぼ毎日配信中!AI技術を駆使して作成した「耳で楽しむ科学」をお届けします。
- 講演 …全国各地で実験講習会・サイエンスショー等を行っています。
- About …「科学のネタ帳」のコンセプトや、運営者である桑子研のプロフィール・想いをまとめています。
- お問い合わせ …実験教室のご依頼、執筆・講演の相談、科学監修等はこちらのフォームからお寄せください。