Data So Clean It’ll Wow You! Cracking the Link Between Potential Energy and Work with Just a Rail and a Marble
Hi, I’m Ken Kuwako, your Science Trainer!
“Anything held up high is packed with energy.”
When it comes to demonstrating potential energy, a pile driver is hands-down the most intuitive and effective tool. The catch? Pile driver kits are pretty pricey.
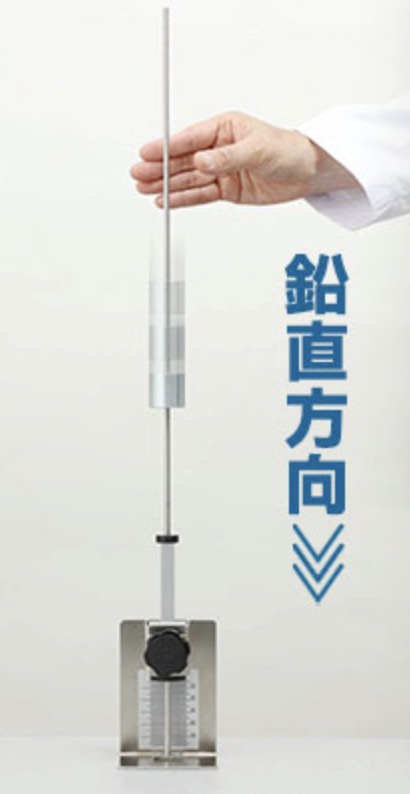
Mechanical Energy Experiment Apparatus DE-Y2D
I bought one myself, and it really does give clean measurements and makes the concept easy to grasp. But let’s be honest: outfitting eight lab groups with them is a tall order. If you want to keep costs down, the answer is a DIY setup using curtain rails or cable covers. Here’s what that looks like.
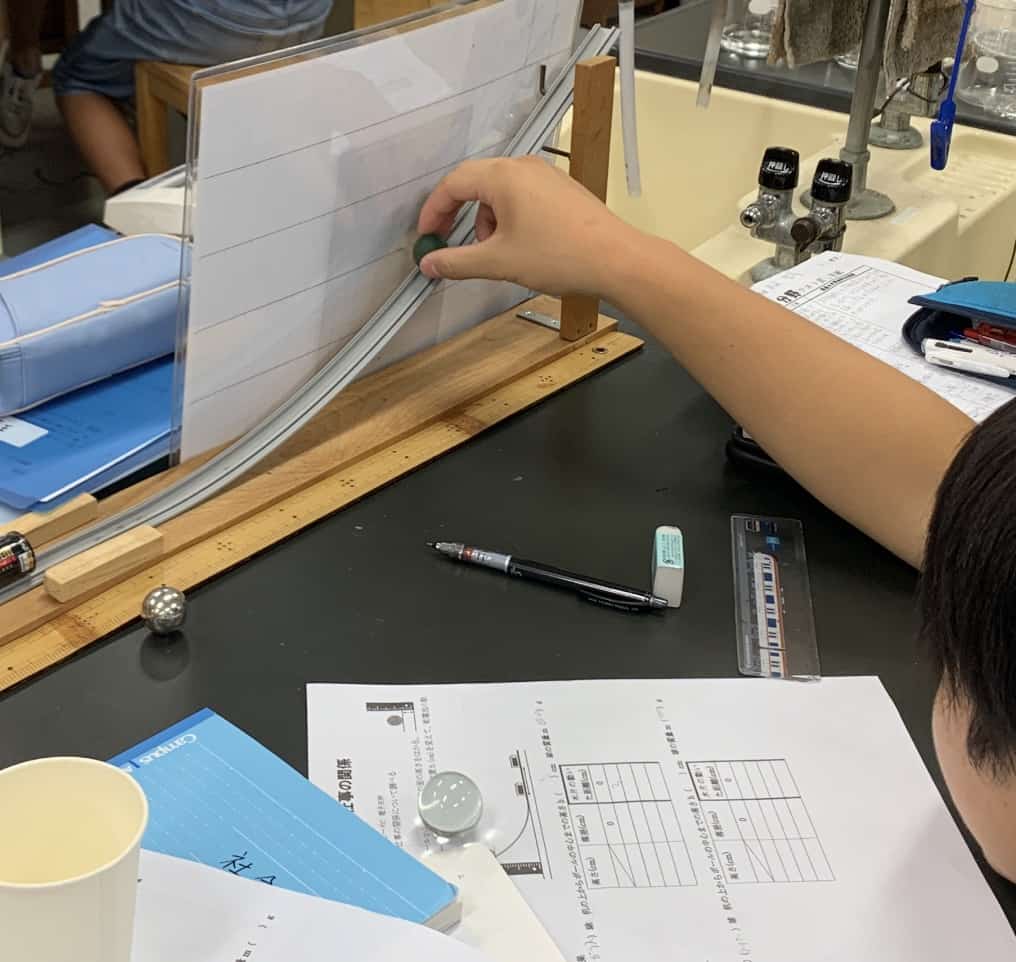
The idea is simple: roll a marble down from a height, let it crash into a battery, and measure how far the battery gets pushed. One tricky thing about this experiment is that students may feel like they’re measuring kinetic energy, even though the goal is to measure potential energy. A pile driver has the same quirk, but I’ll admit this setup makes it look even more like a kinetic energy test. Still, the big win is that you can build it yourself, and most schools can gather the materials without much trouble.
What You’ll Need and How to Set It Up
- A smooth sloped track: You can make one from cable covers or similar materials.
- Three balls of different masses (a glass marble, an aluminum ball, a brass ball, etc.)
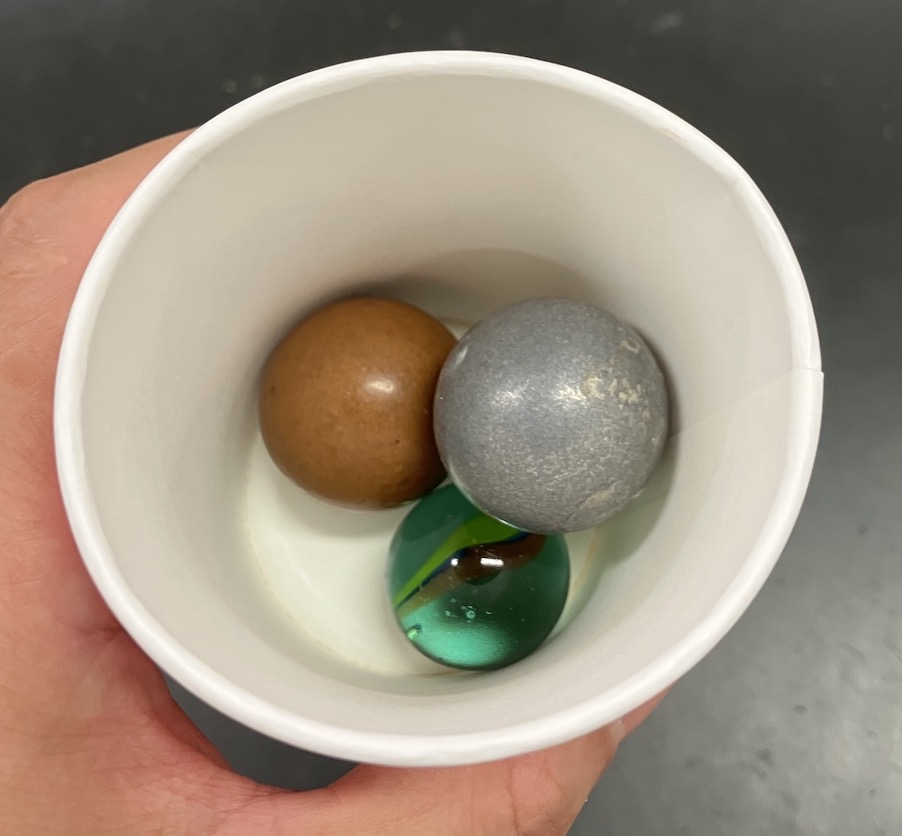
- A D battery (this is the “cargo” the ball will push)
- A ruler, tape, and a recording sheet (the worksheet)
Step-by-Step Instructions and Tips for Success
1. Measure the starting height accurately
Before you roll anything, measure the height of the center of the ball.
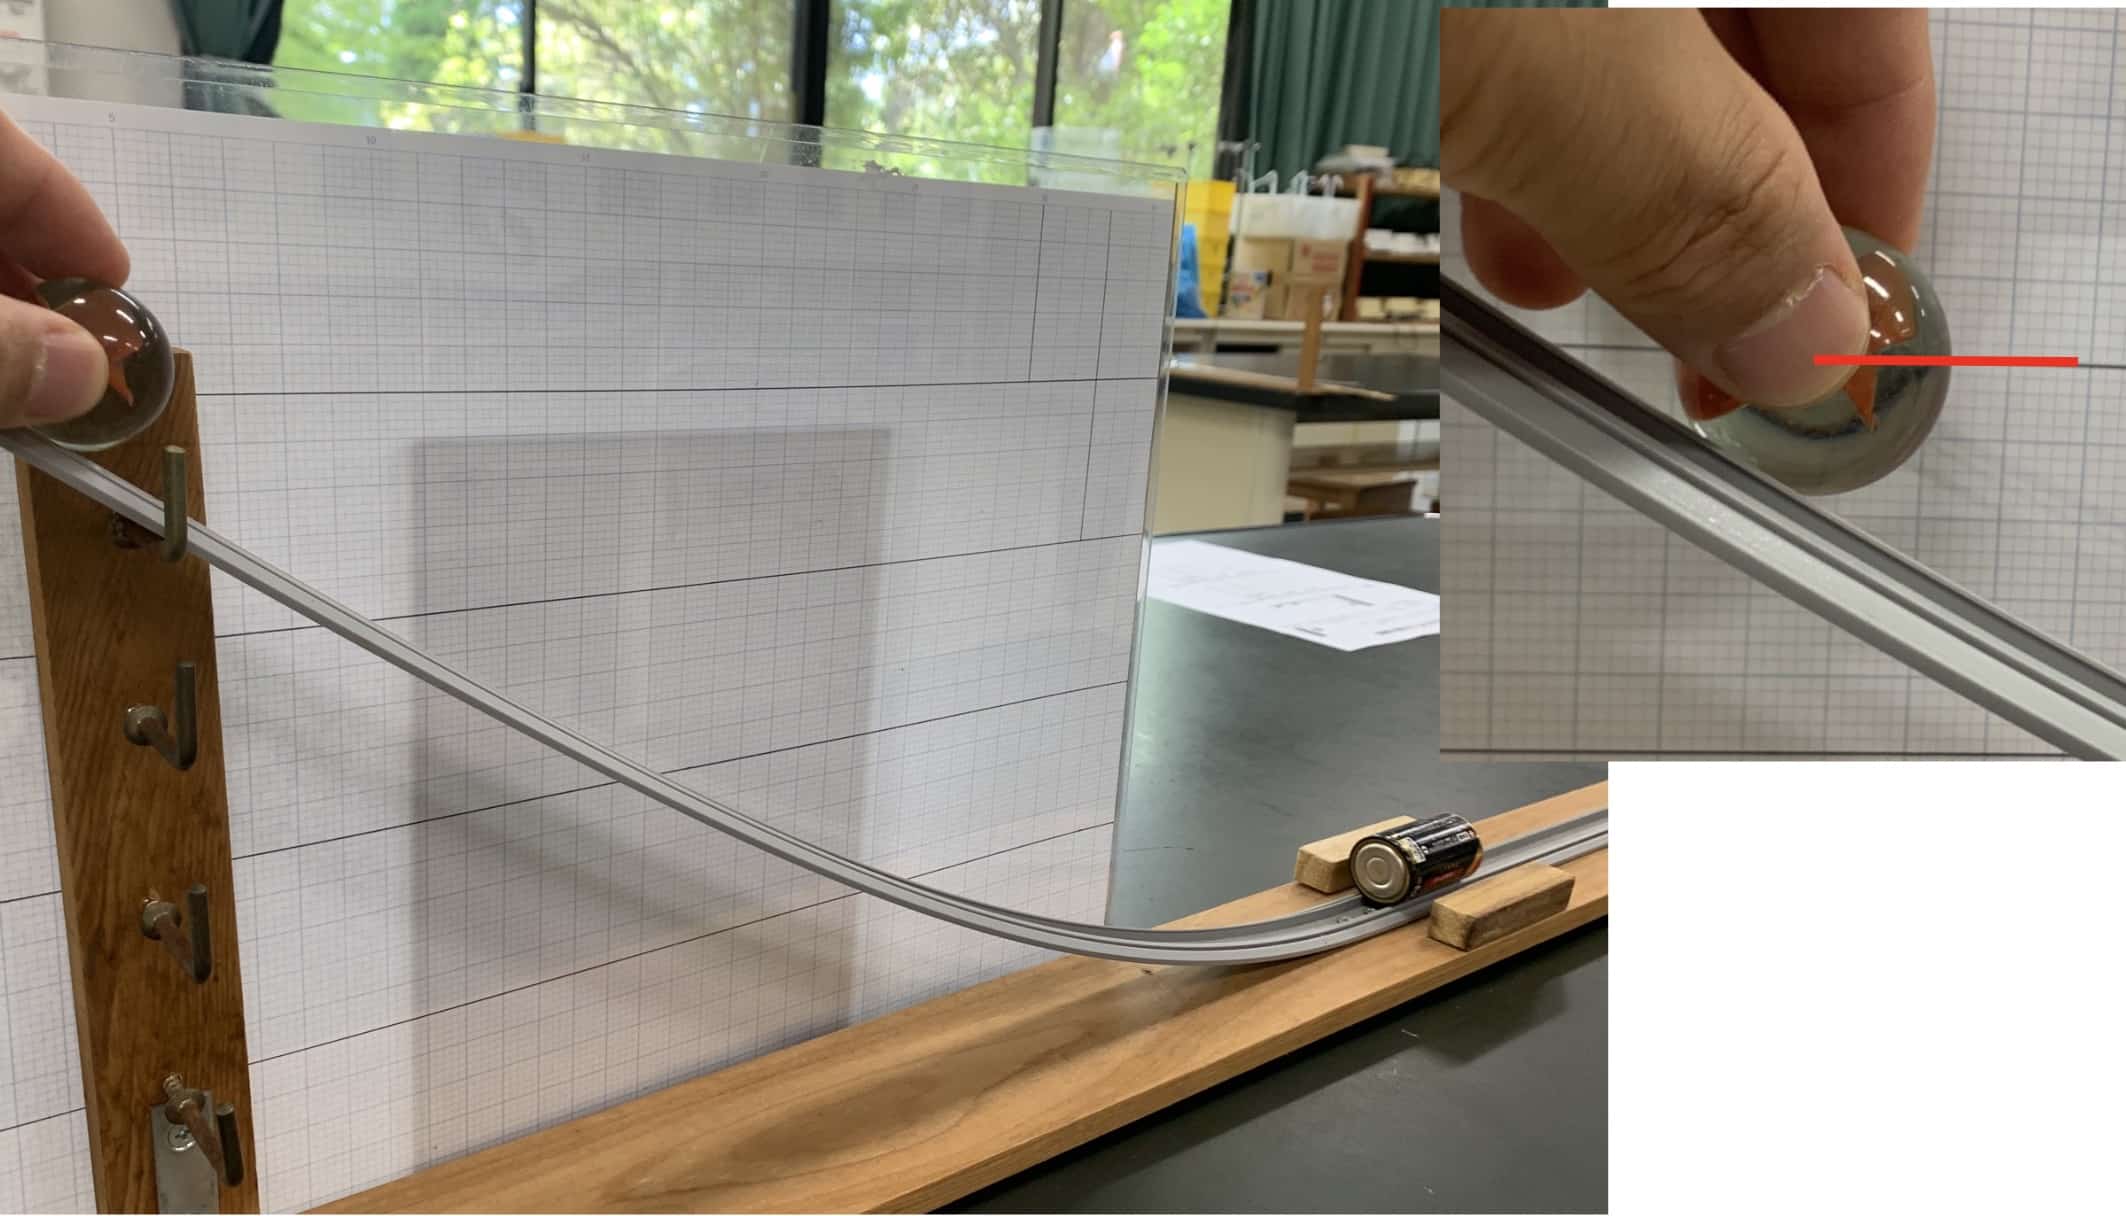
2. Roll the ball from different heights and measure how far the battery moves
Try four starting heights, for example 5 cm, 10 cm, 15 cm, and 20 cm. It’s really important that students get their eyes down to the level of the ball, crouch if they need to, and let go gently. Why? Because potential energy depends on height, and if the starting height is sloppy, the data won’t be reliable.
Place the battery at the bottom of the slope to serve as your “cargo.” How far can the energy of the ball shove it? By measuring that distance, you’re capturing how much work the ball did. This is the magic moment where invisible energy turns into something you can see and measure!
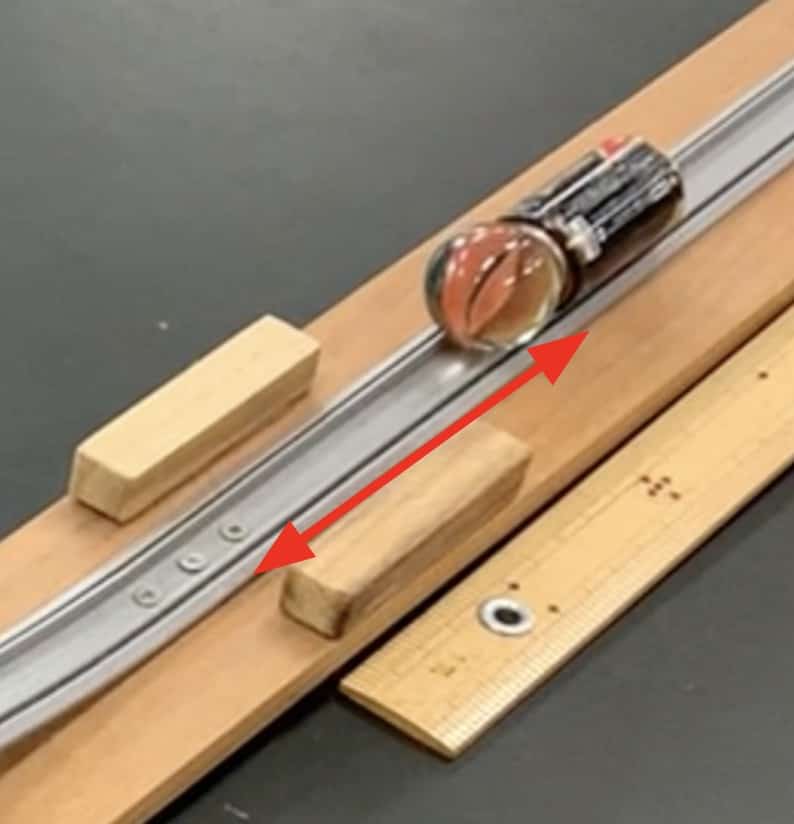
You can see the experiment in action in this video.
One more tip: when you actually calculate potential energy, what matters is not the height itself but the drop in height.
First, measure from the tabletop to the center of the ball. In this case, it was 3.7 cm.
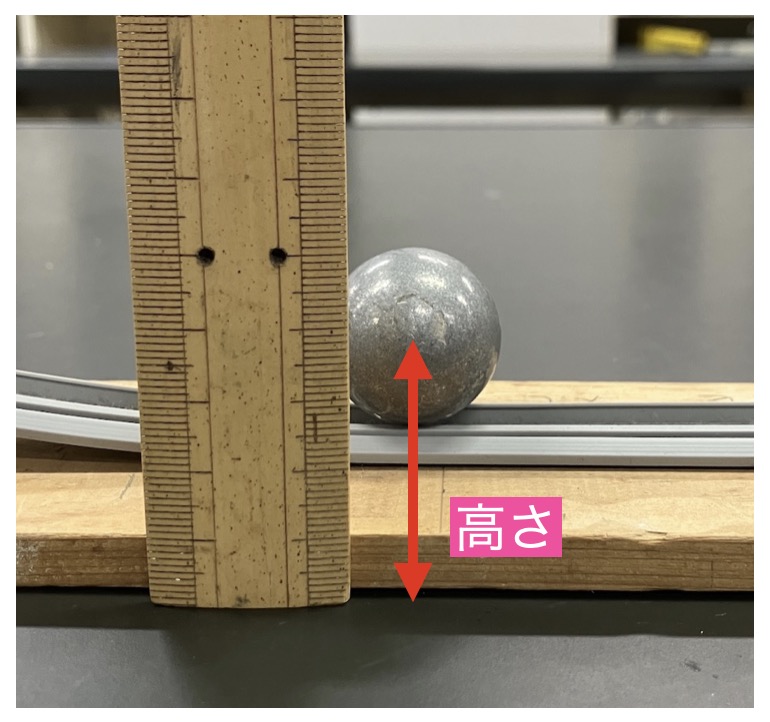
Next, release the ball from a set height, say 20.0 cm.
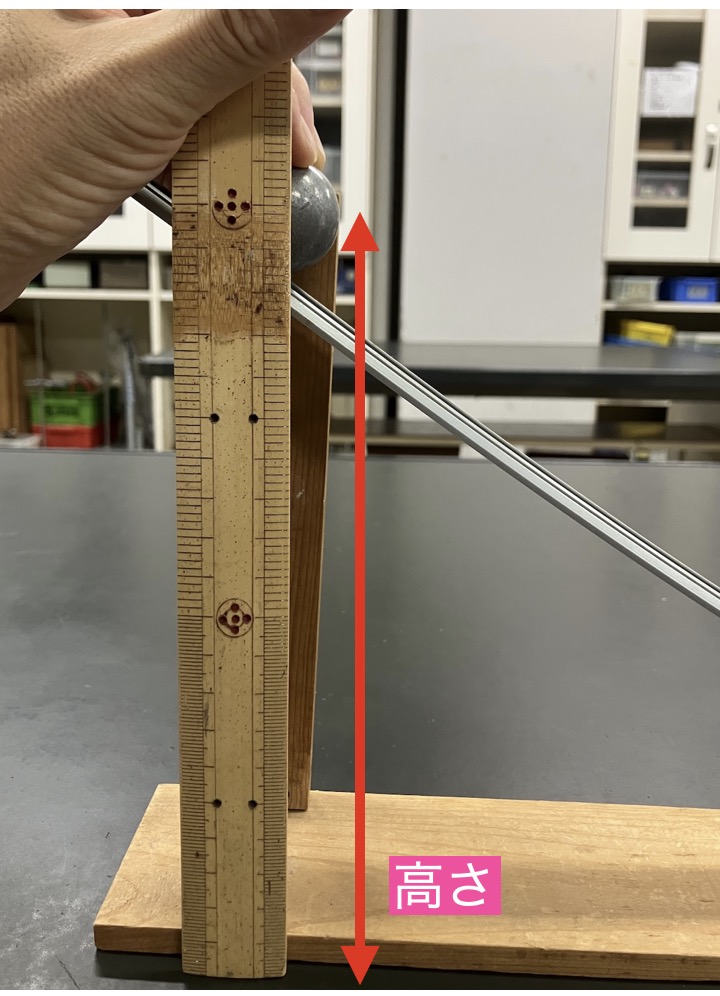
That means the drop in height that actually contributes to the potential energy is:
20.0 – 3.7 = 16.3 cm
Surprisingly Clean Results and Analysis
Here’s an example of results from students who actually ran this experiment.
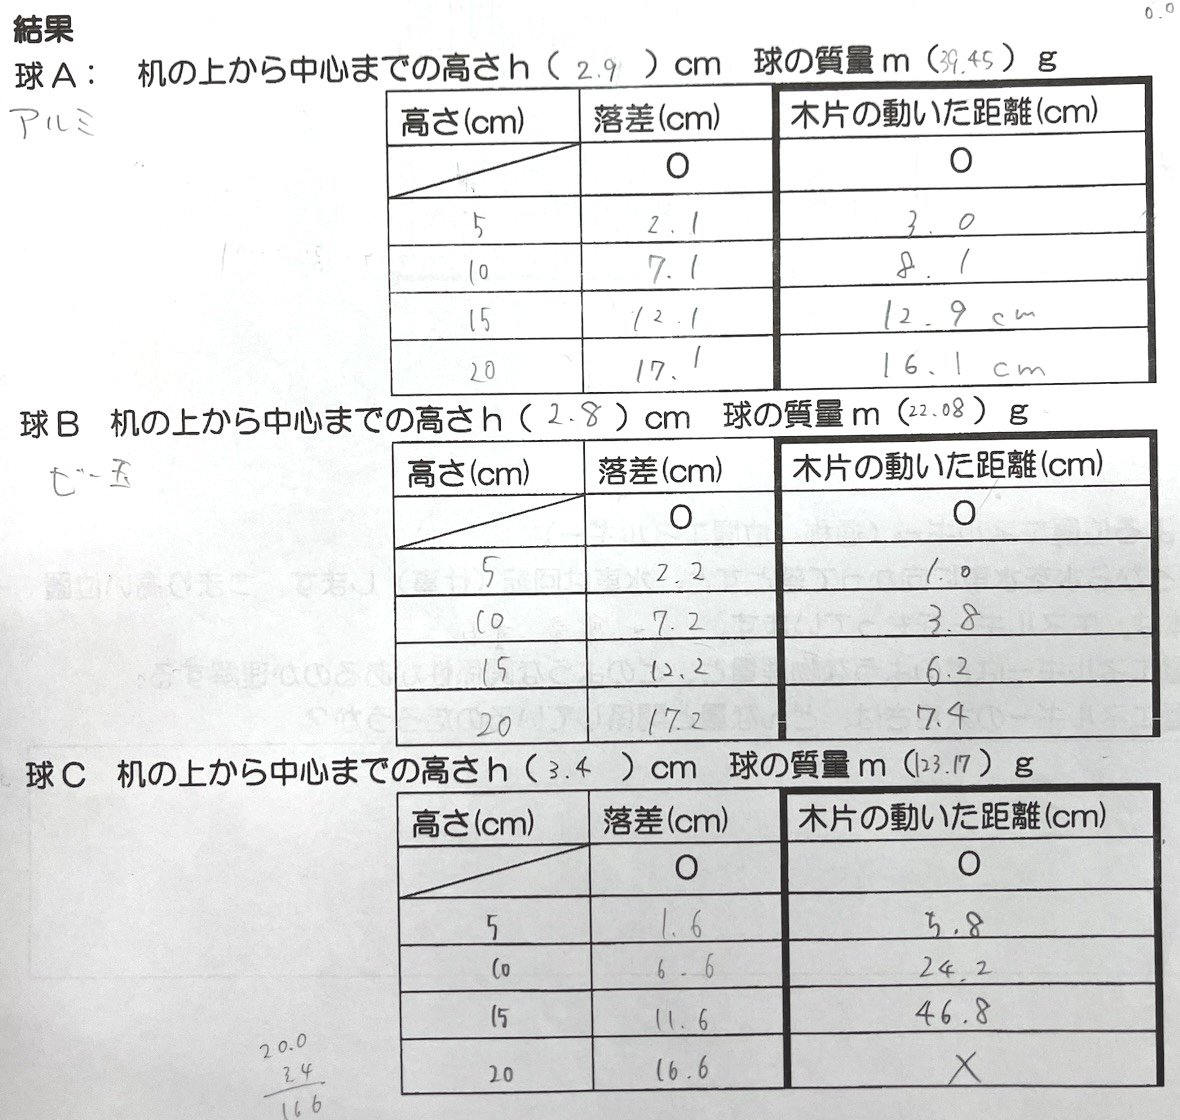
Using these results, I had them draw two kinds of graphs.
Graph 1: Height vs. distance the battery moved (mass held constant)
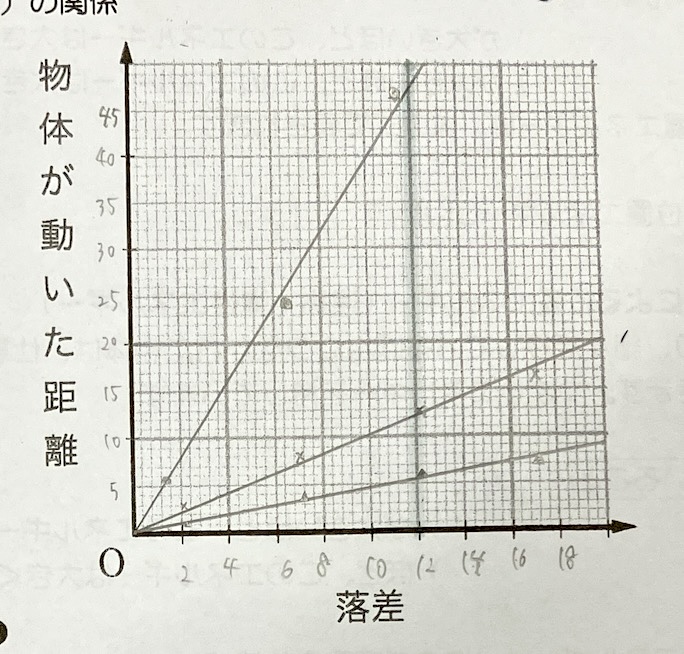
From bottom to top: the glass marble, the aluminum ball, and the brass ball.
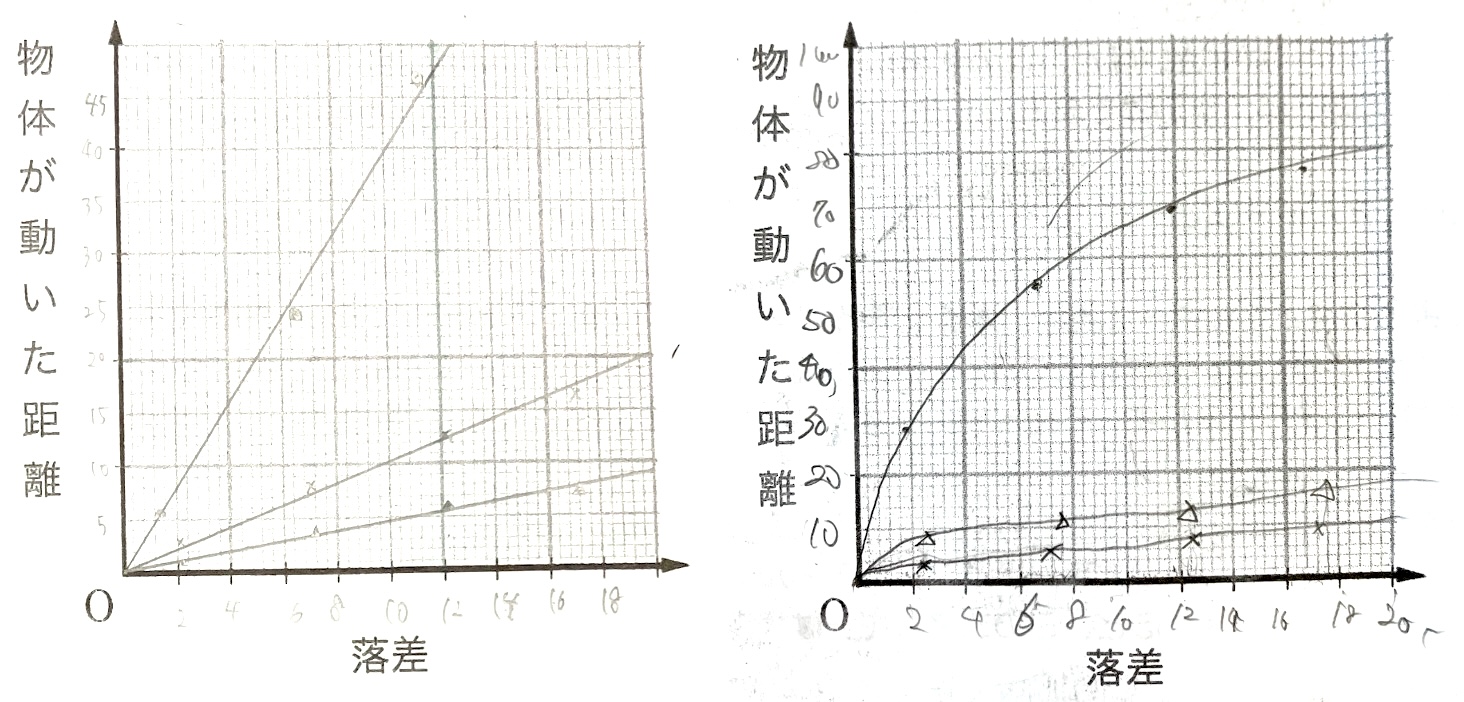
Some students drew a line of best fit, like the one shown on the right, though only 1 of the 16 groups across two classes did.
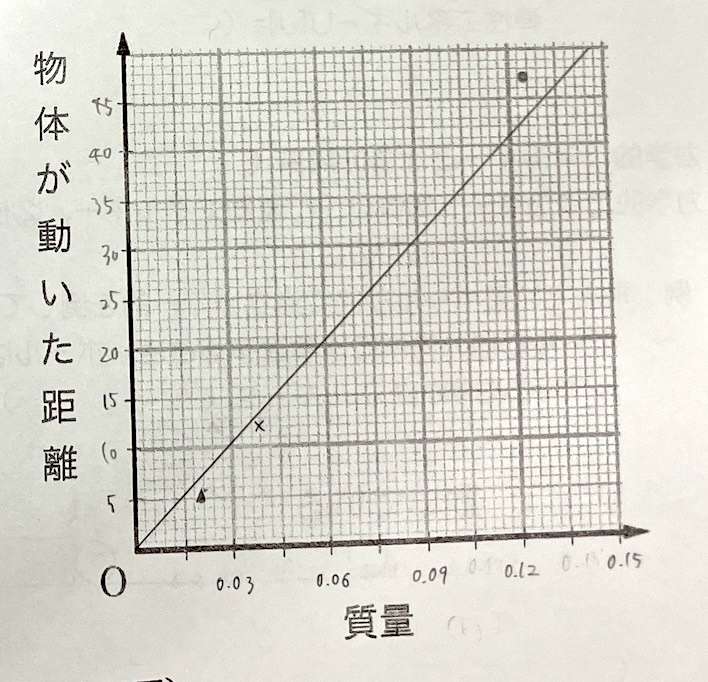
Graph 2: Mass of the ball vs. distance the battery moved (height held constant)
For example, take the data from the graph above at a height of 12 cm and pull out the distances the battery moved,
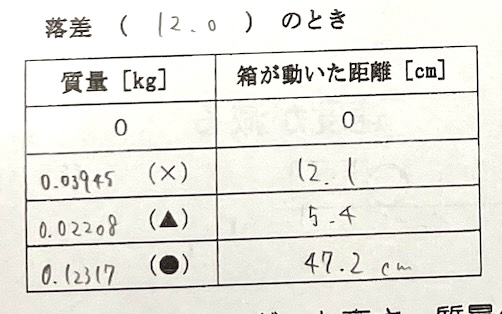
then plot them, and you get a graph like this.
Because there were so few data points, some students concluded that the relationship was quadratic, as in the graph on the right.
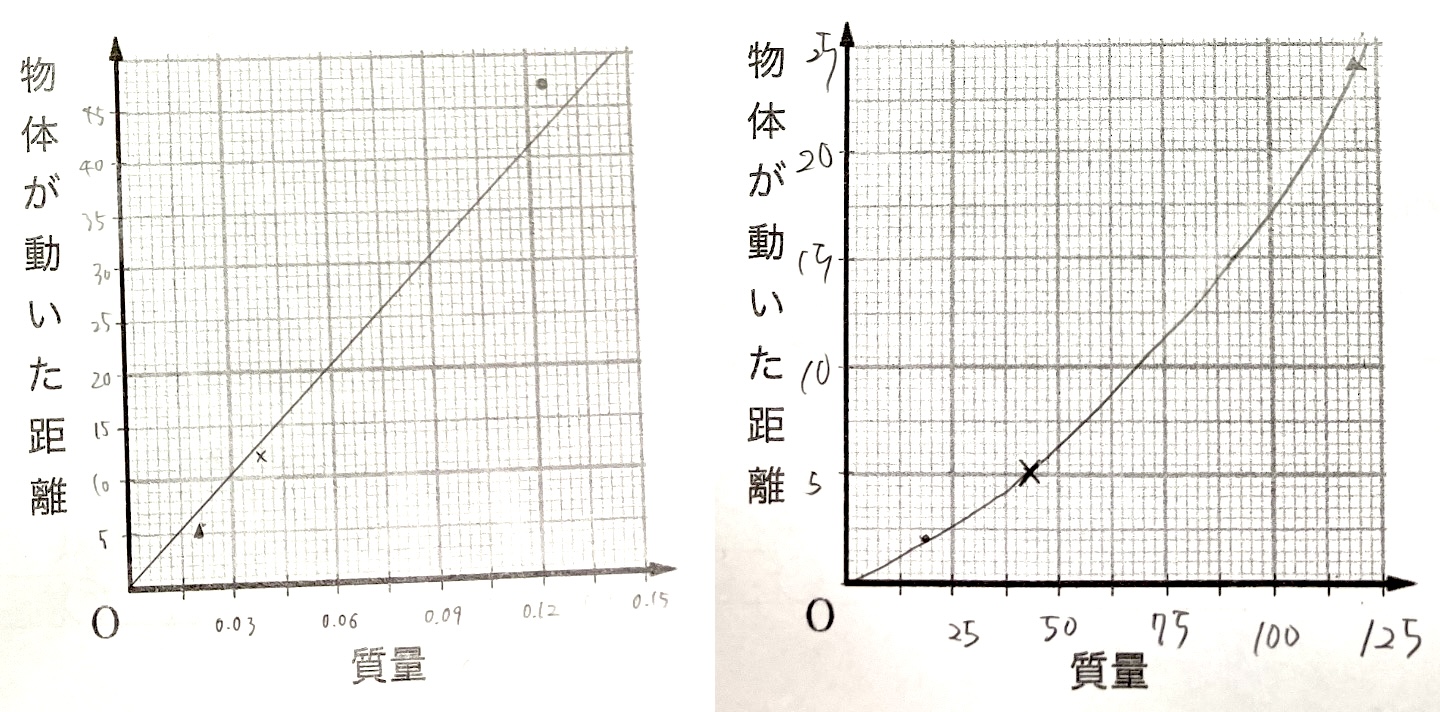
Most students, though, spotted that the distance is proportional to both height and mass. The trick here is to use balls that are big and heavy.
When the line “potential energy is proportional to height and mass” from their textbook showed up in graphs they had made with their own hands, the students seemed truly convinced.
Worksheet
I’ve also prepared a worksheet for students to record their data and write up their analysis. Feel free to use it!
Related Articles You Might Enjoy
Contact and Requests
Let’s bring the wonder and fun of science closer to everyday life! This site is full of fun science experiments you can do at home, along with tips to make them work. Try searching around and see what you find!
・Learn more about the site’s author, Ken Kuwako, here.
・For requests (writing, talks, science workshops, TV supervision or appearances, and more), click here.
・Get article updates on X!
 The Science Neta Channel features experiment videos!
10月のイチオシ実験!
https://youtube.com/shorts/jLVKYRVI1uY?feature=share
テレビ番組監修・イベント等のお知らせ
- 12月26日(土) ナリカサイエンスアカデミー(教員向け実験講習会)開催
書籍のお知らせ
- 『高校入試 分解問題集 理科』(学研)…難しい問題も小さな問題に分解することで、問題を解くことができます。そんな分解の技術が身につくように深く関わりを持って作りました。
 『大人のための高校物理復習帳』(講談社)…一般向けに日常の物理について公式を元に紐解きました。特設サイトでは実験を多数紹介しています。※増刷がかかり6刷となりました(2026/02/01)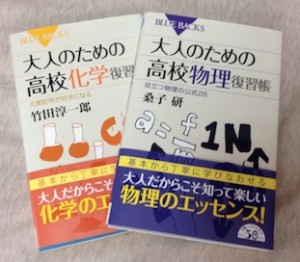
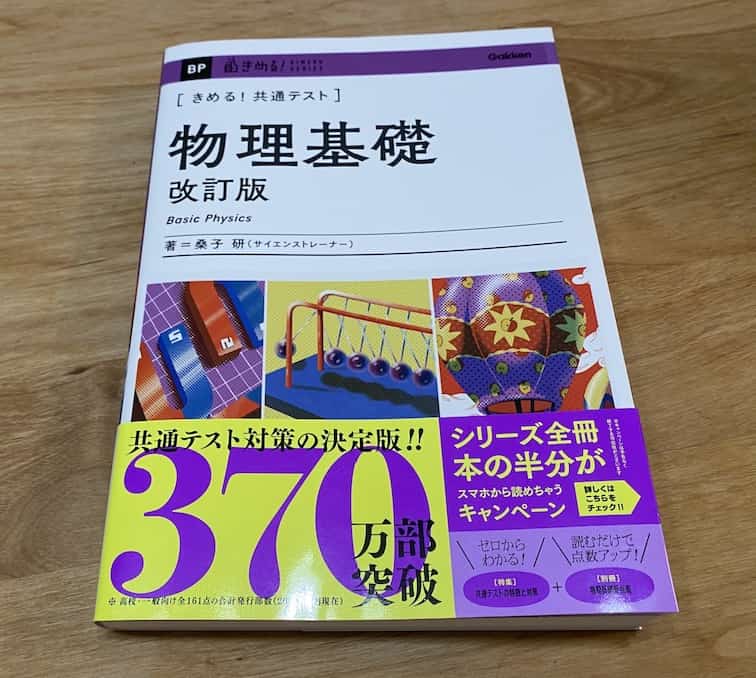
- 『きめる!共通テスト 物理基礎 改訂版』(学研)… 高校物理の参考書です。イラストを多くしてイメージが持てるように描きました。授業についていけない、物理が苦手、そんな生徒におすすめです。特設サイトはこちら。
各種SNS(更新情報をお届け!)
【日本語】X(Twitter)/instagram/Facebook 【英語】BlueSky/Threads
Explore
- 楽しい実験…お子さんと一緒に夢中になれるイチオシの科学実験を多数紹介しています。また、高校物理の理解を深めるための動画教材も用意しました。
- 理科の教材… 理科教師をバックアップ!授業の質を高め、準備を効率化するための選りすぐりの教材を紹介しています。
- Youtube…科学実験等の動画を配信しています。
- 科学ラジオ …科学トピックをほぼ毎日配信中!AI技術を駆使して作成した「耳で楽しむ科学」をお届けします。
- 講演 …全国各地で実験講習会・サイエンスショー等を行っています。
- About …「科学のネタ帳」のコンセプトや、運営者である桑子研のプロフィール・想いをまとめています。
- お問い合わせ …実験教室のご依頼、執筆・講演の相談、科学監修等はこちらのフォームからお寄せください。
- Seeing the World Through an Insect’s Eyes? The Hidden Secrets of Dandelions and Azaleas

- Did the Chopstick Snap? Did It Move Backward? The Strange Images in a Glass of Water
- Making the Invisible Visible: A Laser and Fog Machine Light Show!

- The 1,300-View Wall! What Middle Schoolers Learned About “Reaching People” Through Short Videos (Science Communication Course)

- Is the Image on Your Retina Upside Down? Discover the Magic of Light with a Squid Eye Experiment

- We Built a Volcano—and It Was Explosively Fun! The Ultimate Experiment Recipe Using Plaster and Baking Soda!

- Data So Clean It’ll Wow You! Cracking the Link Between Potential Energy and Work with Just a Rail and a Marble

- Why Are the Top and Bottom of a Leaf Different Colors? The Surprising Link Between Light and Cell Density

- 4x Faster Than Sunlight?! The Secret of Plant Factories Growing Lettuce Under Red Light (Plot Twist: It Was Purple Light!)