One Graph to Rule Them All: Unlocking Newton’s Second Law Through Hands-On Experiment
I’m Ken Kuwako, the Science Trainer. Every day is an experiment.
“What is the single most important equation in high school physics?”
If someone asked you that question, how would you answer? Some might point to the famous equation associated with Einstein’s theory of relativity, while others might choose an equation representing the conservation of energy. There are plenty of worthy candidates. But if you asked many physicists to pick just one, chances are they would choose the famous equation of motion, F = ma.
Just three characters. Yet within this simple equation lies the motion of a thrown ball, the acceleration of a car, and even the moment a rocket launches into space. Knowing an equation and truly experiencing it are two very different things. In this article, I’ll introduce an experiment that allows students to discover this equation for themselves through hands-on investigation.
Purpose of the Experiment: Exploring the Relationship Between Mass, Acceleration, and Force
The goal of this experiment is to uncover the relationship between force (F), mass (m), and acceleration (a) through real experimental data. Ultimately, students will work toward deriving the famous equation on their own. Instead of simply being handed a formula, they get the excitement of discovering it.
Preparation Tips: Setting Up for Success
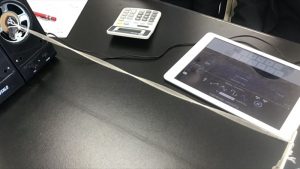
This experiment uses a device called a constant-force apparatus. As the name suggests, it continuously pulls an object with nearly the same force whether the object is stationary or already moving. When students try pulling by hand, the force naturally fluctuates, making it difficult to obtain consistent data. A constant-force apparatus removes that variable and produces much more reliable results.
Most constant-force apparatuses come with two wires. For example, the “Constant Force Apparatus DJ-0461” provides approximately (roughly the weight of 50 g) through the upper wire and approximately (roughly the weight of 100 g) through the lower wire. If you measure the pulling force using a spring scale, you’ll find slight variations, but the device maintains a remarkably consistent force overall.

Constant Force Apparatus DJ-0461
Some teachers may think, “That sounds great, but it’s a bit expensive.” At around ¥10,000, it’s not exactly an impulse purchase. However, if your school can provide one for each lab group, the quality of the data improves dramatically. You can perform a similar experiment using a spring scale while trying to maintain a constant pull, but if you want accurate and reproducible results, a constant-force apparatus is well worth considering.
The “Magic” of Using Two Speed Sensors
Many science teachers are familiar with the speed-measuring device known as the Bee-Spi. Using a photoelectric sensor, it records the time an object passes through and calculates its speed.
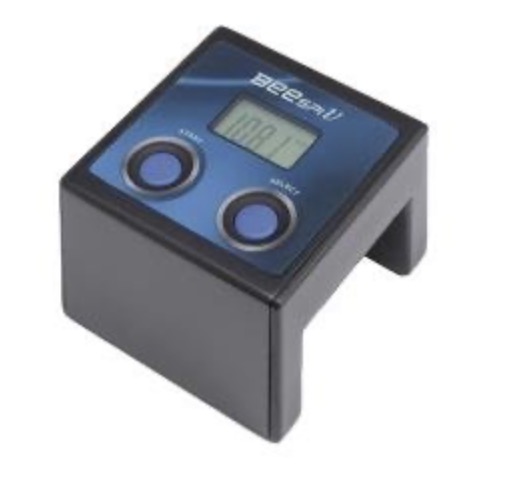
Normally, it’s used to measure the speed of an object passing through a sensor. But if you place two Bee-Spi units in sequence, you can accurately determine an object’s acceleration.
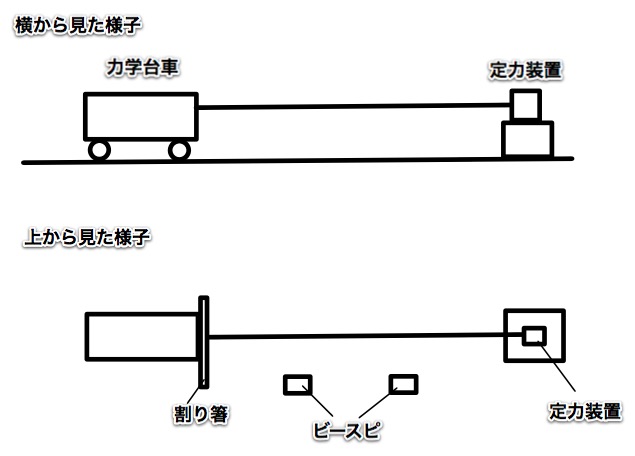
The setup is surprisingly simple. Measure and fix the distance between the two sensors, then attach a chopstick to the front of the cart. As the chopstick passes through the first and second sensors, the cart’s initial and later speeds are recorded. Using those values and the equation below,
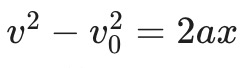
you can calculate the otherwise invisible quantity known as acceleration. Check out the video below to see the experiment in action.
The Science Recipe: Materials and Procedure
Let’s walk through the setup and procedure.
Materials
- Constant-force apparatus: DJ-0461 or equivalent (verify the force values of your own model)
- Dynamics cart
- Bee-Spi speed sensors: Two units (for example, BeeSpi V)
- 1-meter ruler: For measuring the sensor spacing
- Disposable wooden chopstick
- Modeling clay: To add mass (for example, three 500 g blocks)
- Electronic balance: For measuring clay mass accurately
- Newton spring scale: Capable of measuring up to about 2 N
- Calculator: For acceleration calculations
- Vinyl tape: For securing components
Experimental Procedure
- Prepare the spring scale: Hold it horizontally and adjust it so the pointer reads .
- Measure the force produced by the constant-force apparatus: Use the spring scale to determine the pulling force of each wire and record the values. These numbers will become important during analysis.
- Upper wire:
- Lower wire:
- Prepare the cart: Attach a chopstick to the cart using tape. The chopstick will pass through the Bee-Spi sensors and also serve as the hook point for the constant-force apparatus (see the figure below).
- Run the trials and collect data: Measure the cart’s speeds using the two Bee-Spi sensors and calculate acceleration under the following seven conditions. Use the constant-acceleration equation . Assume the cart itself has a mass of .
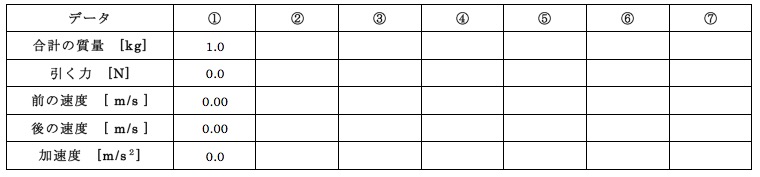
- ① No experiment (control condition).
- ② No added mass, pulled by the upper wire only.
- ③ No added mass, pulled by the lower wire only.
- ④ No added mass, pulled by both wires simultaneously.
- ⑤ Add a 500 g mass and pull using the lower wire only.
- ⑥ Add a 1000 g mass and pull using the lower wire only.
- ⑦ Add a 1500 g mass and pull using the lower wire only.
Analysis and Discussion: Discovering the Law Through Graphs
Once the data has been collected, it’s time to visualize the relationships and see what patterns emerge.
- Create an a–F graph: Using data from conditions ①–④, plot acceleration (a) on the vertical axis and force (F) on the horizontal axis.
- Create an a–m graph: Using data from conditions ③, ⑤, ⑥, and ⑦, plot acceleration (a) versus mass (m).
- Create an a–1/m graph: Using the same data, plot acceleration (a) against the reciprocal of mass (1/m). This graph reveals something particularly important.
The results are often striking:
- The a–F graph shows a clear direct proportionality. Double the force, and the acceleration doubles.
- The a–m graph reveals an inverse relationship. The larger the mass, the harder it is to accelerate.
- The a–1/m graph produces an impressively straight proportional relationship.
Combining these findings leads to
where k is a proportionality constant. If we define a force of 1 as the amount required to accelerate a 1 kg object at 1 m/s², then k becomes 1, and we arrive at the celebrated equation:
F = ma
At this point, you can also explain that the unit of force, the Newton (N), is defined based on this relationship. Students gain a much deeper understanding of what “force” actually means rather than treating it as just another quantity in a formula.
Seeing Motion with Stroboscopic Photography
What’s the difference between giving an object a brief push and continuously applying a force?
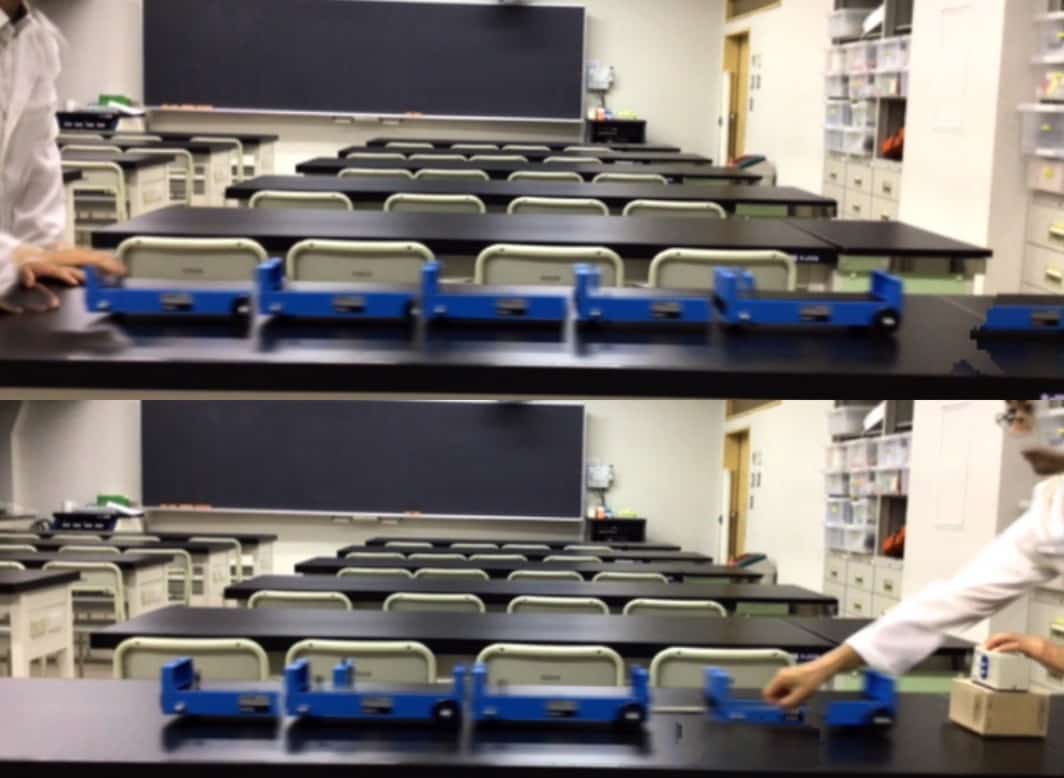
The following stroboscopic images make the answer visible. Watch the video below.
The top sequence shows uniform motion, while the bottom sequence shows accelerated motion. Both objects are moving, but the pattern of motion changes dramatically depending on how force is applied. Being able to make that difference visible is one of the most satisfying parts of this activity.
Through this experiment, students do far more than memorize a formula. They investigate a fundamental law of nature, uncover patterns from real data, and experience the thrill of discovering one of physics’ most important ideas for themselves. Give it a try in your classroom—you may be surprised by how much it sparks students’ curiosity about physics.
Contact and Collaboration
Bring the wonder of science closer to everyday life! This site is packed with fun science experiments you can try at home, along with practical tips and explanations. Feel free to explore.
• Learn more about Ken Kuwako here
• For writing, lectures, science workshops, TV consulting, media appearances, and other requests, click here
• Follow updates on new articles via X!
 Science Ideas Channel features experiment videos!
Suggested Catchy Title:
Can Students Discover F = ma on Their Own? A Hands-On Physics Experiment That Reveals Newton’s Greatest Equation
9月のイチオシ実験!
お弁当箱をプラバンがわりにしてキーホルダーを作ろう!
テレビ番組監修・イベント等のお知らせ
- 8月27日(木)科学監修番組放送予定
- 9月20日(日)ダビンチマスターズ出演予定
- 10月10日(土)11:15~12:00 千葉市科学フェスタ2026「桑子先生の回転科学ショー」にてサイエンスショーを行います。
- 12月26日(土) ナリカサイエンスアカデミー(教員向け実験講習会)開催
書籍のお知らせ
- 『高校入試 分解問題集 理科』(学研)…難しい問題も小さな問題に分解することで、問題を解くことができます。そんな分解の技術が身につくように深く関わりを持って作りました。
 『大人のための高校物理復習帳』(講談社)…一般向けに日常の物理について公式を元に紐解きました。特設サイトでは実験を多数紹介しています。※増刷がかかり6刷となりました(2026/02/01)

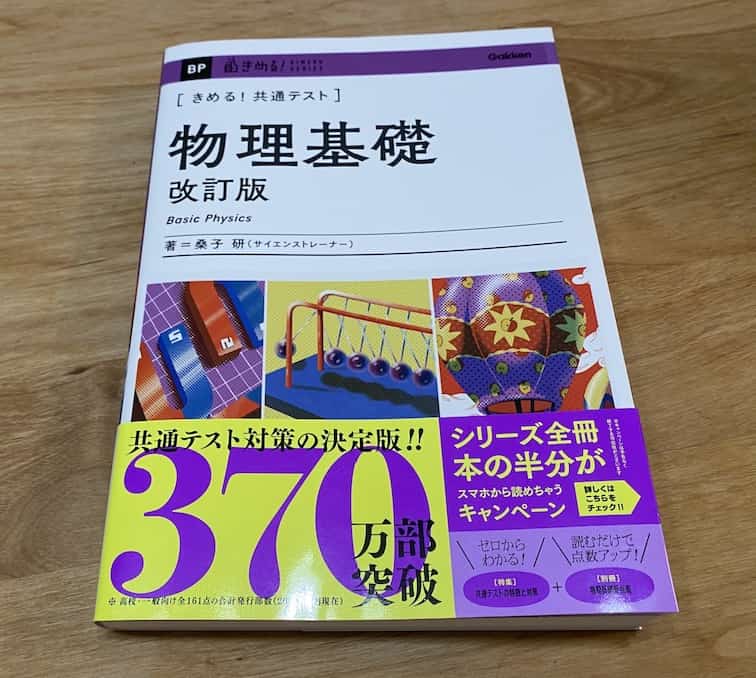
- 『きめる!共通テスト 物理基礎 改訂版』(学研)… 高校物理の参考書です。イラストを多くしてイメージが持てるように描きました。授業についていけない、物理が苦手、そんな生徒におすすめです。特設サイトはこちら。
各種SNS(更新情報をお届け!)
【日本語】X(Twitter)/instagram/Facebook 【英語】BlueSky/Threads
Explore
- 楽しい実験…お子さんと一緒に夢中になれるイチオシの科学実験を多数紹介しています。また、高校物理の理解を深めるための動画教材も用意しました。
- 理科の教材… 理科教師をバックアップ!授業の質を高め、準備を効率化するための選りすぐりの教材を紹介しています。
- Youtube…科学実験等の動画を配信しています。
- 科学ラジオ …科学トピックをほぼ毎日配信中!AI技術を駆使して作成した「耳で楽しむ科学」をお届けします。
- 講演 …全国各地で実験講習会・サイエンスショー等を行っています。
- About …「科学のネタ帳」のコンセプトや、運営者である桑子研のプロフィール・想いをまとめています。
- お問い合わせ …実験教室のご依頼、執筆・講演の相談、科学監修等はこちらのフォームからお寄せください。