The Science Teacher’s Secret Weapon: Cutting 5 Hours of Grading Down to 2 with Digital Systems
I’m Ken Kuwako, a Science Trainer. Every day is an experiment.
[This article is also available on the radio!]

While preparing for experiments and innovating in class are essential, grading tests to accurately measure each student’s comprehension is an equally critical task. Grading a large volume of answer sheets within a limited timeframe and then analyzing the results requires significant effort and time. This burden is particularly immense for science tests, which often involve detailed written responses and lab reports that demand meticulous review.
Are you a teacher who’s often thought, “Is there a way to grade more efficiently?” or “I want to give feedback to my students faster?” If so, I highly recommend looking into a digital grading system. With this system, you can automate and streamline much of the scoring work that used to be done by hand. This not only shortens grading time but also allows you to quickly provide students with feedback on their score rates and centrally manage all academic records.
This process used to take me about five hours. That time included the actual scoring, entering the scores into Excel, analyzing the correct answer rates, double-checking for errors, and finally, inputting everything into the school’s administrative system—which required another round of error checks.
The system we use at our school is called “Hyakumon Ryouran,” but the incredible thing about digital grading is the combination of scoring efficiency, reduced mistakes, and the instant analysis of correct answer rates. All of that now takes only about two hours! It is absolutely revolutionary.
In this article, I will provide an in-depth explanation of how to maximize the use of the “Hyakumon Ryouran” digital grading system for science tests, covering everything from pre-test setup to grading, and post-grading data utilization, complete with specific steps and handy tips. Reading this will dramatically transform your grading workflow, freeing up more quality time to engage with your students—and more time for yourself!
※ Note: There are many other digital grading systems available besides Hyakumon Ryouran.
・Grading Navi (Kyōiku Software Co., Ltd.) ・Degiraku Grading 2 (Scanet Co., Ltd.) ・YouMark Personal (Yujinsha Co., Ltd.) ・Smarky (Smarky Co., Ltd.) ・Answer Box Creator Z (Zetallinks Co., Ltd.) ・SGS (Software Science Co., Ltd.)
And many more. When I talk to teachers at other schools, the reputation for similar usability and significant time savings remains consistent. Since these require vendor contracts, it’s best to compare the available grading systems and choose one that fits your school’s specific needs. I don’t necessarily advocate only for “Hyakumon Ryouran,” but it is certainly a user-friendly system.
Test Creation and Pre-Test Setup (Checklist)
□ Draft the Question Sheet: Create a draft two weeks in advance and have colleagues check it. Make adjustments based on their feedback.
□ Create the Answer Sheet: Once the questions are finalized, create the answer sheet.
□ Solve the Test: Have the test solved (by colleagues as well as yourself).
□ Add Furigana (Reading Aids): Before printing, add furigana (small phonetic readings above kanji) as an accommodation for students who struggle with Japanese. I use a macro to automatically add the readings all at once (See here for detailed steps). After printing a hard copy, check carefully to make sure each reading is correct. Sometimes there are errors—for example, a reading for “father” might incorrectly be set as chichi (my father) instead of tou (general reference to father)—so this manual check is necessary. Also, going through this process is often the first time you realize an ambiguity in your own question wording, so a careful, full reading is mandatory.
□ Print the Question Sheets.
□ Prepare the test packets: Set the regular question sheets into envelopes. Set the question sheets with furigana aside separately.
□ Register the test data in the digital grading system.
□ Prepare and ready the Answer Key and Explanations.
Test Implementation
□ Perform digital grading (as described in this article).
□ Review the Answer Key and Explanations, making minor adjustments based on the correct answer rates to make them clearer.
□ Print the graded data for test return preparation.
On the Day of Return
□ Upload the Answer Key and Explanations data to the classroom system, then return the answer sheets to students.
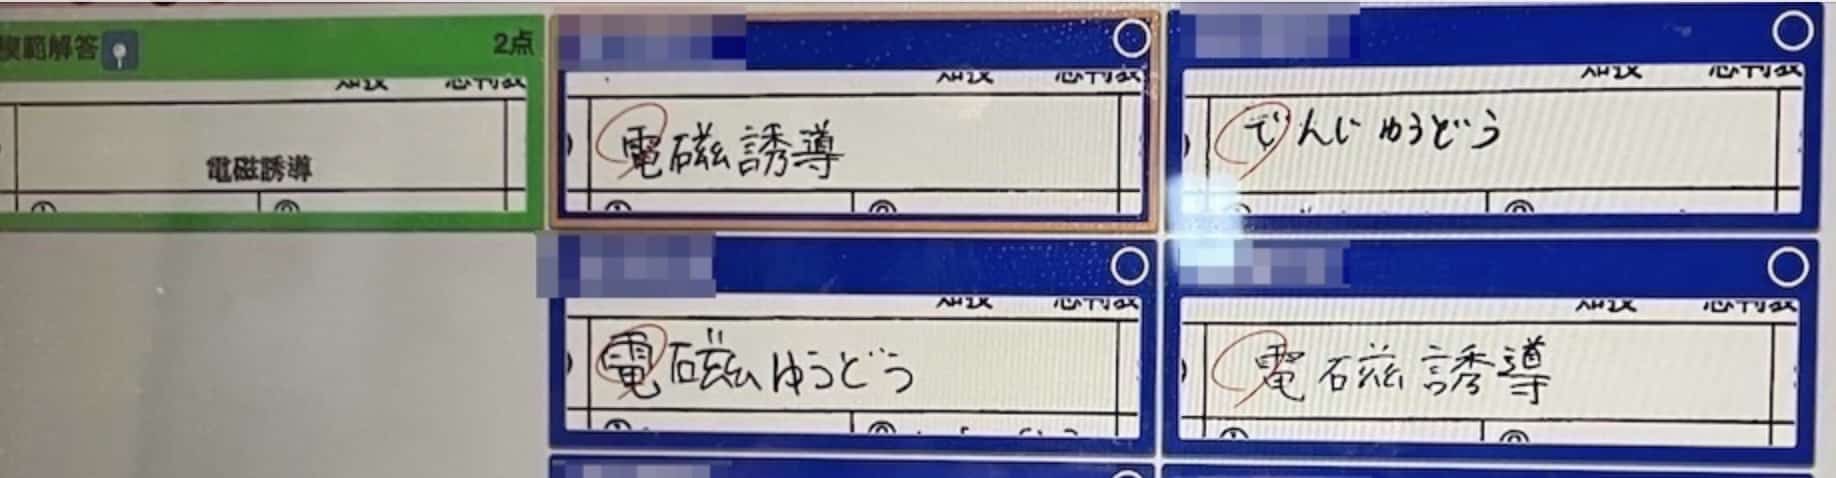
When using digital grading, pay special attention to circled numbers. I don’t overuse automatic grading, so I’m not overly concerned, but if you do use automatic grading, use symbols like A, B, C or ア, イ, ウ for multiple-choice questions instead of circled numbers (①, ②, ③), as the latter are often difficult for the system to recognize accurately.
Descriptive questions and graphing problems can also be graded without issue using the digital system.
If you have students who require furigana on their tests, be sure to add the readings to the question and answer sheets beforehand. I wrote about how to automate the furigana process in this article:
Maximizing Grading Efficiency: Setting Up “Hyakumon Ryouran”
Mastering “Hyakumon Ryouran” depends on the initial setup. Getting this right will make subsequent grading work incredibly smooth. Administrators should prepare by registering student names, teacher accounts, and assigning permissions (e.g., whether a user is limited to scoring only) in advance.
1. Exam Management: Setting Up the Test’s Basic Information
First, register the basic exam information in the system.
- Create Exam Subject: Create the subject for the test you will be grading (e.g., Science, Science 1st Year) from the “Exam Management” menu. This makes managing multiple tests easier.
- Read the Model Answer Sheet: This is a crucial step!
- Load the model answer sheet into the system as a PDF file. When creating the sheet, make sure the answer boxes on the model sheet align perfectly with those on the students’ answer sheets. Also, if the PDF contains text data, the system may not read it correctly. In such cases, exporting it as a JPEG or another image format and then importing the image often works better.
2. Grading Settings: Customizing Scoring Boxes and Points
After loading the model answer sheet, you need to set the detailed grading parameters.
- Model Answer Loading and Box Creation: The system automatically creates scoring boxes. By default, “Medium size” boxes are created automatically, but you should delete any unnecessary ones. Also, at this stage, you do not need to use the class information (as the system is designed to grade question by question across classes).
- Box Classification and Question No.:
- Classify the scoring boxes by assessment criteria such as “Student ID,” “Name,” “Total Score,” “Question,” “Knowledge and Skills,” and “Thinking, Judgment, and Expression.” This allows for multi-faceted analysis of the scoring results.
- Next, assign Question Numbers sequentially to each box. (Simply numbering from top to bottom is sufficient. This process sets the number for each box within the system.)
- Automatic Grading Setup:
- You should actively register multiple-choice questions using symbols like A, B, C or ア, イ, ウ. These will be automatically read and scored by the system. However, you still need to visually verify that the scoring is correct afterwards.
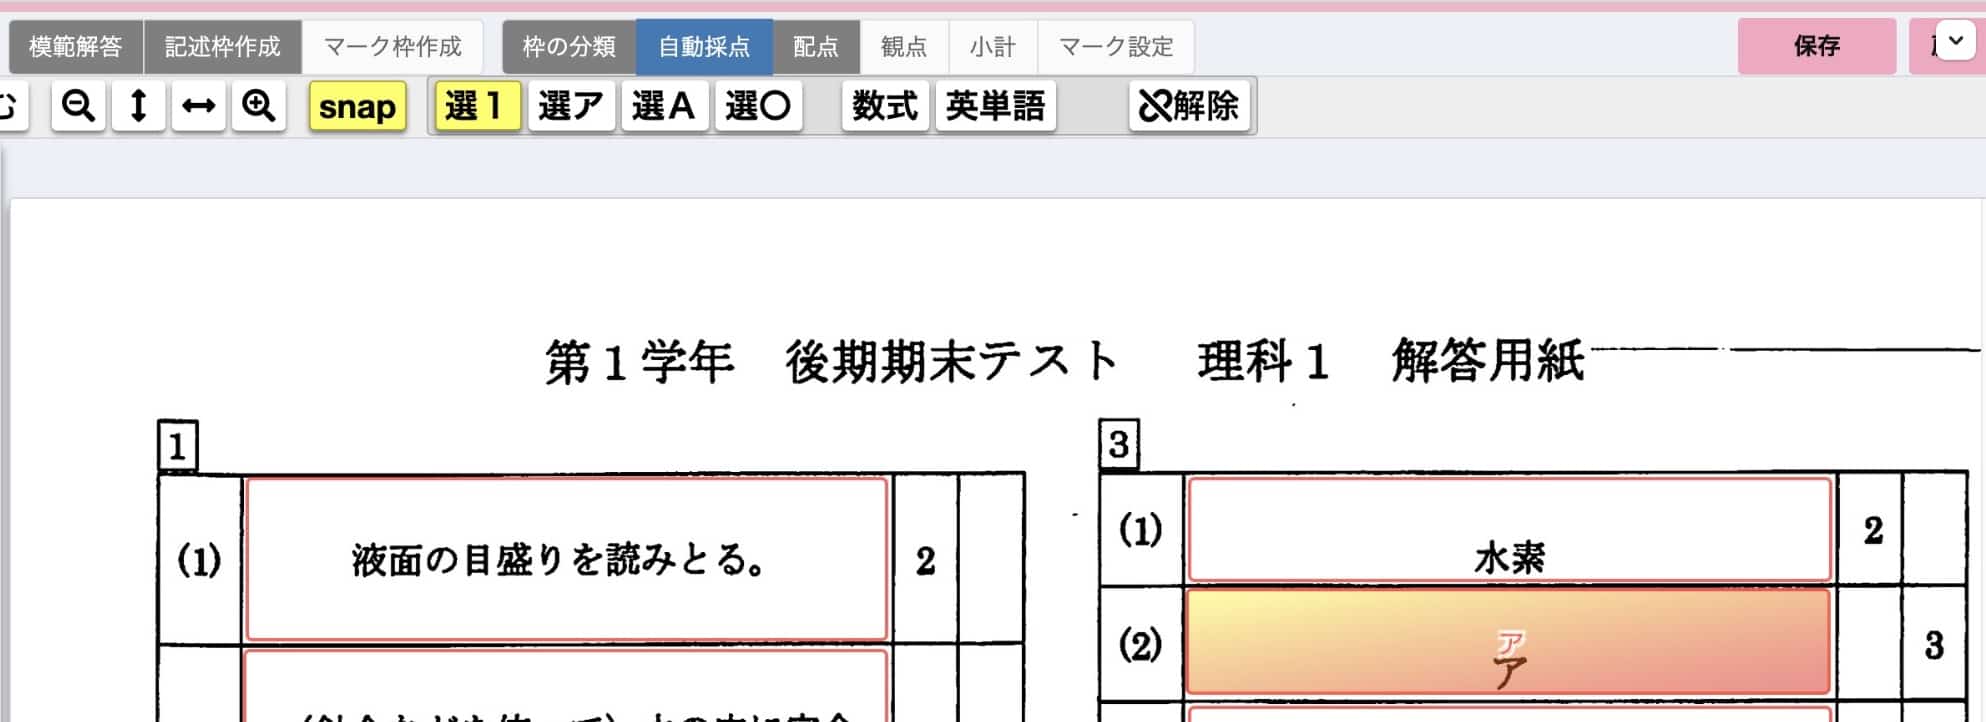
- While automatic scoring is convenient, be aware that the accuracy for single-character symbols like A/B/C is high, but the accuracy for combinations of characters or numbers is low. I recommend not overusing the automatic grading feature. Set it up for the bare minimum.
- You should actively register multiple-choice questions using symbols like A, B, C or ア, イ, ウ. These will be automatically read and scored by the system. However, you still need to visually verify that the scoring is correct afterwards.
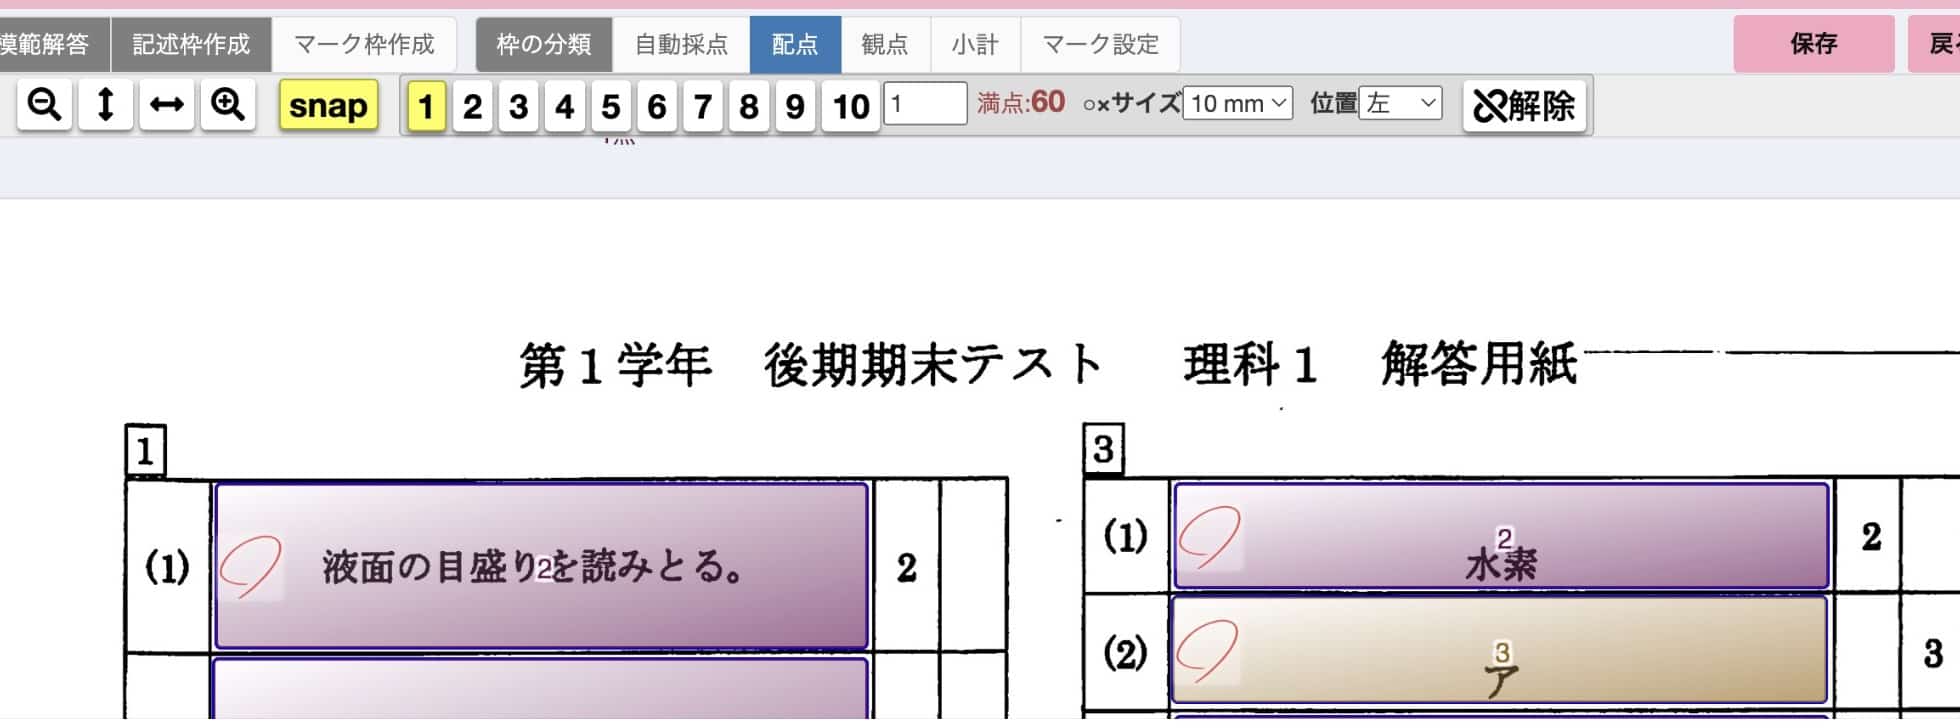
- Point Allocation Setting: Accurately input the point value for each question and always verify that the total score is correct.
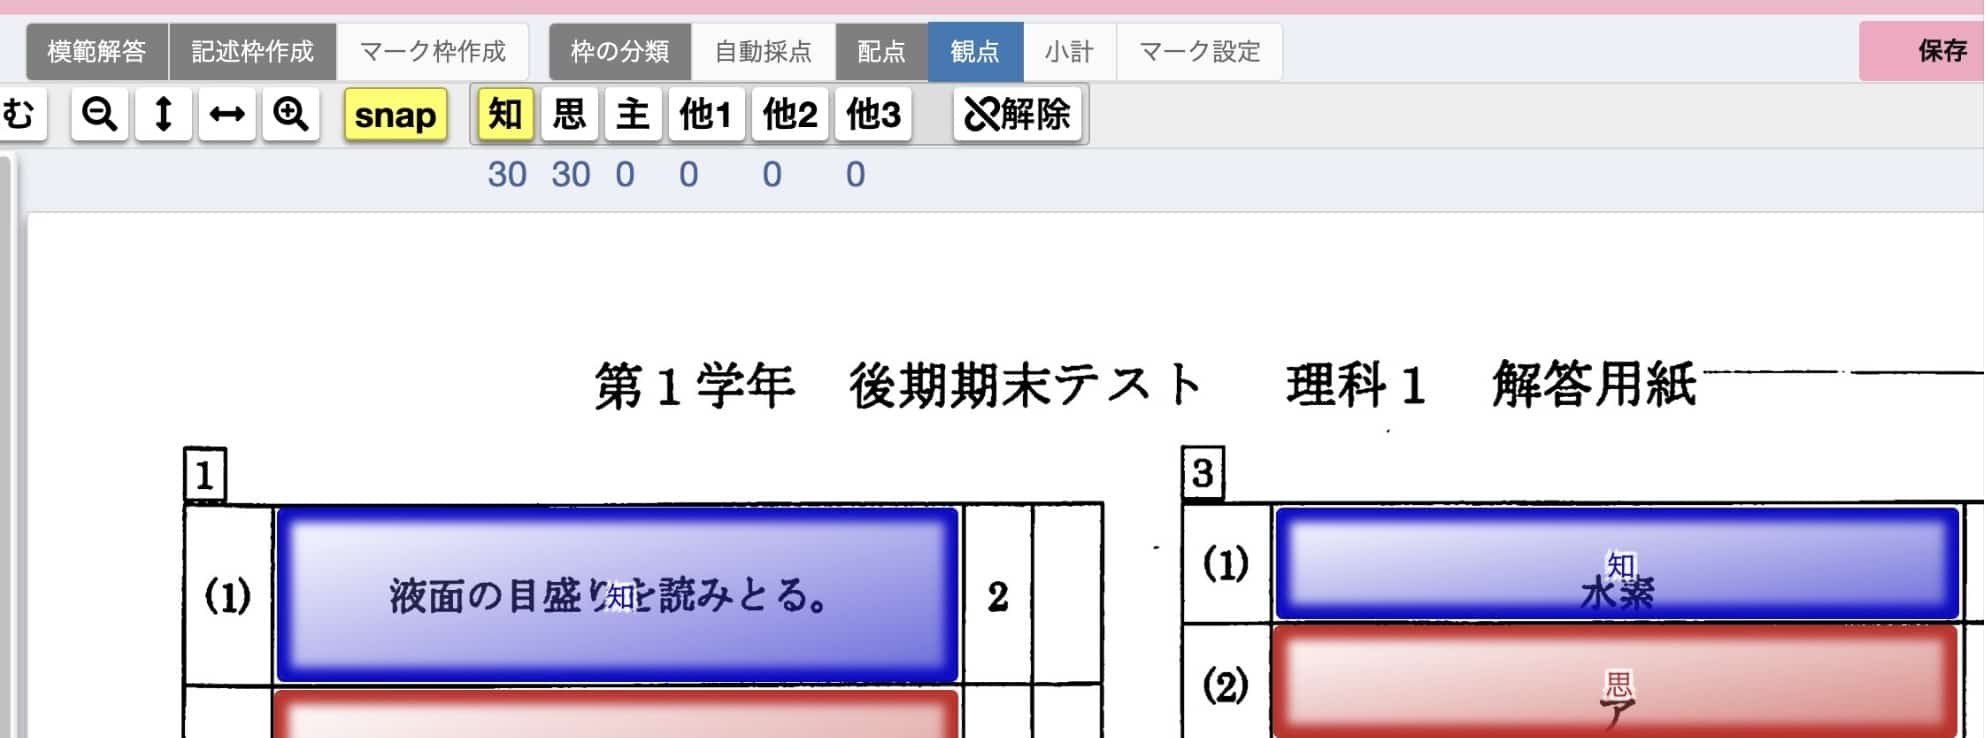
- Criteria-Based Aggregation Setting: In Science, assessment based on criteria from the Course of Study, such as “Knowledge and Skills” and “Thinking, Judgment, and Expression,” is important. Set the points for questions corresponding to each criterion, and confirm that the total points for all criteria match the final total score.
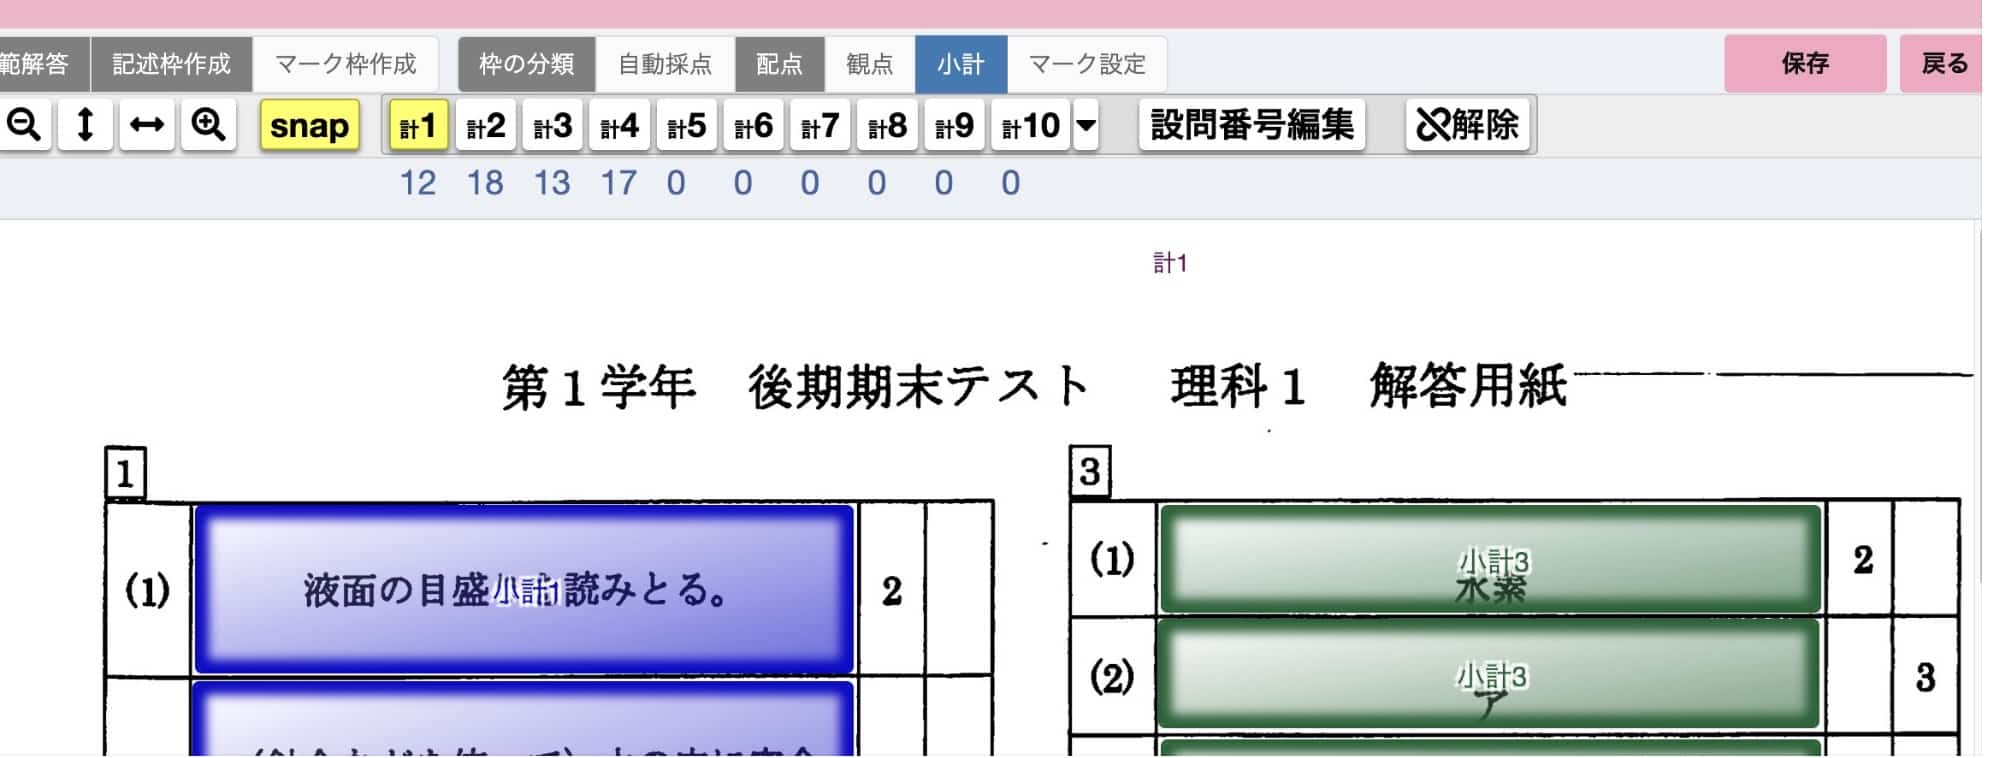
- Subtotal Setting: If necessary, setting up subtotals for each major section (Dai-mon) can help you track progress during grading and assist with later analysis.
These are the critical preparation steps you must complete before beginning to grade the tests. This usually takes about 15 minutes per test. You need to be patient with this 15 minutes of prep, as the subsequent grading work will become dramatically more efficient!
On Test Day: Grading Tips
The Grading Phase: Efficiently Checking Answer Sheets Digitally!
Once the preparation is complete, it’s time to begin the actual scoring.
-
Scanning Answer Sheets and Digitizing:
- After the test, confirm any absent students by class and scan the answer sheets using a scanner without the absent students’ papers. The PDF data should be prepared in class units.
- For single-sided answer sheets: When scanning the documents, it’s necessary to set the scanner to single-sided reading (otherwise, students who write with heavy pressure might have both sides read).

-
Loading Answers into the System and Name Matching:
- From the “Grading” menu, import the scanned answer sheet PDF data into the system.
- Check off any absent students and perform the name matching (meiyose) process. This is where you accurately link the answer sheets automatically recognized by the system to the correct student information. This is extremely important! Be absolutely sure there are no discrepancies.
-
Time to Grade!:
・When scoring, you must grade “cross-sectionally” for all students. While the default view usually shows a specific class (like Class A) at the top, you need to change this to “All Classes.” If you forget this switch, the cross-sectional grading across all classes won’t happen, so be careful.
 ① Review Automatic Scoring: Check that the parts scored automatically by the system (symbol selection, numerical input, etc.) have been scored correctly.
② Manual Scoring: Review the questions that were not automatically scored. If multiple teachers are involved, start with those where the correct/incorrect judgment is simple.
Scoring Method ・o or z key: Score as correct. ・x key: Score as incorrect. ・1 to 9 number keys: Input and confirm partial points.
Be sure to save after grading.
③ The question creator or lead science teacher should then tackle the more ambiguous, open-ended questions. It’s crucial for one person to score these questions entirely and to confirm the scoring criteria throughout the process.
Post-Grading: Leveraging Data for Feedback and Future Lessons!
Once grading is finished, make the most of the results.
- Printing and Returning Individual Reports + Answer Sheets:
- The feature in “Hyakumon Ryouran” to print a set containing each student’s individual report (Koppyo) and a miniature PDF of their answer sheet is incredibly useful. By returning this with the original answer sheet, students can view their answers, scores, and detailed feedback all in one glance.
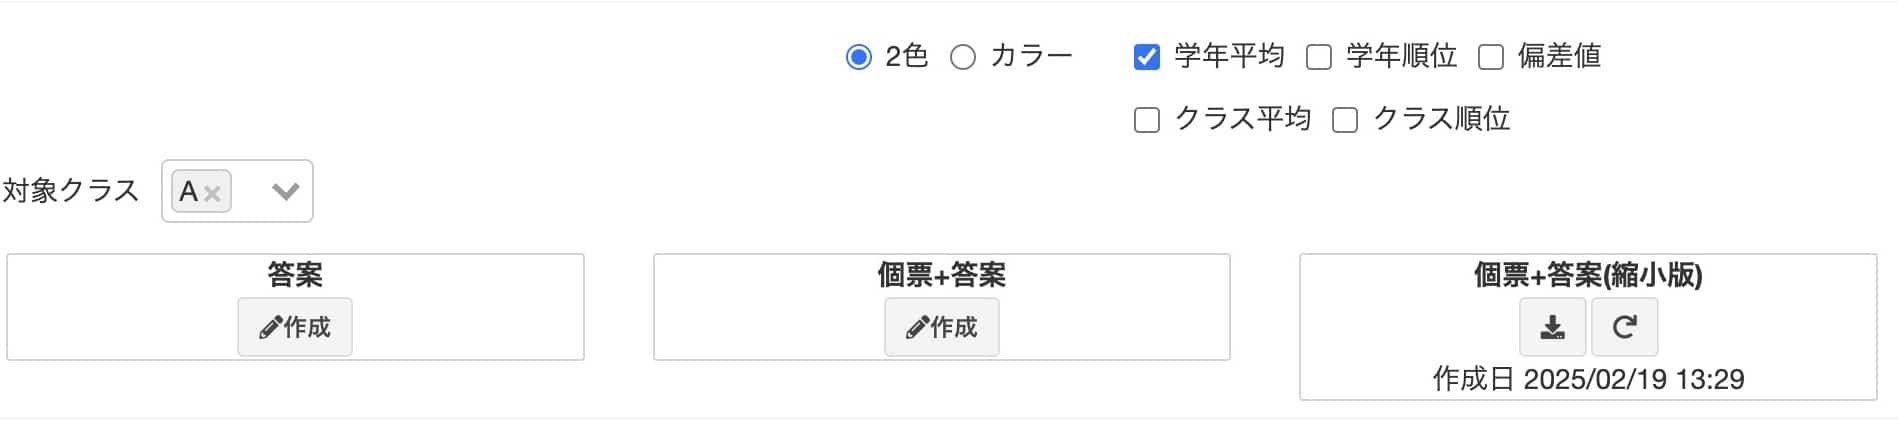
- When printing, display the grade-level average score, and print in two colors (e.g., black and red) using a laser printer (with grayscale settings) to ensure high visibility and save on ink costs. Last time, I created the data with the grade average, two colors, and printed it using a laser printer (grayscale). It’s convenient to select “All Classes” from the Answer Sheet PDF screen when generating this data.
The individual report + miniature answer sheet PDF offers significant benefits to students by including analysis data. By grasping the correct answer rate for each question and the achievement status for each criterion, you can improve future lessons and tailor individual guidance for students.
! Now is the time to re-confirm the correct answer rates!
If any correct answer rate is conspicuously low, there might be an error in the model answer. This check is crucial here.
At our school, we also distribute the model answers digitally. Don’t forget to set them up in Google Classroom.
We currently hand out the printed individual reports and miniature answer sheets along with the original test paper. Although this results in more paper usage, the system also has a feature that allows you to return them via Google Classroom (requires a separate contract).

Notes on the Return Day
If you discover a scoring error!
If a scoring error is found when returning the tests, there’s no need to recollect the students’ answer sheets because they are already digitized in the system. You only need to collect the printed individual reports from the students. Then, you simply re-grade the test digitally, print out the corrected individual reports, and hand the replacement back to the student. This eliminates the huge hassle of collecting all the answer sheets, which was a major headache in the past.
What about absent students?
After they take the test on a different day, you can collect their answer sheet, scan it, and add it for scoring later.
Follow-up Tasks
Importing to the School’s Administrative System
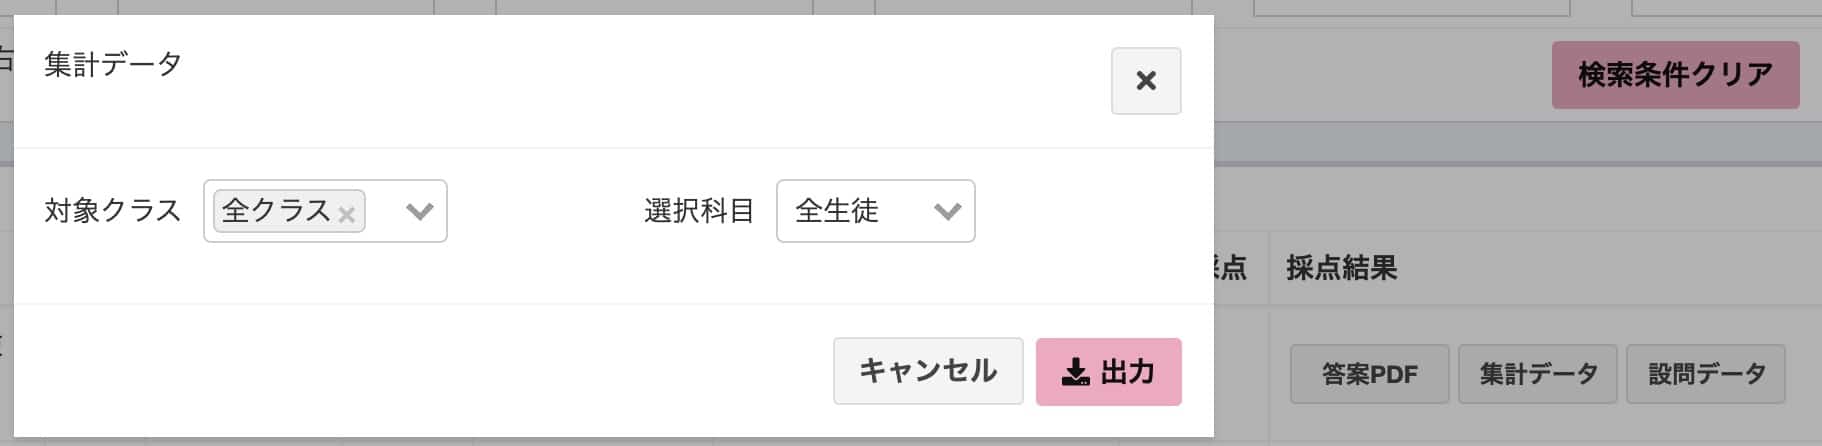
You can output the scoring results in a CSV format and paste this data directly into Excel. This should be used for import.
As shown, mastering a digital grading system not only alleviates the burden of scoring but also allows you to understand each student’s learning progress more deeply and provide high-quality feedback. I strongly encourage you to adopt this system to further enhance your science classes!
Inquiries and Requests
Bring the wonder and fun of science closer to you! I put together easy-to-understand tips and fun science experiments you can do at home. Feel free to search around! ・About the operator, Ken Kuwako: Click here ・For various requests (writing, lectures, workshops, TV supervision, appearances, etc.): Click here ・Updates to articles are delivered on X!
![]() We post experiment videos on the Science Idea Channel!
We post experiment videos on the Science Idea Channel!
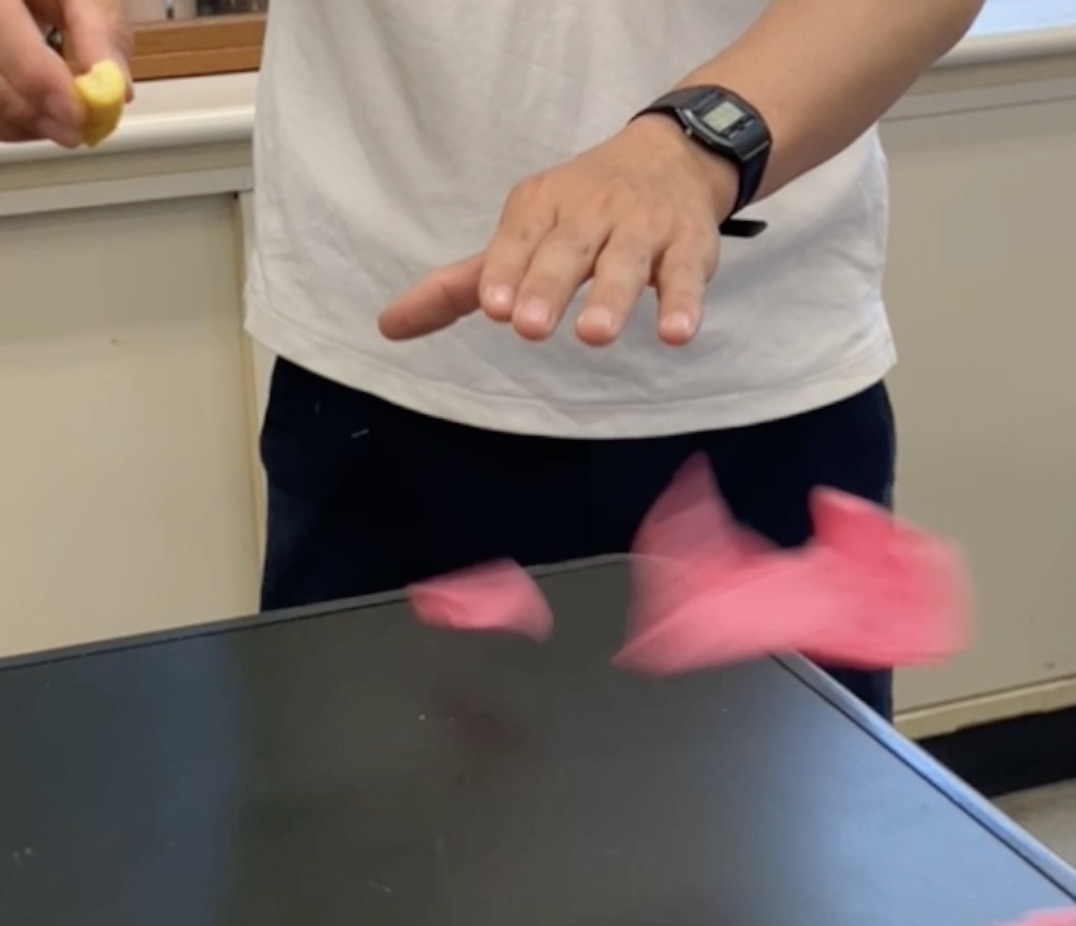
6月のイチオシ実験!
レモンやオレンジで風船を割ろう!インパクトが抜群のリモネン風船の実験
テレビ番組監修・イベント等のお知らせ
- 6月26日(金) 公開研究会「脱作業化!デジタル化と段階的指導で実現する オームの法則の探究」
- 6月28日(日) ダビンチマスターズ@昭和女子
- 6月30日(火) 6/30 23:56〜 【科学監修・出演】「地球まるごと大実験ネイチャーティーチャー」(TBS)
- 7月18日(土) 教員向け実験講習会「ナリカカサイエンスアカデミー」の講師をします。お会いしましょう。
- 12月26日(土) ナリカサイエンスアカデミー(教員向け実験講習会)開催
書籍のお知らせ
- 7月16日発売 『高校入試 分解問題集 理科』(学研)…難しい問題も小さな問題に分解することで、問題を解くことができます。そんな分解の技術が身につくように深く関わりを持って作りました。
- 『大人のための高校物理復習帳』(講談社)…一般向けに日常の物理について公式を元に紐解きました。特設サイトでは実験を多数紹介しています。※増刷がかかり6刷となりました(2026/02/01)

- 『きめる!共通テスト 物理基礎 改訂版』(学研)… 高校物理の参考書です。イラストを多くしてイメージが持てるように描きました。授業についていけない、物理が苦手、そんな生徒におすすめです。特設サイトはこちら。

各種SNS(更新情報をお届け!)
【日本語】X(Twitter)/instagram/Facebook 【英語】BlueSky/Threads
Explore
- 楽しい実験…お子さんと一緒に夢中になれるイチオシの科学実験を多数紹介しています。また、高校物理の理解を深めるための動画教材も用意しました。
- 理科の教材… 理科教師をバックアップ!授業の質を高め、準備を効率化するための選りすぐりの教材を紹介しています。
- Youtube…科学実験等の動画を配信しています。
- 科学ラジオ …科学トピックをほぼ毎日配信中!AI技術を駆使して作成した「耳で楽しむ科学」をお届けします。
- 講演 …全国各地で実験講習会・サイエンスショー等を行っています。
- About …「科学のネタ帳」のコンセプトや、運営者である桑子研のプロフィール・想いをまとめています。
- お問い合わせ …実験教室のご依頼、執筆・講演の相談、科学監修等はこちらのフォームからお寄せください。