Why Is the Blue Flame the Strongest? Understand Gas Burners Perfectly by Thinking Like Gas Itself!
I’m Ken Kuwako, your Science Trainer. Every day is an experiment.
A Bunsen burner might look intimidating at first, but don’t worry. This article breaks down exactly how to use one. Every single step in operating a Bunsen burner is backed by a scientific reason. Why this specific order? Why does the color of the flame change? Understanding these “whys” transforms a simple task into an engaging scientific inquiry that sparks intellectual curiosity.
Safety First: The True Start to Science
Before diving into the actual experiment, let’s prepare your surroundings. This crucial setup is what ensures a safe and successful lab session.
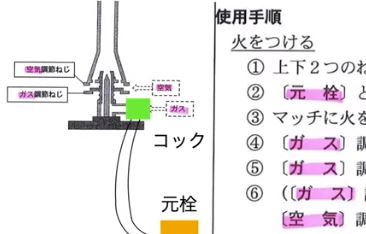
- Check the Knobs and Valves: Lightly turn the gas control knob and the air hole control collar on the burner to ensure they move smoothly. Once checked, you must “gently close” both before lighting the burner.
- Position the Used Match Container (Striker/Waste): This is where your spent matches go. Keep it right next to your dominant hand. This simple step prevents you from wandering around with a lit or recently extinguished match, allowing for a quick and safe cleanup.
- The Wet Rag Standby: This is your reliable security guard for emergencies. If an unexpected fire occurs, calmly smother it with the wet rag. This cuts off the oxygen supply, instantly putting the fire out.
Lighting the Way: The Science of Ignition
It’s time to light up! The key here is to “visualize the flow of gas and operate the controls starting from the burner end (farthest from the main supply).” Picture the gas traveling gradually from the main source to the burner.
- Confirm Both Knobs are [Closed]: First, do a final check to ensure the burner’s “gas control knob” and “air hole control collar” are both fully closed. This is the gas’s final checkpoint. If they are closed, gas cannot escape freely.
- Open the [Main Valve], then the [Bench Valve/Stopcock]: The gas journey begins! Open the main gas source, the [Main Valve], and then open the [Bench Valve (Stopcock)] located on your lab bench. The pathway for the gas is now clear up to the burner.
- Ready the Lit Match at the Burner Head: Approach the burner head with a pre-lit match. Why? Because if you search for a match after turning on the gas, a dangerous amount of unburnt gas can quickly spread into the air. The golden rule is: “Be ready for the gas at the exit.”
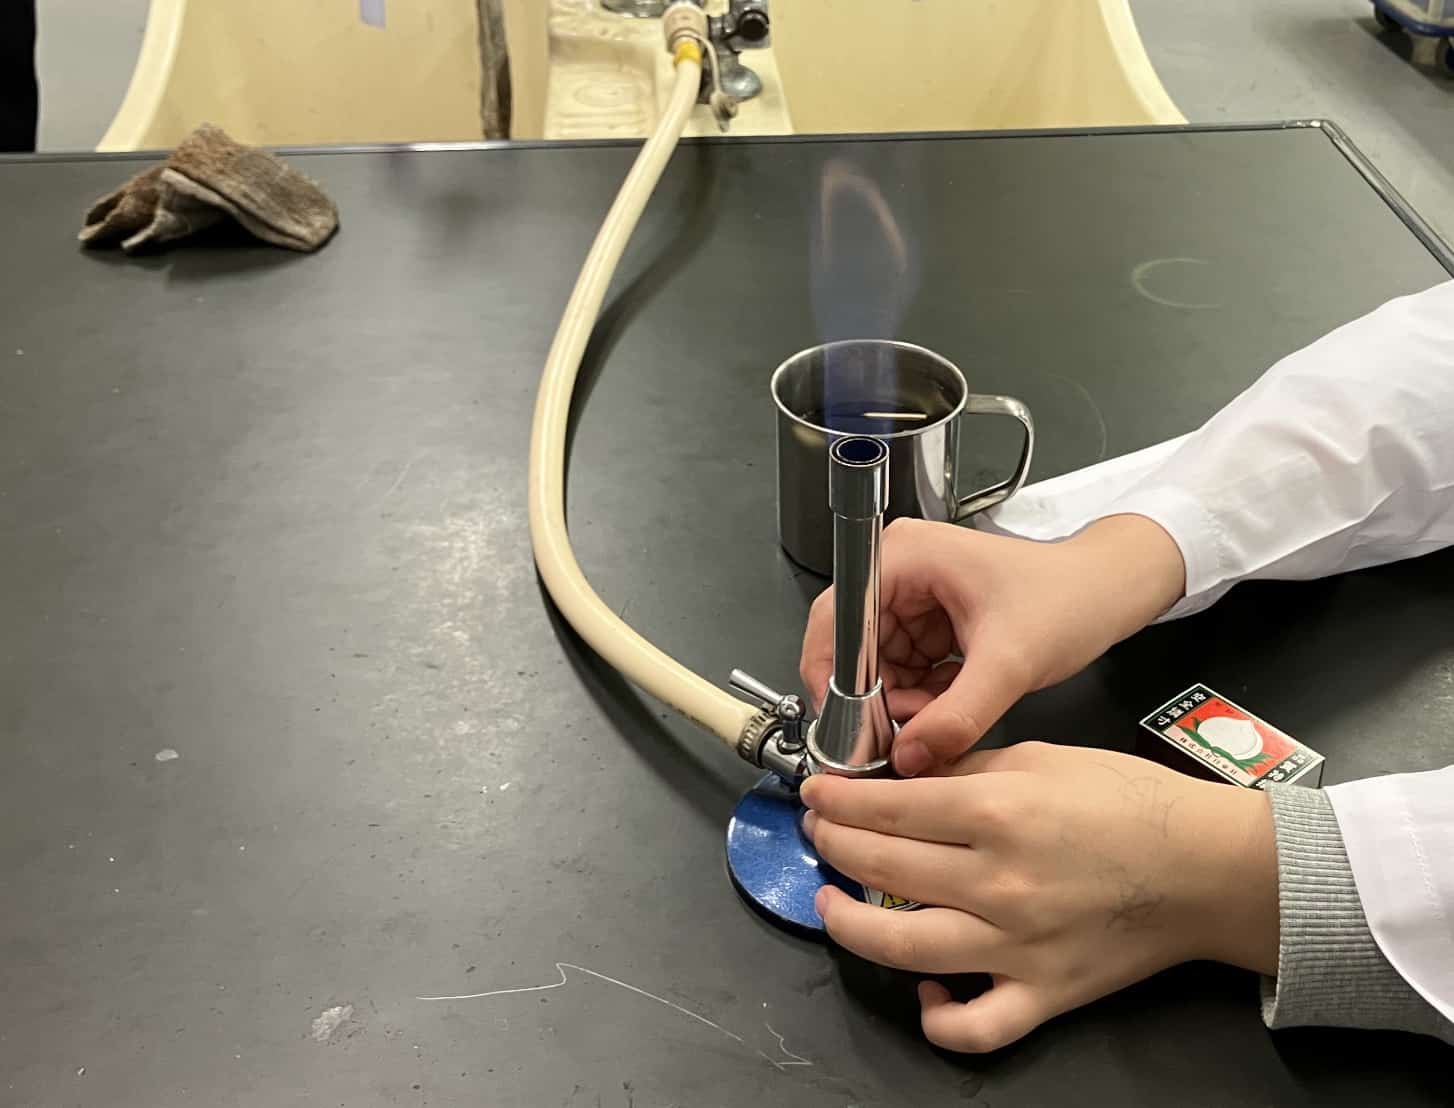
- Slowly Open the [Gas Control Knob] and Ignite! The climax! While holding the lit match near the opening, very slowly and gently open the [Gas Control Knob]. You will hear a “shhh” sound as the gas escapes. The match will then ignite the gas with a distinctive “pop” sound. Place the spent match in the container.
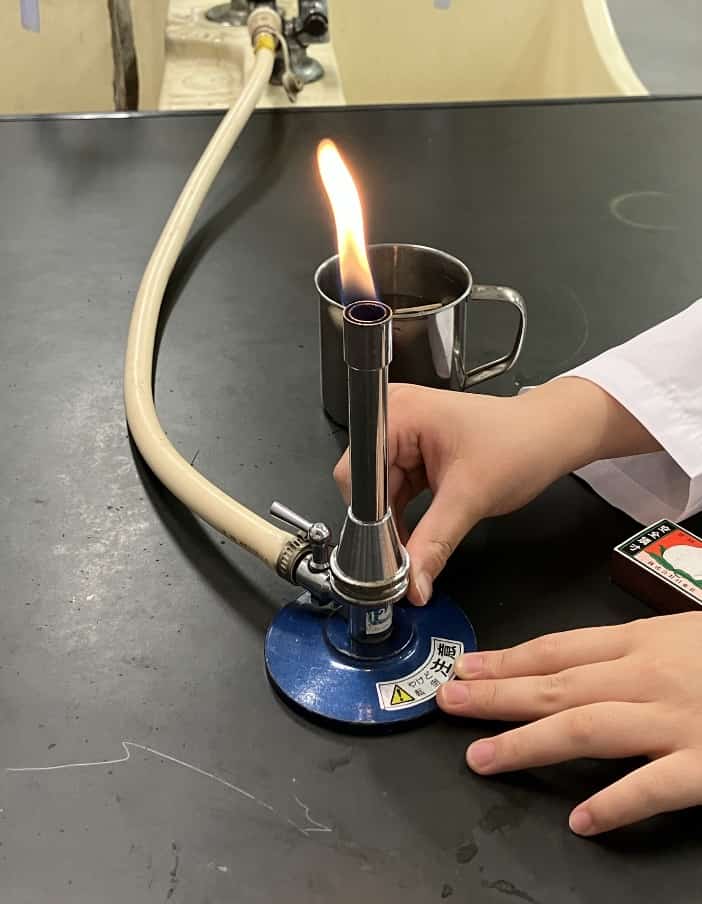
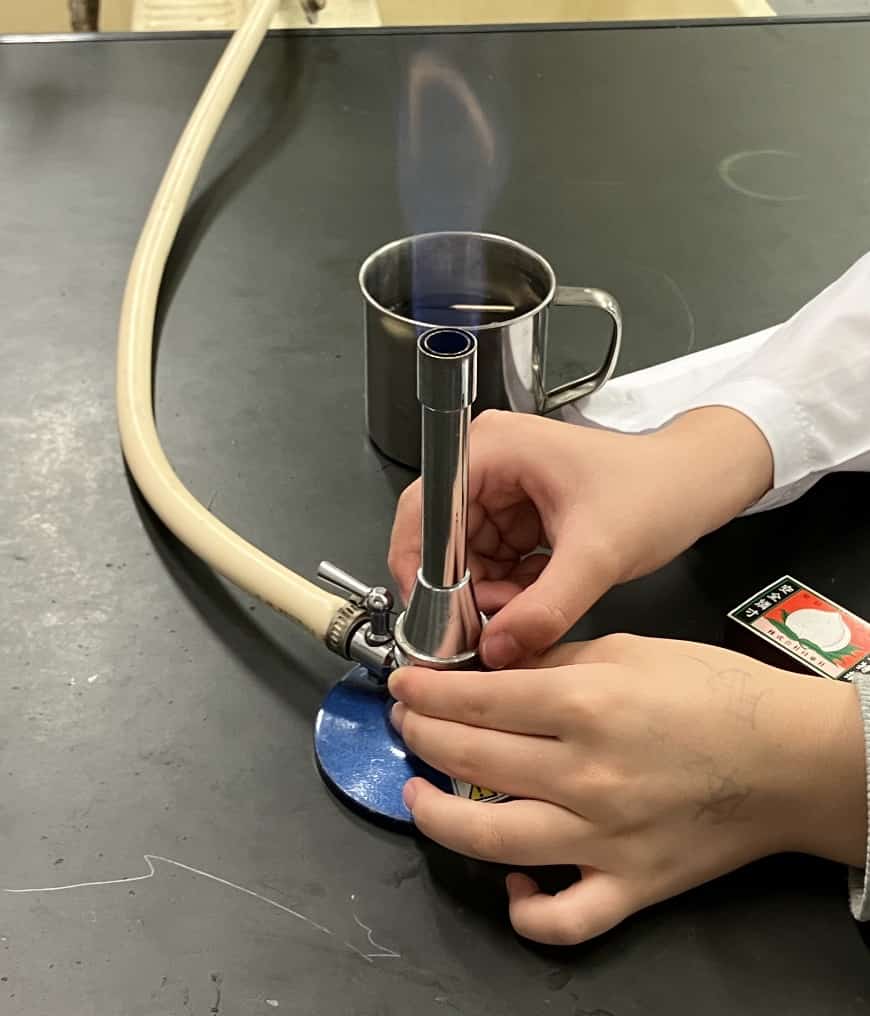
- Flame Makeover: From Orange to Blue! The flame is orange immediately after ignition. This is a state of “Incomplete Combustion”—it’s sooty and relatively low in temperature because of insufficient air (oxygen). For experiments, we need a clean, hotter, blue flame. While holding the [Gas Control Knob], slowly open the [Air Hole Control Collar]. The flame will change with a “whoosh” sound, transforming into a beautiful, stable [Blue] color. This is the proof of “Complete Combustion,” where sufficient oxygen is mixed with the gas.
The Shutdown Sequence
Once the experiment is complete, it’s time to safely extinguish the flame. The rule is the exact reverse of the ignition process: “Close the valves starting from the point closest to the flame.” Think of it as completely clearing the gas from the entire line.
- Close the [Air Hole Control Collar] (The flame turns back to orange)
- Close the [Gas Control Knob] (The flame goes out)
- Close the [Bench Valve/Stopcock]
- Close the [Main Valve]
Following this sequence prevents a dangerous phenomenon called “flashback,” where the flame travels back down the tube, and ensures no gas is left trapped in the pipes. Used correctly, the Bunsen burner is a safe and supreme partner that makes the world of science infinitely more exciting. Master these steps and witness various chemical changes with your own eyes!
| Video (Youtube) | Content | Worksheet (PDF) |
| How to Light and Extinguish a Bunsen Burner |
This summarizes how to light and extinguish a Bunsen burner. Nothing beats hands-on experience, but this video shows the actual process of lighting the burner. |

|
Contact and Requests
Bring the wonder and excitement of science closer to you! We provide easy-to-understand explanations of fun science experiments you can do at home, along with tips and tricks. Feel free to browse through our content! ・The content from Science Notebook is now available as a book. Details are here ・Find out more about the operator, Ken Kuwako, here ・For all requests (writing, lectures, science classes, TV supervision/appearances, etc.), click here ・Updates on new articles are posted on X!
![]() We stream experiment videos on the Science Topics Channel!
We stream experiment videos on the Science Topics Channel!
6月のイチオシ実験!
レモンやオレンジで風船を割ろう!インパクトが抜群のリモネン風船の実験
テレビ番組監修・イベント等のお知らせ
- 6月3日(水)20:30〜 「
バカリズムのちょっとバカりハカってみた!」(テレビ東京)を科学監修・出演します。テーマは「 そばの出前は何人前まで運べるのか、限界を測ってみた」です。 - 6月4日(木) 7:00〜 「THE突破ファイル」(日本テレビ)について科学監修しました。
- 6月14日(日) 千葉大学インスタレーション「探究」にて講師を務めます
- 6月26日(金) 公開研究会「脱作業化!デジタル化と段階的指導で実現する オームの法則の探究」
- 6月28日(日) ダビンチマスターズ@昭和女子
- 7月18日(土) 教員向け実験講習会「ナリカカサイエンスアカデミー」の講師をします。お会いしましょう。
書籍のお知らせ
- 『大人のための高校物理復習帳』(講談社)…一般向けに日常の物理について公式を元に紐解きました。特設サイトでは実験を多数紹介しています。※増刷がかかり6刷となりました(2026/02/01)

- 『きめる!共通テスト 物理基礎 改訂版』(学研)… 高校物理の参考書です。イラストを多くしてイメージが持てるように描きました。授業についていけない、物理が苦手、そんな生徒におすすめです。特設サイトはこちら。

各種SNS(更新情報をお届け!)
X(Twitter)/instagram/Facebook(日本語)
Explore
- 楽しい実験…お子さんと一緒に夢中になれるイチオシの科学実験を多数紹介しています。また、高校物理の理解を深めるための動画教材も用意しました。
- 理科の教材… 理科教師をバックアップ!授業の質を高め、準備を効率化するための選りすぐりの教材を紹介しています。
- Youtube…科学実験等の動画を配信しています。
- 科学ラジオ …科学トピックをほぼ毎日配信中!AI技術を駆使して作成した「耳で楽しむ科学」をお届けします。
- 講演 …全国各地で実験講習会・サイエンスショー等を行っています。
- About …「科学のネタ帳」のコンセプトや、運営者である桑子研のプロフィール・想いをまとめています。
- お問い合わせ …実験教室のご依頼、執筆・講演の相談、科学監修等はこちらのフォームからお寄せください。