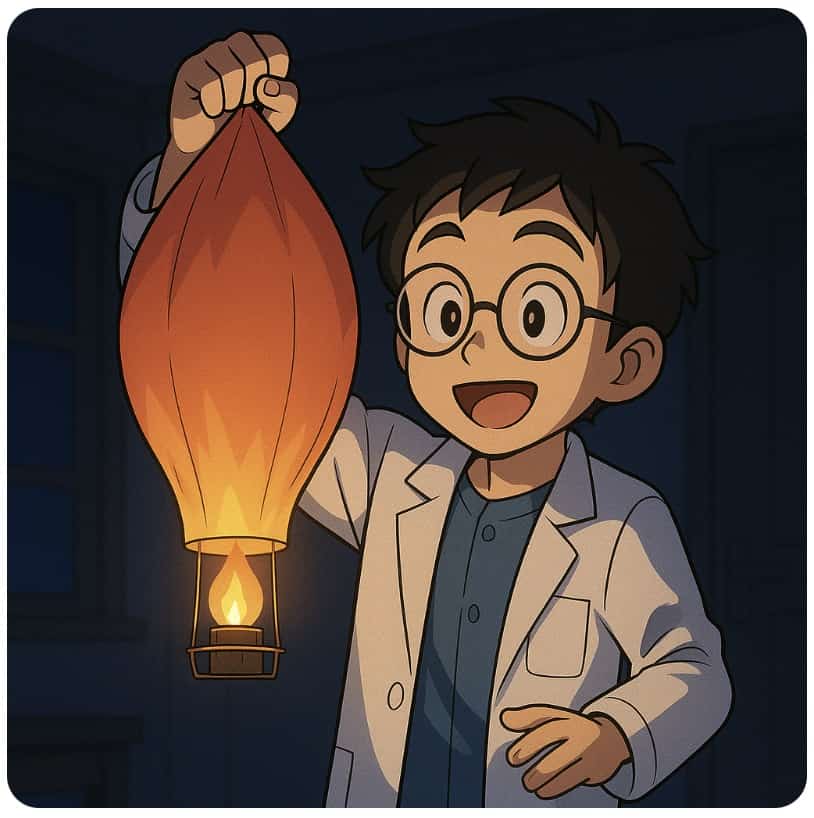
A Hot Air Balloon You Can Fly at Home! Build a Mini Hot Air Balloon in Just 15 Minutes – A Simple Experiment to Experience Buoyancy
I’m Ken Kuwako, your science trainer. Every day is an experiment!
【Listen to this article on the radio!】
Have you ever dreamed of drifting through the endless blue sky in a giant hot air balloon? There is something truly magical about the moment a massive balloon gently lifts off the ground. I remember a trip to Hokkaido where I stumbled upon a breathtaking scene: dozens of colorful balloons rising into the air all at once. That view, straight out of a picture book, is still vividly etched in my mind.
I wanted to share that sense of wonder with my students! So, in my science class, we decided to give shape to that “dream of flying.” While building a full-sized balloon is a bit much, we tackled something much more accessible: a mini hot air balloon you can make right at home.
Behind every soaring balloon lies a fundamental scientific principle often found in high school physics and university thermodynamics: buoyancy. Rather than just memorizing formulas from a textbook, we decided to get hands-on. By launching our own balloons, we could actually “feel” the invisible force at work.
You might think, “Launching a balloon sounds complicated!” But don’t worry—it’s surprisingly simple. With just a few everyday materials and a bit of care, anyone can experience the thrill of flight in their own living room (provided it’s a safe, draft-free space).
Based on the videos we used as a reference, I’ll guide you through the process of building and launching your own mini balloon from a professional perspective. First, take a look at this video of a successful launch!
The materials for this experiment can be found at any hardware store, supermarket, or pharmacy. Since we’ll be working with fire, please make sure to have an adult present and prioritize safety above all else.
What You’ll Need:
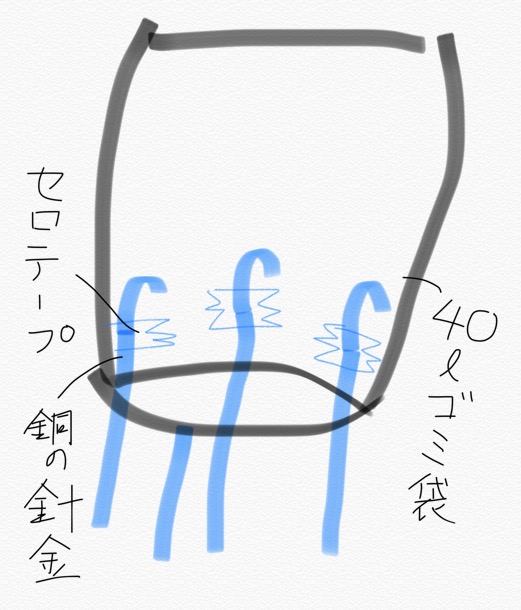
- 40-liter Trash Bag (thin, clear or translucent): This serves as the balloon’s envelope. Look for something lightweight and reasonably heat-resistant.
- Clear Tape: To secure the parts.
- Enamel Wire (4 x 40cm pieces): This forms the frame to hang the gondola. It’s heat-resistant and easy to shape.
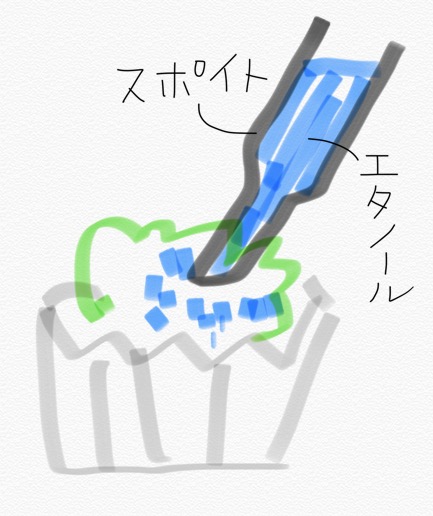
- Dropper: To measure and soak the cotton with ethanol.
- Ethanol: This is your fuel. Standard rubbing alcohol from a pharmacy works fine. Be extremely careful, as it is highly flammable.
- Long-reach Lighter: For safely igniting the fuel.
- Cotton Balls: These act as the “wick” to hold the fuel.
- Aluminum Foil (25cm x 25cm): To create the gondola (the combustion tray).
- Wire Cutters: To cut the enamel wire.
- Toothpick (or a thin skewer): To poke holes in the foil.

Amazon Ethanol
Rakuten Anhydrous Ethanol IP (400mL) Kenei Pharmaceutical
Step-by-Step: 4 Steps to Bring Your Flying Dream to Life
Let’s get building! Follow these steps carefully, and you’ll have a beautiful balloon ready for takeoff.
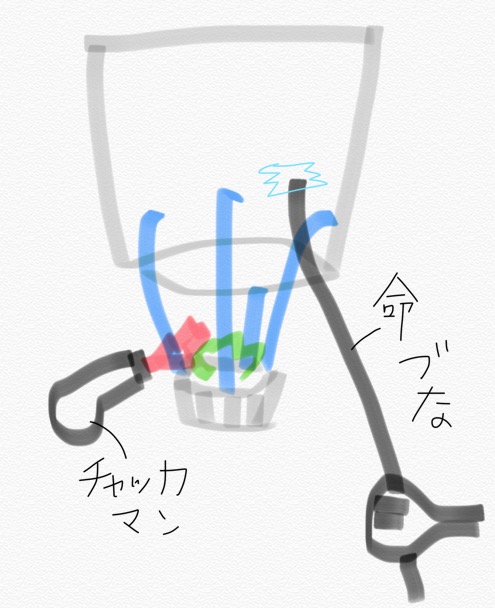
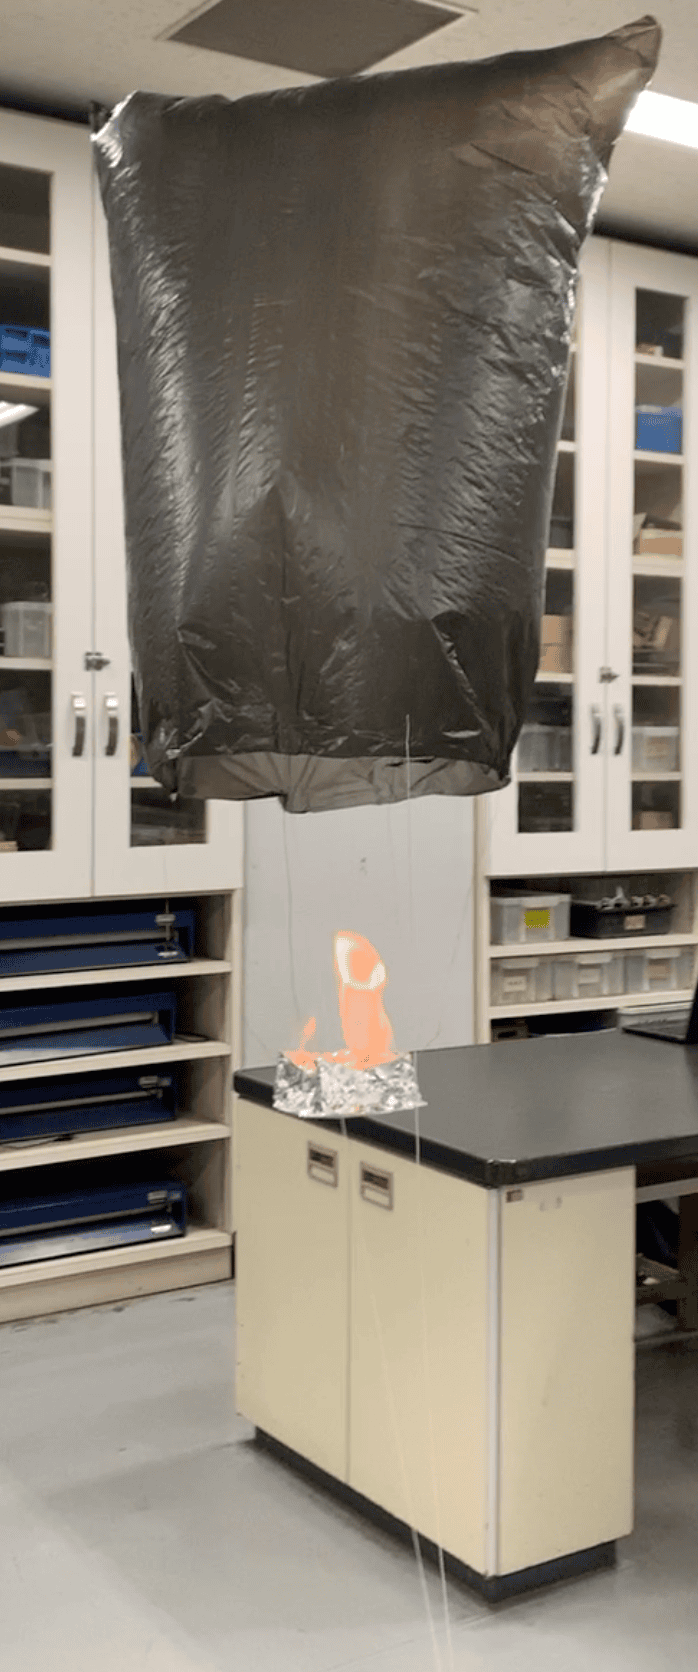
Build the Gondola (Combustion Tray) Using your 25cm x 25cm square of foil, fold it into a small box-like shape. This will be the “hearth”—the heart of your hot air balloon.
Attach the Enamel Wires to the Gondola Poke small holes in the four corners of your foil gondola using a toothpick. Thread one 40cm wire through each hole and twist them at the bottom to secure them. Important Safety Tip: Never use tape here! The heat from the flame will melt the tape, causing the tray to fall.
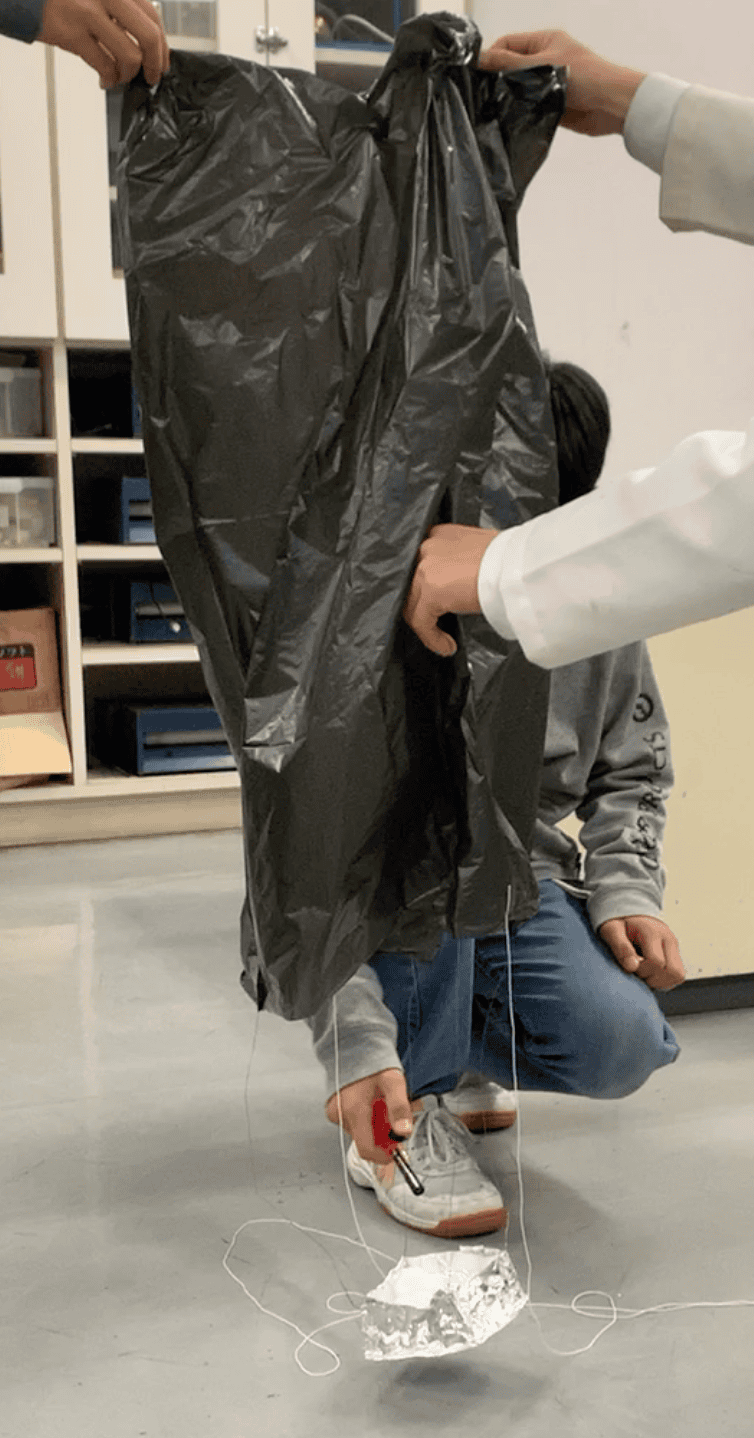
Attach the Wires to the Trash Bag Tape the other end of each wire to the four corners of the trash bag opening. Adjust the wire lengths so that the gondola hangs level directly beneath the center of the bag.
Fuel Up and Prepare for Launch! Place the cotton balls in the gondola and use the dropper to soak them with ethanol (we used about 8mL total). Before you ignite, ensure you have a wet rag nearby for emergencies and confirm there are no drafts from air conditioners or windows.
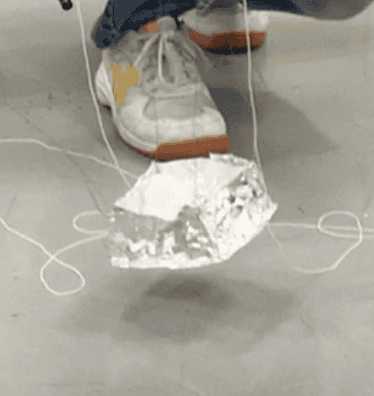
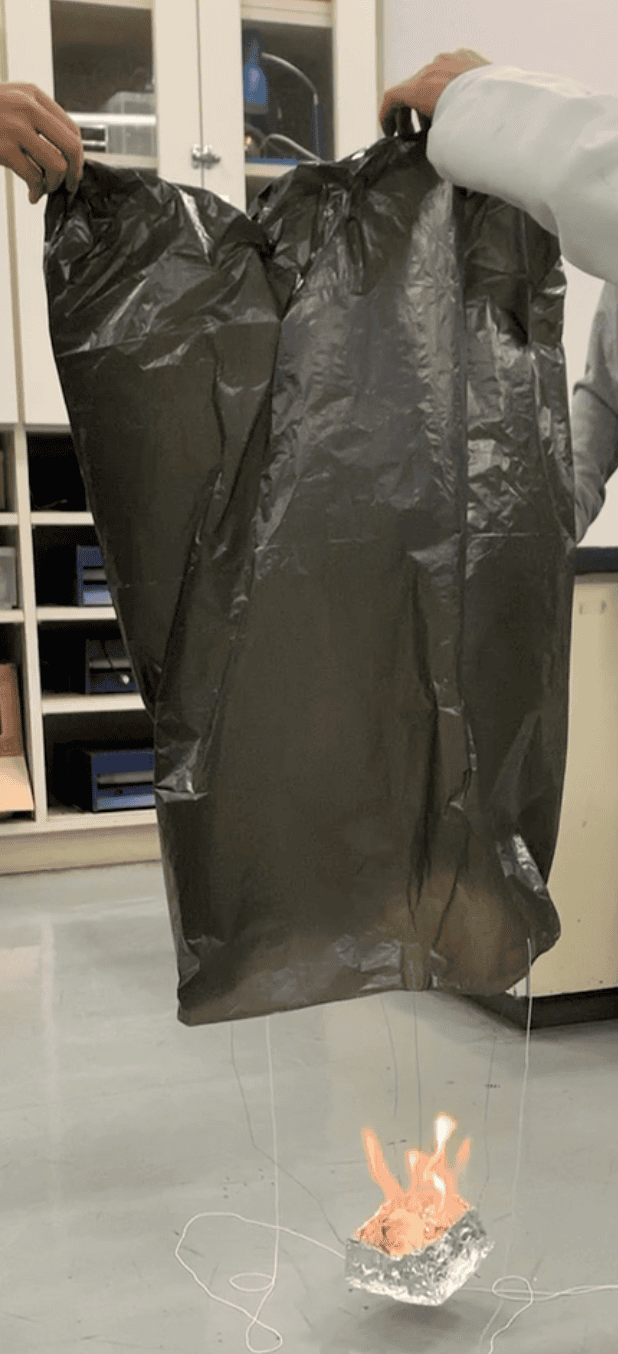
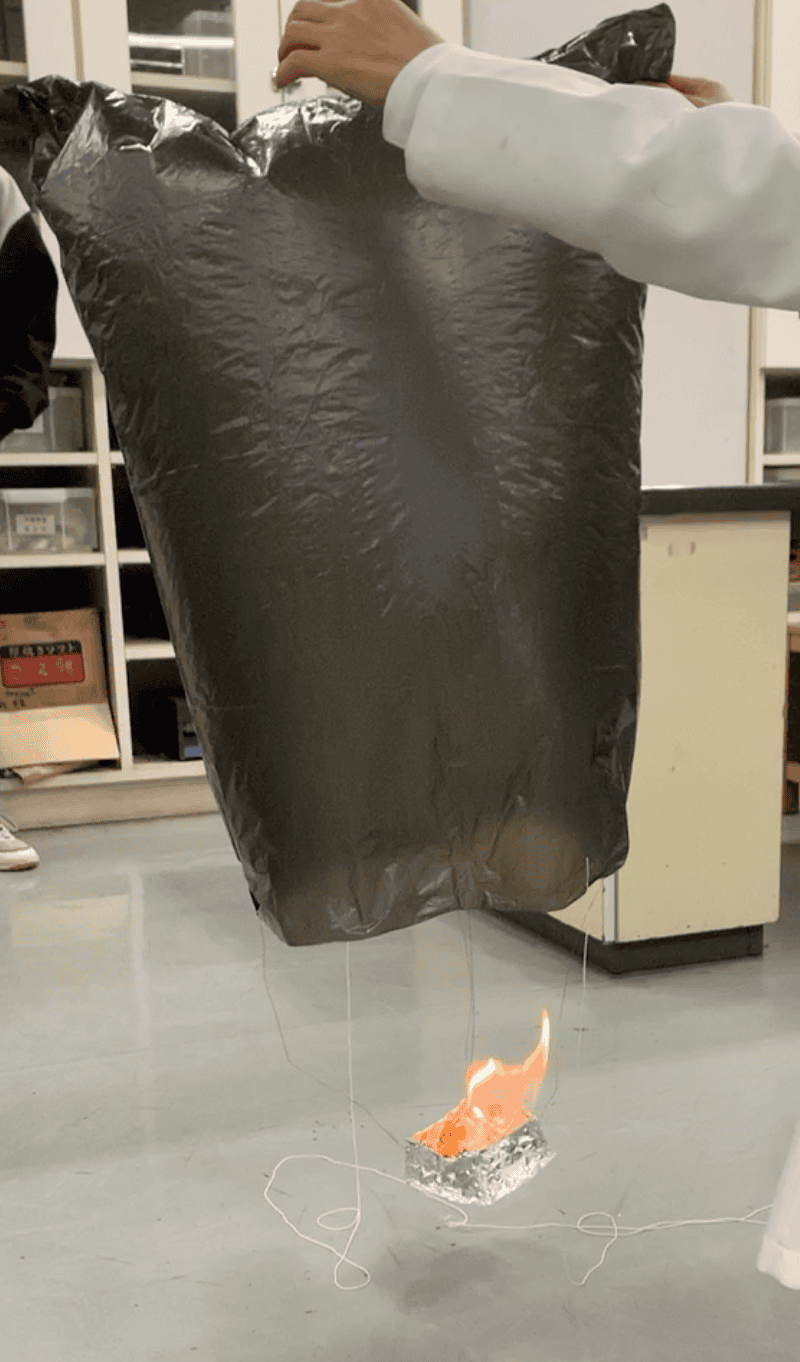
With two people, hold the bag open so the plastic doesn’t touch the flame, then light the fuel. As the air heats up and the bag inflates, you’ll start to feel the “upward tug” in your hands!
When you feel like it’s ready to soar, gently let go.
Be sure to attach a “tether” (a thin string) so your mini balloon doesn’t drift away. If anything seems unsafe, pull the tether to retrieve it immediately and extinguish the flame with the wet rag. Science is only fun when it’s safe!
Seeing a balloon float weightlessly brings a cheer from kids and adults alike. This is buoyancy in action: heated air molecules move faster, making the air inside the bag less dense and lighter than the cool air outside. It’s a powerful feeling to control the invisible forces of nature with your own hands. I hope you enjoy this magical experience at home!
When you feel it’s ready to fly, let go of the opening.
Watch how gracefully the balloon rises as the bag fills with hot air.
Contact & Inquiries
Making the wonders of science more accessible! I share fun home experiments and clear tips on how to master them. Feel free to explore more! ・About Ken Kuwako: Click here ・For requests (writing, lectures, workshops, TV supervision, etc.): Click here ・Get updates on X (formerly Twitter)! Follow for the latest news.
Inquiries & Requests
Making the wonders of science more accessible! I’ve put together fun home experiments and easy-to-understand tips. Take a look around! ・My science “Idea Book” is now available in print! Details here ・About the creator, Ken Kuwako: Here ・For work requests (writing, speaking, workshops, TV): Here ・Latest updates on X!
![]() Check out experiment videos on our Science Lab Channel!
Check out experiment videos on our Science Lab Channel!
NEW 分解問題集 理科
- 7月21日発売!『高校入試 分解問題集 理科』(学研)…難しい問題も小さな問題に分解することで、問題を解くことができます。そんな分解の技術が身につくように深く関わりを持って作りました。
7月のイチオシ実験!
夏でプシュッと爽やか実験!

テレビ番組監修・イベント等のお知らせ
- 7月18日(土)「TIF presents ONE SONG FES. 」(フジテレビ)
- 7月18日(土) 教員向け実験講習会「ナリカカサイエンスアカデミー」
- 7月23日(木)科学監修 19:00〜 THE突破ファイル(日本テレビ)
- 7月30日(水) 監修したテレビ番組放送予定
- 12月26日(土) ナリカサイエンスアカデミー(教員向け実験講習会)開催
書籍のお知らせ
- 『大人のための高校物理復習帳』(講談社)…一般向けに日常の物理について公式を元に紐解きました。特設サイトでは実験を多数紹介しています。※増刷がかかり6刷となりました(2026/02/01)

- 『きめる!共通テスト 物理基礎 改訂版』(学研)… 高校物理の参考書です。イラストを多くしてイメージが持てるように描きました。授業についていけない、物理が苦手、そんな生徒におすすめです。特設サイトはこちら。

各種SNS(更新情報をお届け!)
【日本語】X(Twitter)/instagram/Facebook 【英語】BlueSky/Threads
Explore
- 楽しい実験…お子さんと一緒に夢中になれるイチオシの科学実験を多数紹介しています。また、高校物理の理解を深めるための動画教材も用意しました。
- 理科の教材… 理科教師をバックアップ!授業の質を高め、準備を効率化するための選りすぐりの教材を紹介しています。
- Youtube…科学実験等の動画を配信しています。
- 科学ラジオ …科学トピックをほぼ毎日配信中!AI技術を駆使して作成した「耳で楽しむ科学」をお届けします。
- 講演 …全国各地で実験講習会・サイエンスショー等を行っています。
- About …「科学のネタ帳」のコンセプトや、運営者である桑子研のプロフィール・想いをまとめています。
- お問い合わせ …実験教室のご依頼、執筆・講演の相談、科学監修等はこちらのフォームからお寄せください。