The Science Behind Glass Tears! Experience the Shocking Secret of the ‘Dutch Tear’
I’m Ken Kuwako, a science trainer, and for me, every day’s an experiment!
Today, I want to share a beautiful and bizarre experiment called Prince Rupert’s Drop that I did with my science club students. It’s truly fascinating how we can take a common material like glass and see it behave in ways that defy our imagination. Watching the molten glass fall into the water is like witnessing a work of art. But behind that beauty lies a dramatic story of phase changes and hidden internal stresses.
The Impact and Beauty of Prince Rupert’s Drop: Unlocking the Mysteries of Glass
When you heat a glass rod and drop it into water, it forms a teardrop-shaped piece of glass. This is what’s known as a Prince Rupert’s Drop. The magic of this experiment lies in the beauty of its formation and the unpredictable destruction that follows.
What are Prince Rupert’s Drops? The Science of Glass
Prince Rupert’s Drops are made by dropping molten glass into cold water. This process creates a glass structure with a very unique internal composition.
The mechanism is similar to a phenomenon known as “chilled marbles.” When the molten glass hits the water, the outer layer cools and solidifies rapidly. As the glass transitions from a liquid to a solid, its volume slightly decreases. Since the surface hardens first, the still-molten glass on the inside gets squeezed by the shrinking outer layer.
Then, as the inner glass slowly cools and solidifies, it’s subjected to intense tensile stress from being stretched by the already hardened outer shell. As a result, the surface of the Prince Rupert’s Drop is under strong compressive stress, while the inside is under strong tensile stress. This unique balance of forces is the key to Prince Rupert’s Drop.
Because of this internal stress, the bulb of the drop becomes incredibly tough. You can even hit it with a hammer, and it won’t break! But here’s the amazing part: if you use a pair of pliers to nick or break off just the very end of the “tail” of the glass teardrop, the entire thing will shatter into a fine powder in an instant. This is because the tiny fracture at the tip of the tail releases the immense internal tensile stress, causing a rapid chain reaction of destruction throughout the entire drop.
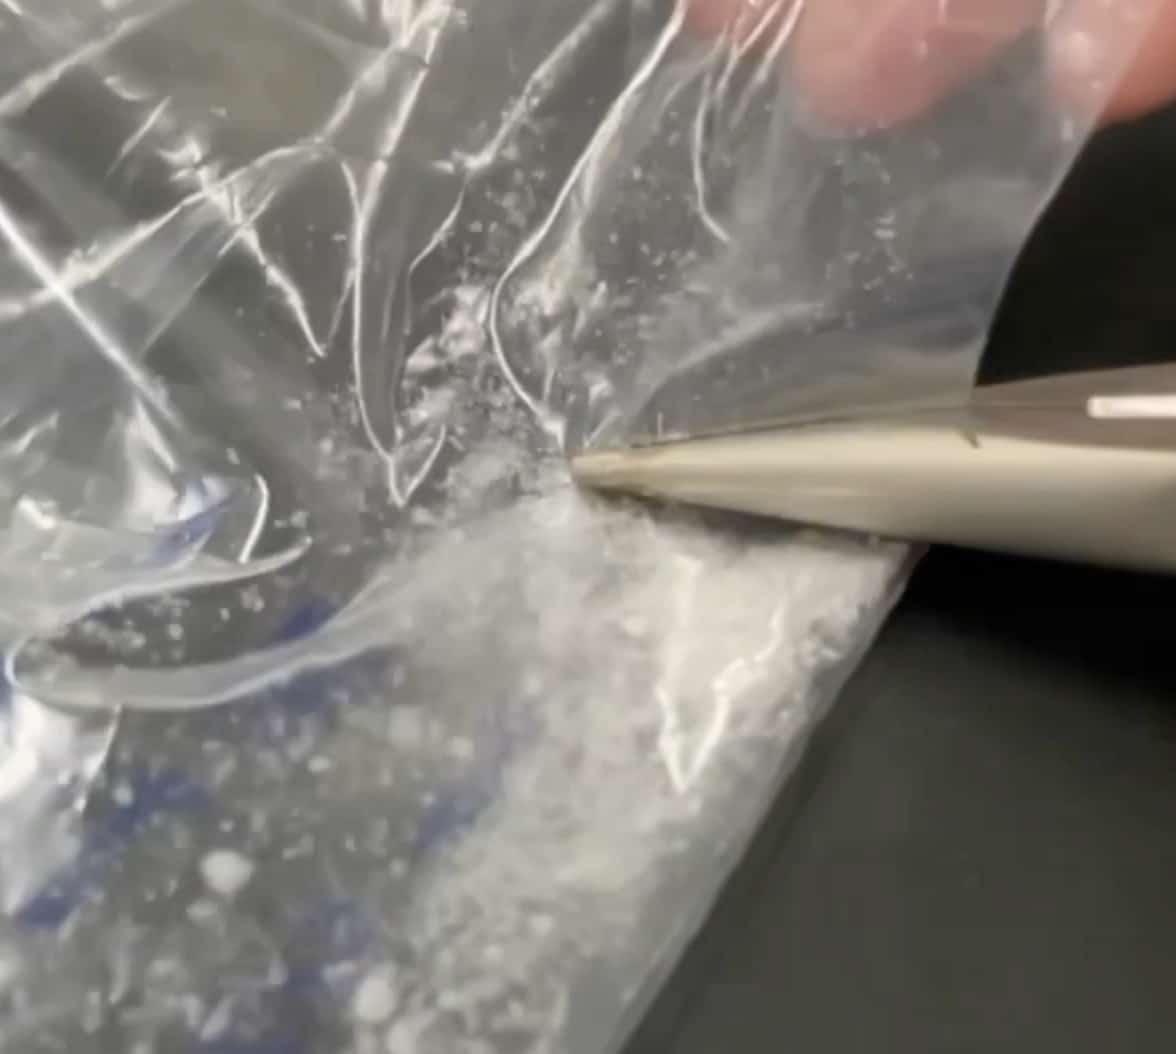
Make sure you wear safety glasses and put the drop in a plastic bag before you try it! Just use a pair of pliers to snap off the tip through the bag, and the entire thing will break apart at once.

Here are the websites I used for reference:
Can’t break it with a hammer?! Making an amazing piece of glass
October 30, 2020 – Tsukuba University of Technology, School of Industrial Technology
The Experiment: Our Science Club in Action!
Our science club decided to take on this incredible experiment!
What you’ll need
- Glass rod: A standard lab glass rod works perfectly.
- Torch burner (or gas burner): You’ll need high heat to melt the glass.
- Heat-resistant beaker or metal container: To hold the cold water where the glass drop will land.
- Cold water: Fill the beaker with plenty of it.
- Pliers: For breaking the tail of the drop you create.
- Safety glasses: You must wear these! Glass fragments can fly everywhere.
- Heat-resistant gloves: For safely holding the glass rod.
- Workstation: Make sure you have a stable surface.
The Procedure
- Prep the water:
- Fill a heat-resistant beaker or metal container with plenty of cold water.
- Heat the glass rod:
- Put on your safety glasses and heat-resistant gloves.
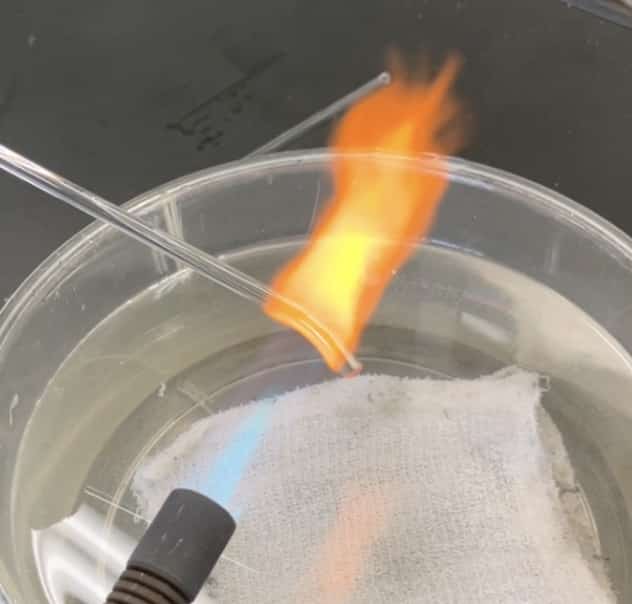
- Heat the tip of the glass rod with the torch burner flame. You’ll see the glass turn red and then start to melt and get soft. Keep heating until the glass forms a nice, round drop.
- Have your students watch from a safe distance and be very careful not to get burned!
- Drop it in the water:
- Once the glass has melted and a drop has formed, slowly lower the hot tip of the glass rod into the cold water, allowing the melted glass to fall off naturally like a “teardrop.” Don’t try to shake it off.
- The moment the glass hits the water, it’ll cool instantly and solidify into its teardrop shape.
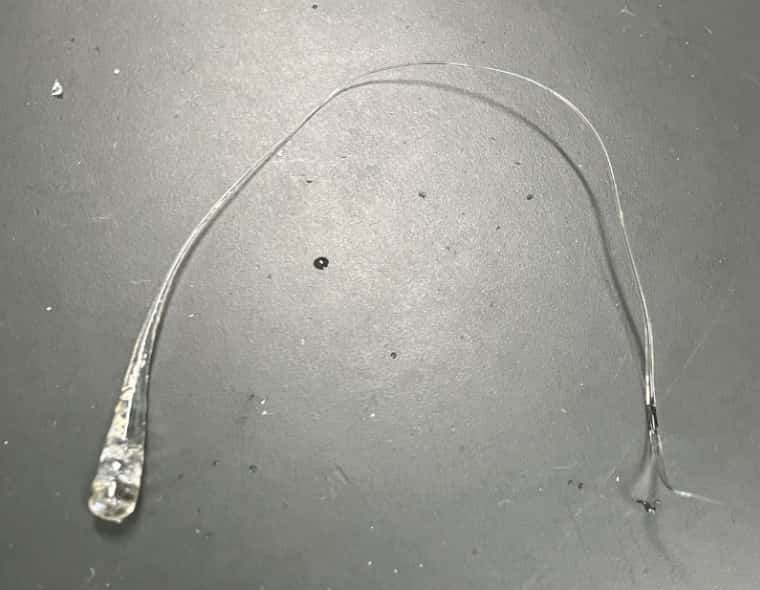
- Examine your drop:
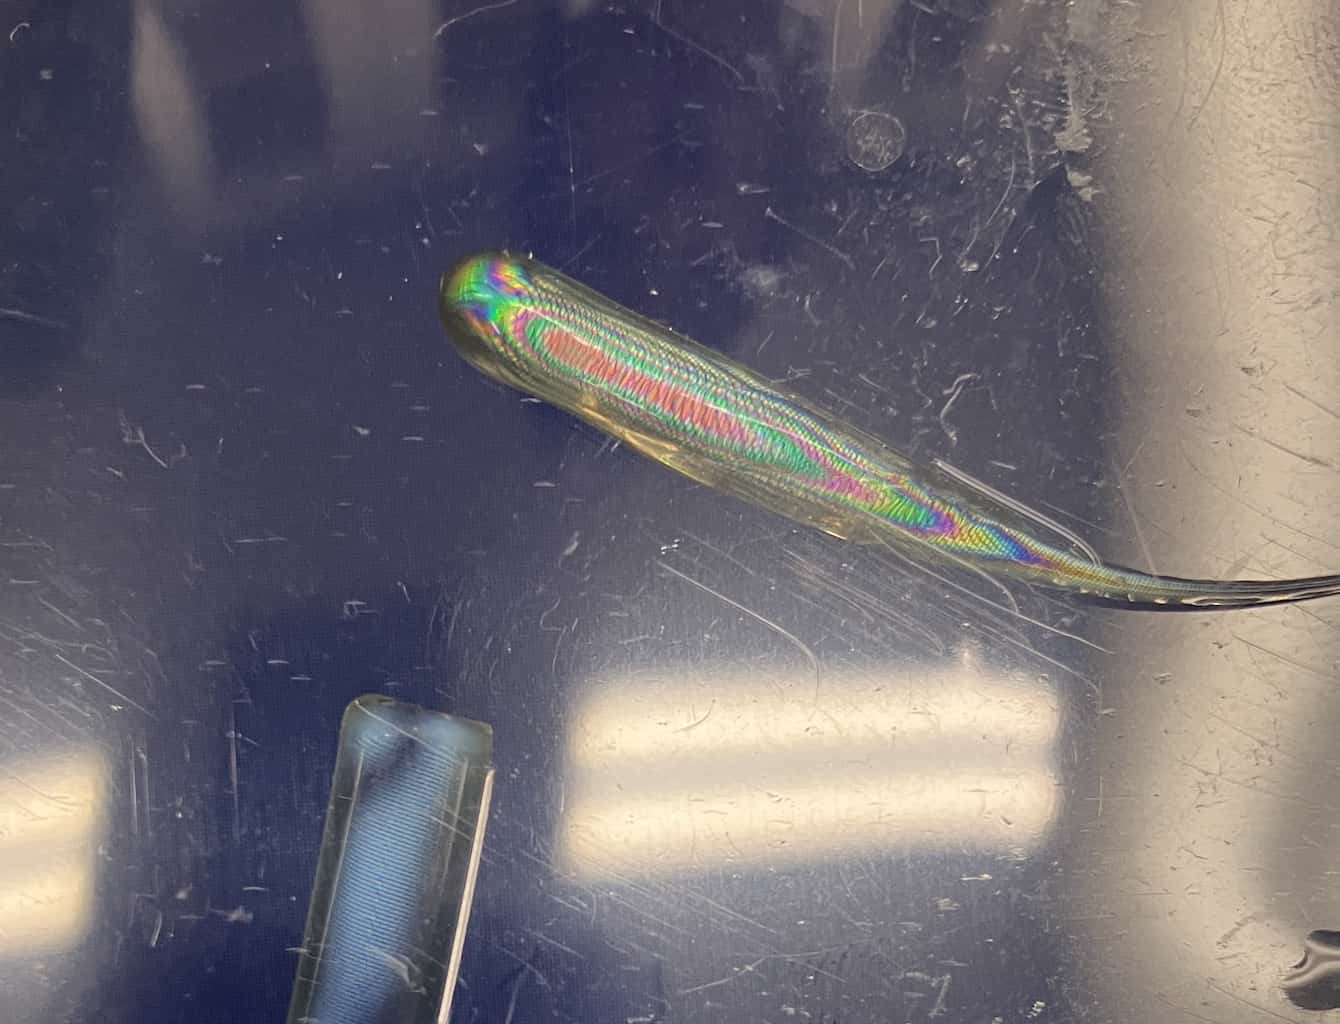
- Carefully take the Prince Rupert’s Drop out of the water and admire its unique shape and clarity. If you look at it through a polarizing filter, you’ll see amazing colors, which are evidence of the internal stress.
- Carefully take the Prince Rupert’s Drop out of the water and admire its unique shape and clarity. If you look at it through a polarizing filter, you’ll see amazing colors, which are evidence of the internal stress.
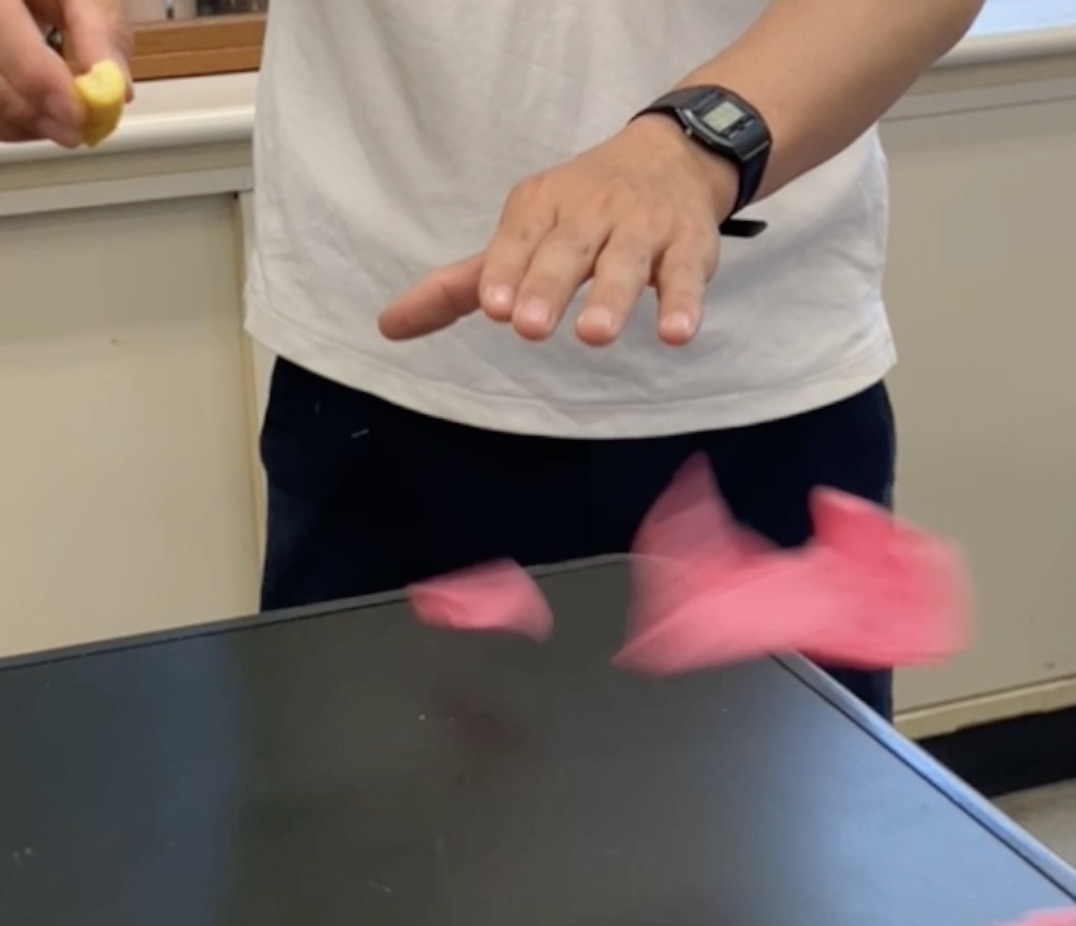
- The shocking moment! The destruction experiment:
- Make sure you are wearing your safety glasses and are in a safe area.
- Use pliers to grip and break the very tip of the “tail” of your drop.
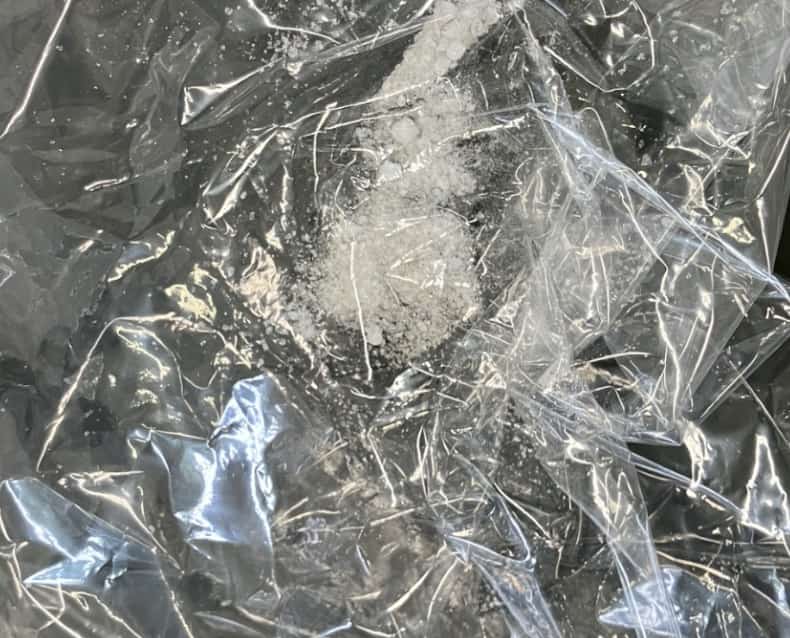
- You’ll hear a “CRACK!” as the entire drop instantly shatters into dust. This dramatic destruction will surely get a reaction from your students!
- Since fragments can fly, be aware of your surroundings and make sure you’re in a place where it’s safe for them to scatter, or even better, perform the experiment inside a clear container.
What Can We Learn from This Experiment?
The Prince Rupert’s Drop experiment isn’t just cool to watch; it’s a great opportunity to learn about some important scientific principles:
- States of Matter: Observe glass change from a solid to a liquid and then back to a solid.
- Thermal Expansion and Contraction: Learn how the shrinking volume of a material as it cools creates the unique internal stress structure of the drop.
- Internal Stress and Fracture: Visually understand how accumulated internal stress can be released by an external force, leading to a spectacular fracture. This is a fundamental concept in material science.
- The Connection between a Material’s Properties and Its Structure: Realize that even the same material, glass, can have completely different physical properties (strength and brittleness) depending on how it’s processed.
Contact and Requests
Interested in the wonders of science? I’m sharing fun, easy-to-do science experiments you can try at home, along with tips and tricks! Feel free to explore more on my site.
About the author, Ken Kuwako: Click here
For requests (writing, lectures, workshops, TV supervision, etc.): Click here
– I post updates on X!
![]() My science channel has more experiment videos!
My science channel has more experiment videos!
6月のイチオシ実験!
レモンやオレンジで風船を割ろう!インパクトが抜群のリモネン風船の実験
テレビ番組監修・イベント等のお知らせ
- 6月26日(金) 公開研究会「脱作業化!デジタル化と段階的指導で実現する オームの法則の探究」
- 6月28日(日) ダビンチマスターズ@昭和女子
- 6月30日(火) 6/30 23:56〜 【科学監修・出演】「地球まるごと大実験ネイチャーティーチャー」(TBS)
- 7月18日(土) 教員向け実験講習会「ナリカカサイエンスアカデミー」の講師をします。お会いしましょう。
- 12月26日(土) ナリカサイエンスアカデミー(教員向け実験講習会)開催
書籍のお知らせ
- 7月16日発売 『高校入試 分解問題集 理科』(学研)…難しい問題も小さな問題に分解することで、問題を解くことができます。そんな分解の技術が身につくように深く関わりを持って作りました。
- 『大人のための高校物理復習帳』(講談社)…一般向けに日常の物理について公式を元に紐解きました。特設サイトでは実験を多数紹介しています。※増刷がかかり6刷となりました(2026/02/01)

- 『きめる!共通テスト 物理基礎 改訂版』(学研)… 高校物理の参考書です。イラストを多くしてイメージが持てるように描きました。授業についていけない、物理が苦手、そんな生徒におすすめです。特設サイトはこちら。

各種SNS(更新情報をお届け!)
【日本語】X(Twitter)/instagram/Facebook 【英語】BlueSky/Threads
Explore
- 楽しい実験…お子さんと一緒に夢中になれるイチオシの科学実験を多数紹介しています。また、高校物理の理解を深めるための動画教材も用意しました。
- 理科の教材… 理科教師をバックアップ!授業の質を高め、準備を効率化するための選りすぐりの教材を紹介しています。
- Youtube…科学実験等の動画を配信しています。
- 科学ラジオ …科学トピックをほぼ毎日配信中!AI技術を駆使して作成した「耳で楽しむ科学」をお届けします。
- 講演 …全国各地で実験講習会・サイエンスショー等を行っています。
- About …「科学のネタ帳」のコンセプトや、運営者である桑子研のプロフィール・想いをまとめています。
- お問い合わせ …実験教室のご依頼、執筆・講演の相談、科学監修等はこちらのフォームからお寄せください。