This article is also available as a podcast!
Watch the video explanation with slides.
A watter rocket ( a small plastic bottle rocket ) is a perfect hands-on project for summer vacation science experiments—and one I highly recommend trying at least once. You can discover all sorts of fascinating things, like how changing the amount of water affects the flight distance, or how a little cloud forms inside the rocket after launch. These rockets are also known as “water rockets” and work by shooting water out the back, making them an eco-friendly and safe way to explore rocketry. You can often find them sold as kits (for example, on Amazon or Rakuten—I own one myself). But today, I’ll show you how to make your very own plastic bottle rocket from scratch, no kit required!
Compact, inexpensive, easy to make—and packed with power! This 500ml plastic bottle rocket was designed for elementary, middle, and high school students. It’s completely safe, yet capable of flying impressive distances. You’re guaranteed to be amazed—experience the thrill of science in action!
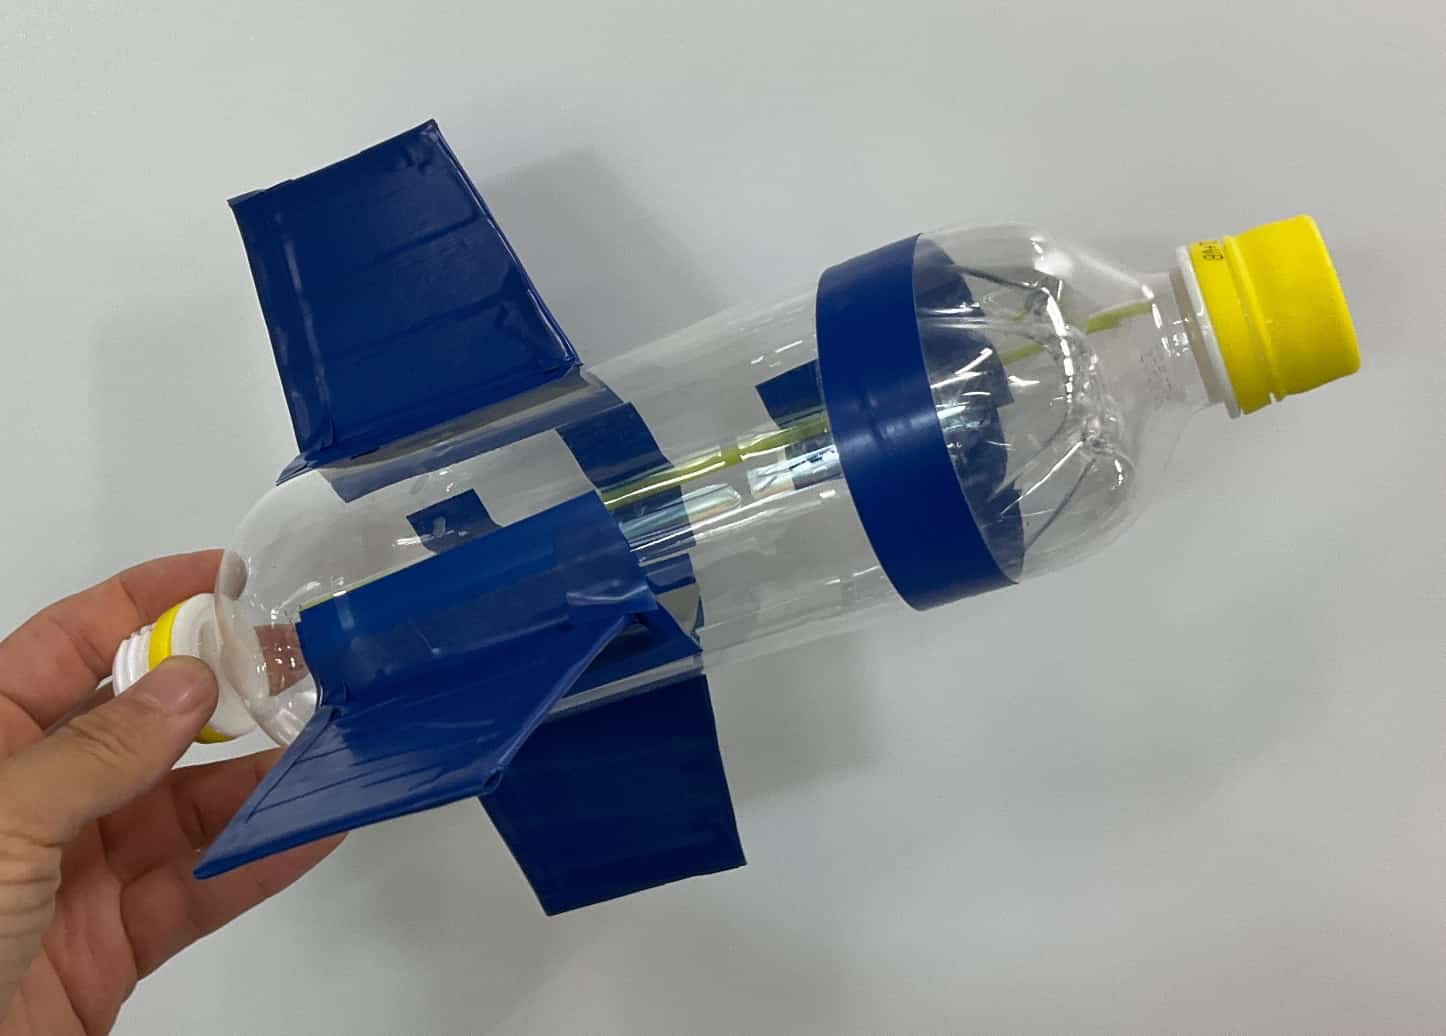
This small rocket is made using two 500ml plastic bottles. Thanks to its compact size, it’s easy to carry and store once it’s built. Compared to the larger 1.5-liter version, it’s lighter and more manageable, making it perfect for younger builders.
You might be thinking, “But if it’s small, won’t it fly less?” Surprisingly, it soars farther than you’d expect! With a good launch, it can fly over 20 meters—and sometimes even more than 30 meters! In my classes, I see students every year who manage to beat the 30-meter mark. At these distances, you get to enjoy all the fun of both building and launching, without the hassle of transporting a large rocket. It’s an ideal range for flying in a park or schoolyard.
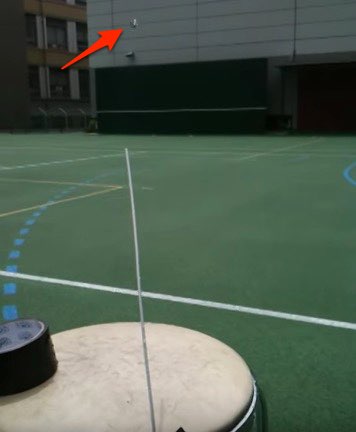
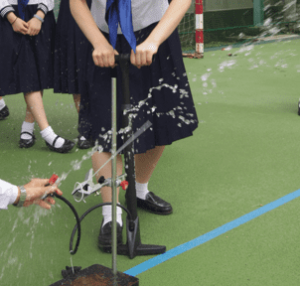
I’ve even included a video showing the rocket in action—check it out!

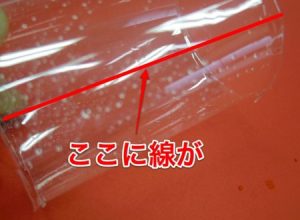
See that red arrow? That’s where the rocket is!
Before we get started, here’s something to note: the larger 1.5L plastic bottle rocket kit (shown below) can easily fly over 30 meters if launched well. But it’s bulky, tricky to carry home, and needs a big open space to be safe—so it’s not exactly convenient for everyday fun. That’s why I recommend the compact version.
A plastic bottle rocket isn’t just fun—it’s a fantastic science learning tool! You can explore concepts like conservation of momentum, Newton’s third law, adiabatic changes, and even cloud formation. Kids, teens, and adults alike can enjoy it while deepening their love for science (I’ve included a full explanation later in this post).
So—let’s get building!
Science Recipe: What You’ll Need
Rocket Body
Two 500ml plastic bottles (if making paper fins, you only need one bottle – details here)
One bottle becomes the water tank for propulsion.
The other becomes the fins.
For the tank, only use bottles made for carbonated drinks—they’re stronger and can handle pressure.
Tools & Materials: Vinyl tape, straws, cutter, scissors, double-sided tape, awl, board, pliers, size #6 or #7 rubber stopper (#6 is ideal),
-
Needle nozzle for an air pump (make sure it fits your pump)
-
Safety goggles
Launch Pad (One per class/group is enough)
-
Wire hanger, air pump (preferably with a pressure gauge), chair
Step 1: Cutting the Head & Fins
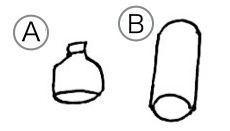
The whole build takes about 50 minutes. First, cut the bottle along the dotted lines in the diagram to make the head cone (A) and the fin cylinder (B).
For safety:
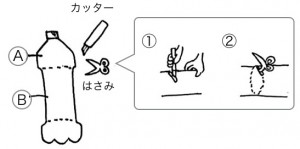
-
Hold the bottle with one hand, place the cutter blade vertically, and carefully press down to make a small starter hole.
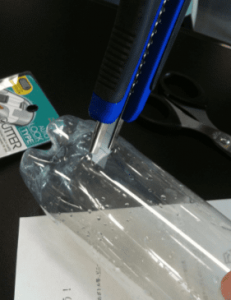
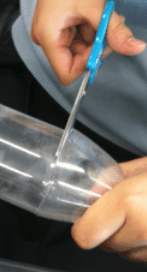
-
Insert the scissors into the hole and cut around in a circle.
With this method, even elementary school students can help—just make sure a parent or teacher supervises the cutter step.
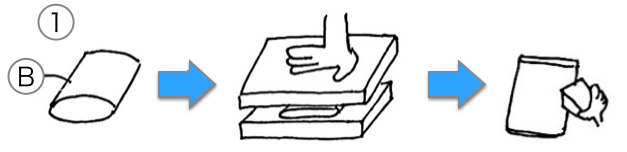
Step 2: Making the Fins
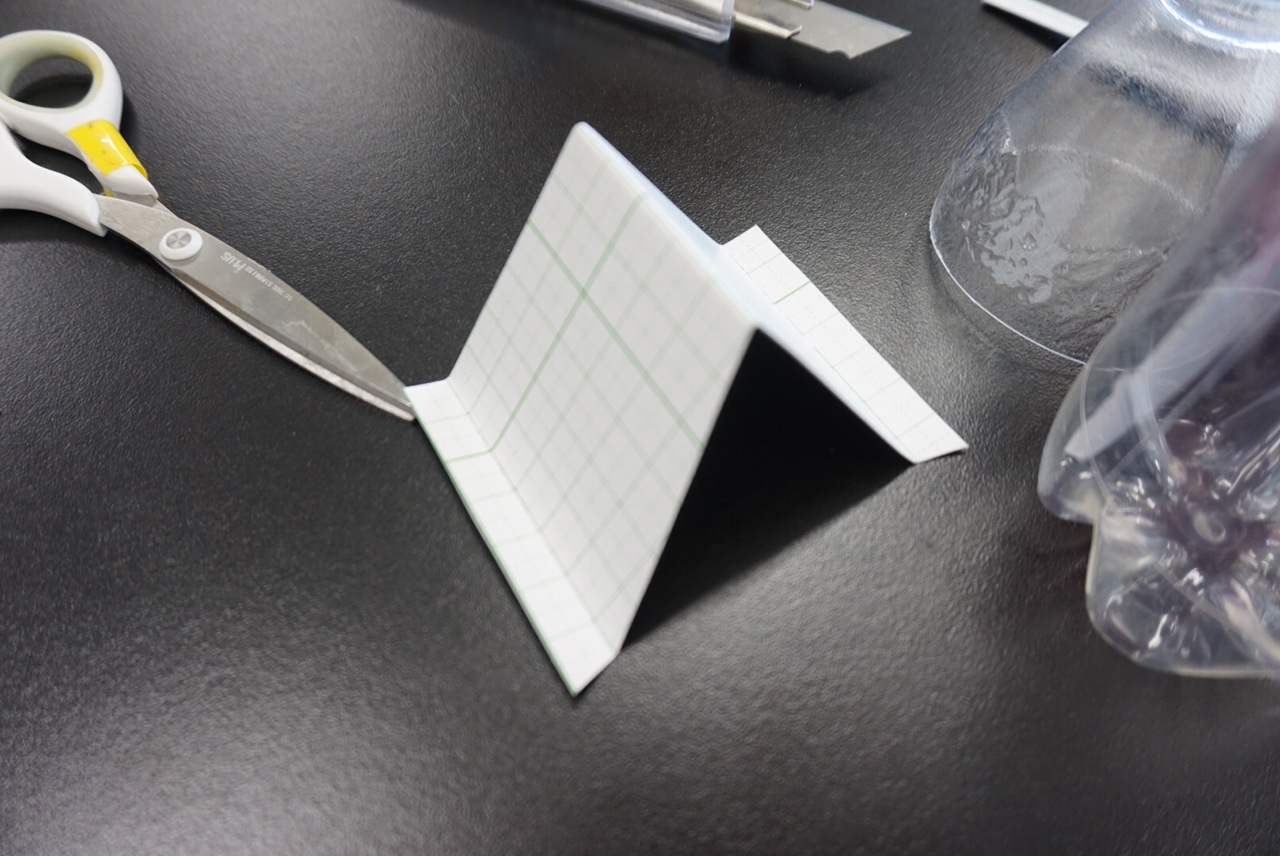
If you look closely at the cylindrical piece of plastic labeled “B,” you’ll see two faint lines running along it.
First, fold along these lines with your hands to make a crease. Can you see them? They’re faint, but in the real piece they’re obvious—so check your actual plastic part. After that, place the piece between two boards and press down firmly with your body weight.
Once flattened, remove the plastic sheet and press the sides even more thoroughly. This takes some strength, so younger kids should ask an adult for help. You can press it down using a wooden block or similar tool.

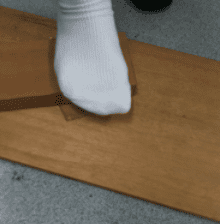
You can also step on it to flatten it.
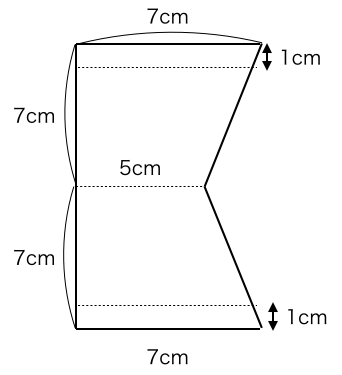
Next, place a ruler on the piece and cut it at the 10 cm mark from the top (Step 2).
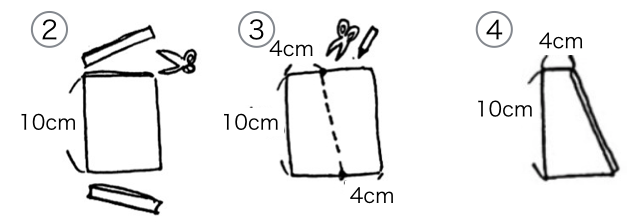
Then, measure and mark two points with a permanent marker—4 cm from the upper left and 4 cm from the lower right. Use a ruler to draw a diagonal line between these points (Step 3). Cut along this line with scissors (Step 4). Finally, open the fin, and at the folded edge, make a 1 cm cut from the bottom (Step 5). Fold this small tab back to create a gluing edge (Step 6).
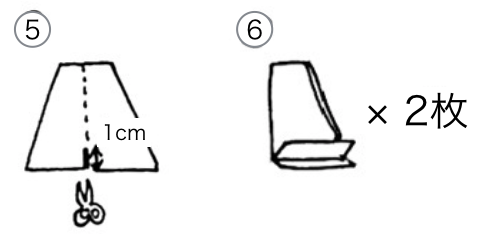
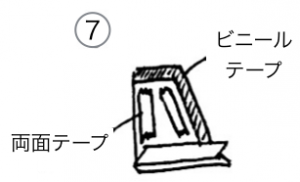
Apply double-sided tape along the gluing edges and attach the fins firmly. To prevent cuts from the edges and give a cleaner look, wrap vinyl tape around the perimeter (Step 7).
Step3. Attaching the Parts
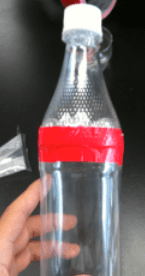
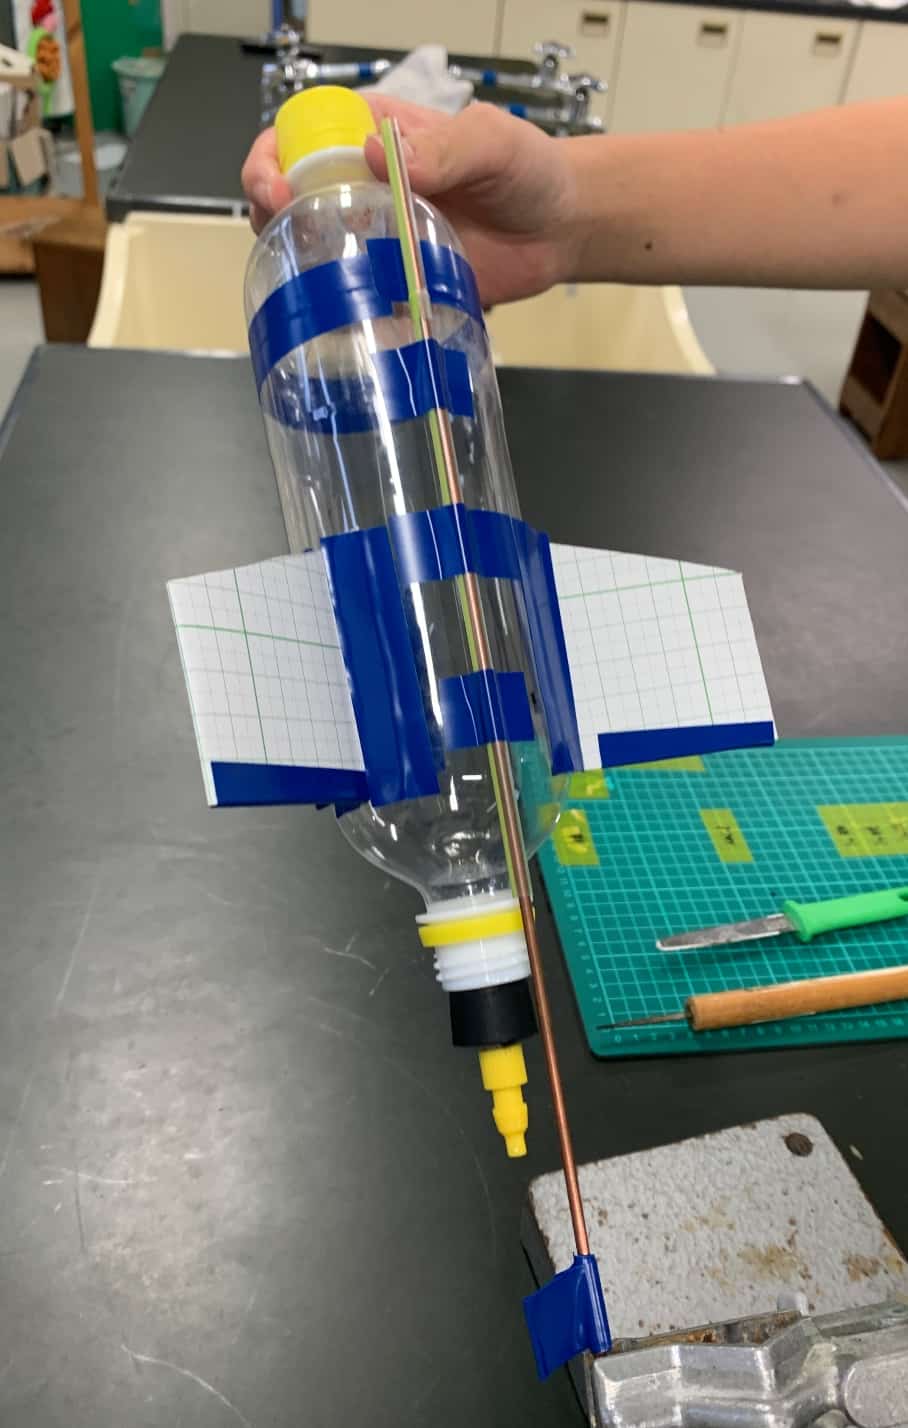
Take the unused bottle for the tank (the one you haven’t modified) and attach the head piece (A) you cut earlier to the bottom end of the bottle. Secure it by wrapping vinyl tape all the way around.
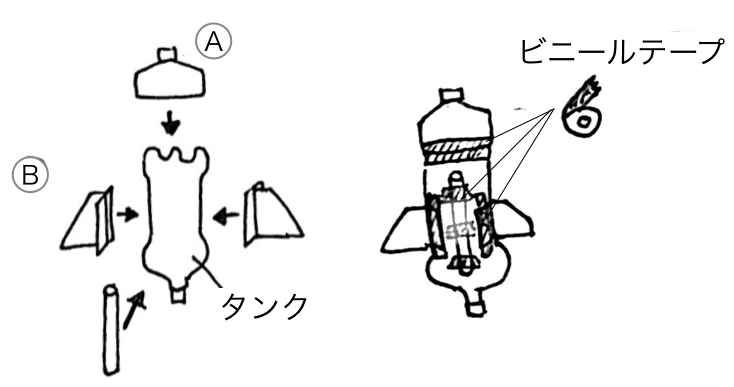
Next, fasten the fin’s folded gluing tabs to the tank with vinyl tape.

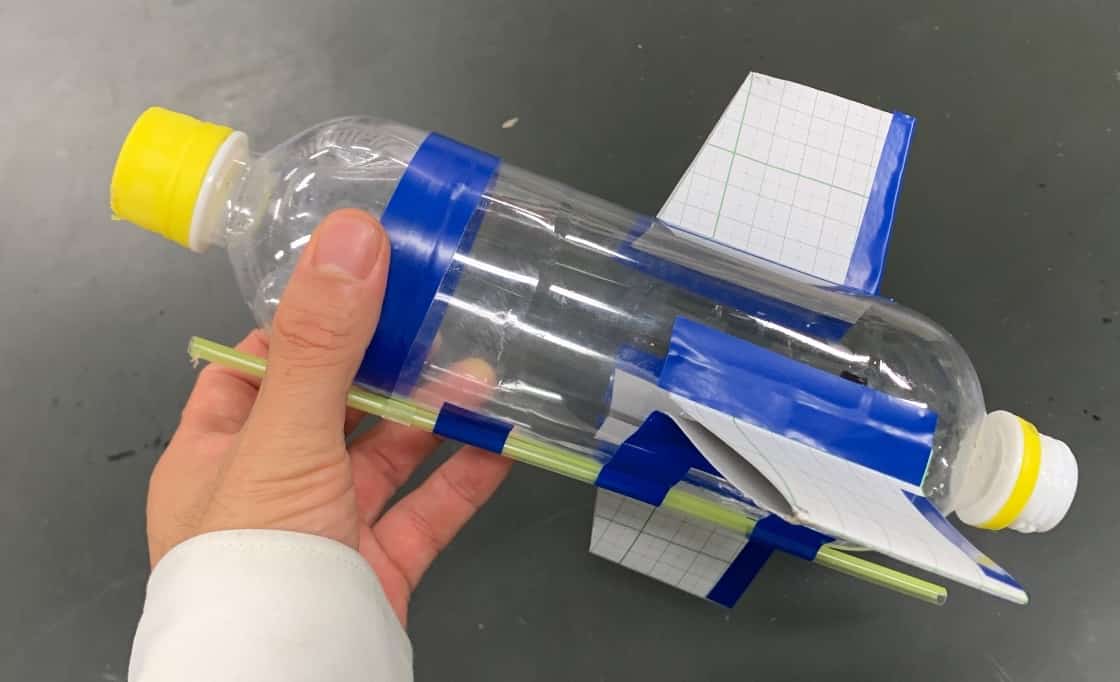
Finally, attach a straw between the fins. This straw plays an important role—it helps the rocket maintain a stable posture during launch.

Once the straw is in place, your rocket is complete!
STEP4. Making the Air Intake
Now we’ll create the air intake—the part that powers your plastic bottle rocket.
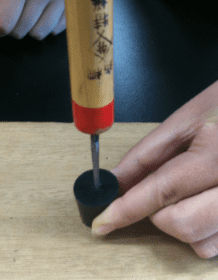
Using a gimlet (hand drill), make a hole in the center of a No. 6 or No. 7 rubber stopper. This requires some force, so elementary school students must have an adult help. Place the rubber stopper upright on a board, position the gimlet vertically, and carefully drill the hole. Since this step requires strength and involves sharp tools, be extra cautious!
Once the hole is made, insert the inflation needle into it. This step also takes some strength. When the tip of the needle pokes out from the other side of the rubber stopper, you’re good to go.

Making the Launch Pad
Next, let’s build the launch pad. If you’re making rockets in a school setting, you don’t need one for each person—having 1 to 3 pads is enough. For example, with a class of 40 students, three launch pads will allow everyone to take turns and enjoy launching.
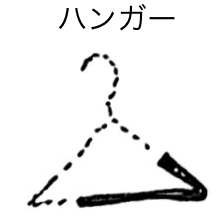
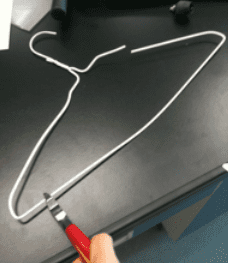
Cut a clothes hanger with pliers as shown in the diagram (this step takes strength!). You’ll only need the black portion shown in the diagram—discard the rest.
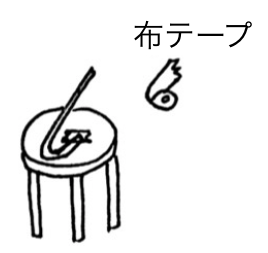
Attach the cut piece securely to a chair or similar stable object. Be aware that the ends of the hanger can be sharp. Adults should smooth them with a file or wrap them with vinyl tape for safety.
When cutting the hanger with pliers, position the material at the jaws of the plier’s cutting edge. Since it takes strength, younger students should ask an adult to help.
If you’re working in a science classroom, you can also fix the hanger piece to a lab stand. In the photo, the lower part shows the arm of such a stand.
Let’s Launch the Rocket!
Pour a small amount of water into the tank and seal it with the rubber stopper. The amount of water you add is key! Try experimenting with different amounts to see how it affects the flight. Then, set the rocket onto the launch pad, threading the rocket’s straw through the hanger on the pad.
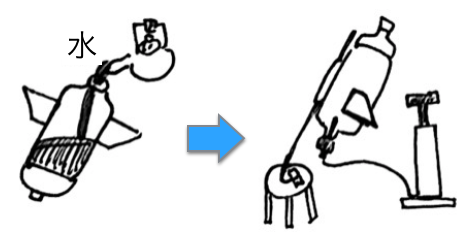
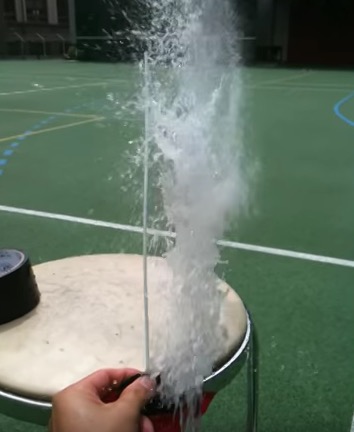
Once set, use a pump to fill the tank with air. As the pressure builds, the stopper will pop off and the rocket will blast into the air!
Set it up…
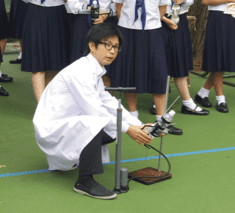
Pump in the air… and launch!

For extra distance, a teacher (or adult) can hold the stopper in place until the moment of launch—this prevents the stopper from flying backward due to recoil, allowing more of the force to push the rocket forward. (It’s also fun to ask students why this makes the rocket go farther!)
Experiment
When launching your rocket, try varying the amount of water inside and measure how it changes the flight distance. What’s the optimal amount? And what’s the best launch angle?
If there’s too little water, there won’t be enough mass to push out, and the rocket won’t go far. If there’s too much water, some will remain inside at launch, and the rocket will again fall short.
This makes a great science project. For high school students, you can even connect it to the concept of conservation of momentum, discussed later.
As for launch angle, theory says 45° should give the greatest range, but because of air resistance, the optimal angle might be a bit lower in practice. Try launching and see what happens.
After launching, take a quick look inside the rocket—you’ll often see a small cloud form, making it appear white and misty. This is due to adiabatic expansion, which causes the air temperature inside the rocket to drop. Why does it cool down? That’s another fascinating science question to explore.
Be careful, it gets wet! You might be tempted to push the rubber stopper in tighter or pump more air into the bottle to make it fly farther. While this DIY bottle rocket is designed to have the stopper come off naturally, making it quite safe, some bottle rocket kits can be dangerous. This is because plastic bottles can have invisible cracks that may cause them to explode under high pressure. If you are using a kit-based rocket, always prioritize safety by wearing safety goggles during launch.
You should also instruct people not to raise the internal pressure unnecessarily. Please launch the rocket at 4 atmospheres of pressure or less. For this purpose, be sure to use an air pump with a pressure gauge that shows the internal pressure.
Additionally, please launch the rocket in a wide, open area where there are no people. While a collision is unlikely to cause a major injury, it is still dangerous.
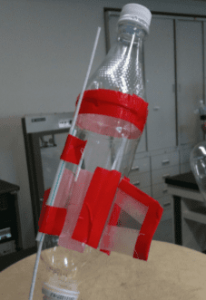
Making Paper Fins Saves Time!
When doing this activity in a school class, a 50-minute lesson isn’t always enough time using the standard method. So, here’s a simpler way to make it faster: by using cardstock to make the fins, you can complete a rocket in just 30 minutes. We use craft paper with pre-printed lines, which makes it easy for anyone to cut and assemble neatly.
Since each rocket needs 2 fins, one sheet is enough for 4 rockets. That means 5 sheets can cover rockets for 20 students. The fin template looks like this:


This time, we used two fins per rocket to save time, but you could also use three or four—either way, it’s possible to make them quickly. For example, when 10 students from grades 7 to 9 participated, the crafting part was completed in just 30 minutes, and including the launch, the whole activity took about an hour.
Exploring Bottle Rockets: Conservation of Momentum
Why do bottle rockets fly? Let’s explore it using the conservation of momentum. Consider a bottle rocket of total mass M (including water) initially at rest. If it ejects water of mass m at a relative speed -v with respect to the rocket, as shown in the diagram:
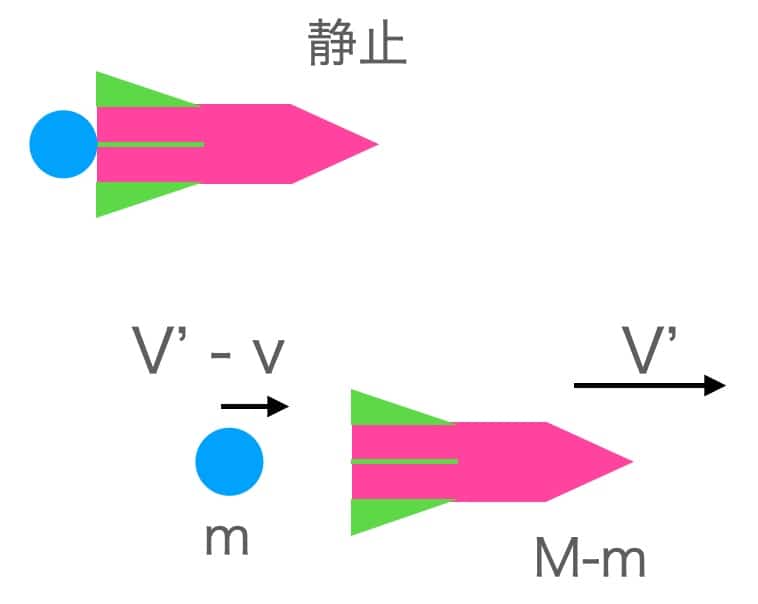
Let the rocket’s velocity after ejection be V’. From the conservation of momentum before and after launch, we get:
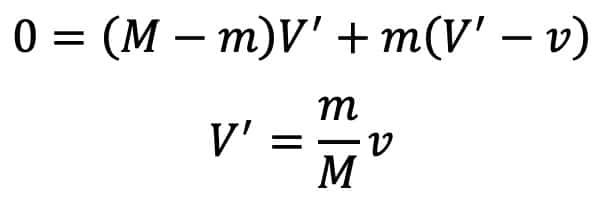
To increase V’, you can either increase the water mass m or the ejection speed v. If the bottle doesn’t have enough water, too much air is ejected instead, reducing m, and the rocket fails to fly effectively.
We tested this with students in our science club, varying the amount of water in the rocket. The results are shown here: if the water amount is too high, some remains in the rocket, and the flight distance decreases.
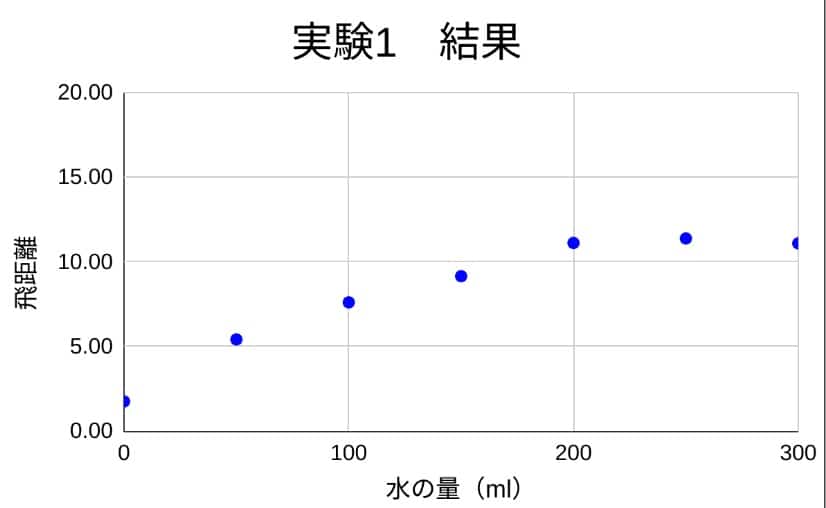
(The launch angle was 45°, and each experiment was repeated three times to get the average values.)
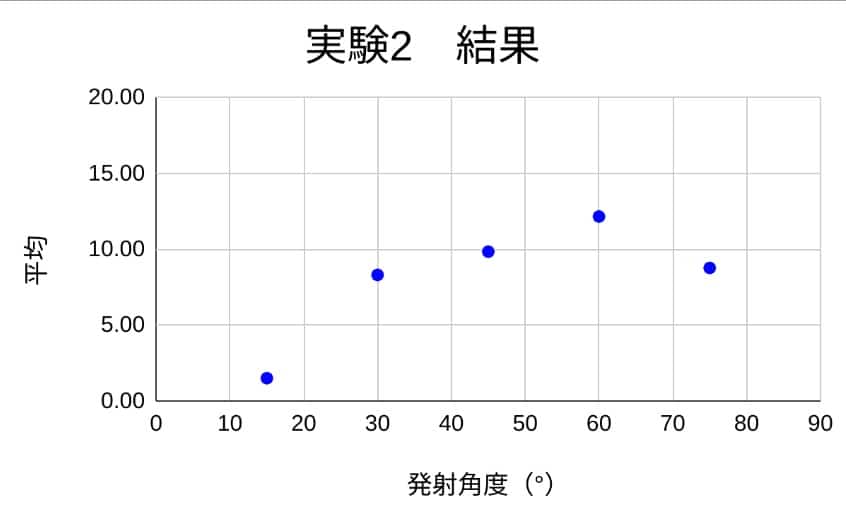
We also experimented with different launch angles. Theoretically, 45° gives the maximum distance without air resistance, but in practice, 60° produced the best results. Since we tested in 15° increments, the actual maximum likely lies between 45° and 50°.
Finally, we examined the effect of the number of fins on flight.
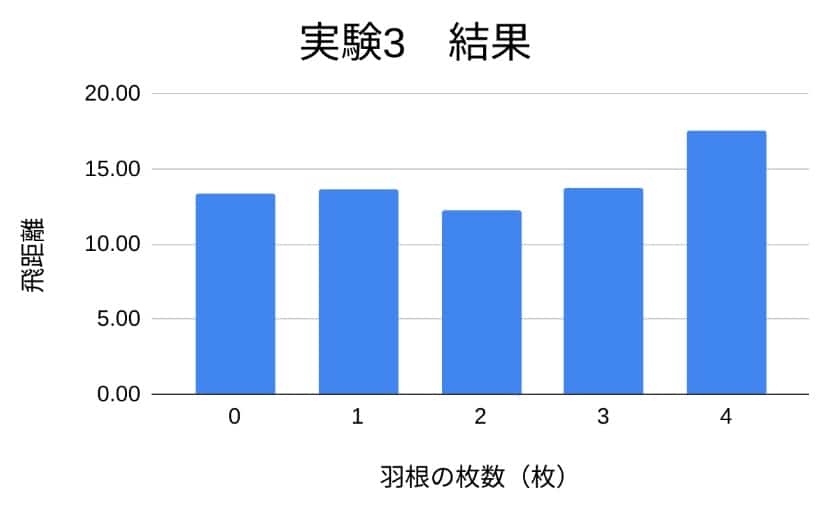
Rockets with four fins flew the best. Observing the flights, rockets with four fins were the most stable in the air.
Things That Work Like a Bottle Rocket
Let’s look at some examples of machines and animals that operate on the same principle as a bottle rocket.
-
Jet engines on airplanes: Air is taken in from the front of the engine, compressed to 30–40 times atmospheric pressure, mixed with fuel, and ignited. The resulting hot gases are expelled out the back at high speed, producing thrust.
-
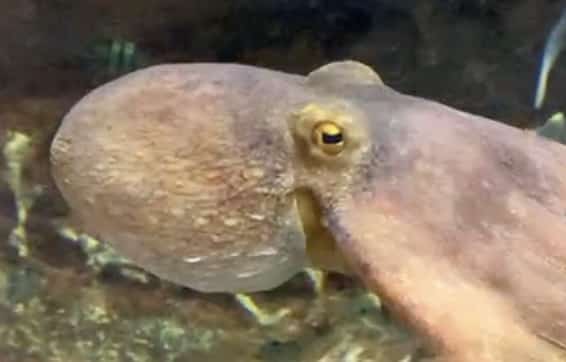
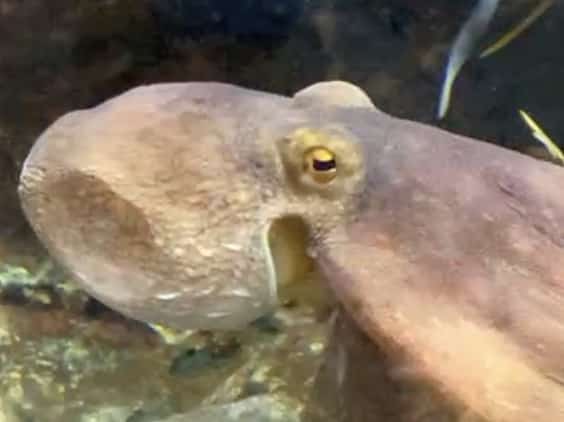
Squid and octopuses: These animals draw water into their mantle cavity and forcefully eject it through a funnel, propelling themselves forward.
-
Water jet propulsion in boats: This system works similarly to a jet engine, but it uses water instead of air. Boats using water jet propulsion can reach speeds of up to 90 km/h.
-
Rocket engines: Unlike jet engines, rockets do not take in air from the outside—space has no atmosphere. Rockets carry both fuel and oxygen on board, burn them in the engine, and eject gas at high speed to generate thrust.
-
Ion engines (e.g., Hayabusa spacecraft): Xenon gas is exposed to microwaves to create plasma and ions. An electric field accelerates these ions and ejects them backward, producing a gentle but continuous thrust.